Skip to content

A well-made cowl neck looks almost effortless, which is exactly why the construction behind it is easy to underestimate. The neckline seems to fall into place by itself, but in development rooms a few millimeters of shoulder movement, a slightly heavier fabric, or a small change in grain direction can turn a clean drape into a neckline that gaps, twists, collapses, or exposes more than intended. The challenge is not simply creating folds. It is creating folds that still look intentional after the wearer walks, sits, bends, raises her arms, and wears the dress for several hours. That makes cowl neck construction a useful test of pattern knowledge, fabric judgment, sewing control, and production discipline all at once.
A cowl neck dress is constructed by adding controlled volume to the neckline, placing that volume on a suitable grain or stretch direction, and balancing it with shoulder support, bust coverage, fabric weight, lining, and finishing. The pattern creates the available fold volume, the fabric determines how that volume falls, and the sewing method keeps the neckline stable without making the drape stiff. Good construction therefore depends on pattern, material, fit, and process working together.
The difference becomes obvious when two dresses use almost the same sketch but behave differently on the body. One neckline falls into a soft crescent and settles back after movement; the other looks attractive only while the model stands still. In many real development projects, the first sample exposes the issue: the design is visually simple, but the garment is mechanically sensitive. The most reliable way to solve it is to stop treating the cowl as decoration and start treating it as a controlled system. Once that system is understood, the neckline becomes easier to draft, fit, sew, grade, inspect, and reproduce in bulk.
What Is Cowl Neck Dress Construction?
Cowl neck dress construction is the controlled use of extra neckline volume, fabric drape, grain direction, and upper-body balance to create soft folds that remain attractive and wearable. The final shape depends on pattern geometry, shoulder anchoring, bust coverage, fabric weight, lining behavior, and sewing control. A successful cowl should look relaxed, but the relationship between those elements is carefully engineered rather than left to chance.
How the Drape Is Created
The cowl begins with intentional excess volume. A conventional fitted neckline is drafted to stay close to the body, while a cowl pattern allows part of the front or back neckline to fall away from the body. That extra area is usually introduced by opening the pattern through slash-and-spread, pivoting dart volume, draping on a form, or building a separate cowl piece. Gravity then turns the additional fabric into folds. The important point is that the extra volume has a location and direction; it is not simply loose fabric added around the neck.
More volume does not automatically create a better result. Too little added width can leave the neckline looking flat and tense, while too much can create an oversized pouch, excessive bust exposure, or a heavy front that pulls on the shoulders. During sampling, small controlled changes are easier to evaluate than large redrafts. For example, opening a pattern by roughly 10-20 mm at selected spread points can reveal how fold depth and distribution change without completely altering the garment. The same total added width can also behave differently depending on whether it is concentrated at center front or distributed across several areas.
A practical fitting review should measure the parts of the cowl that influence the appearance rather than describing the sample only as “too deep” or “not drapey enough.” Useful checkpoints include the finished neckline opening, shoulder position, lowest fold point, side-bust coverage, and the way the fold returns after movement. These measurements help distinguish a pattern-volume problem from a fabric or balance problem, which is essential when the style moves from one sample into repeat production.
Bias and Straight-Grain Construction
Cowl necklines are strongly associated with bias cutting because woven fabrics become more flexible when positioned diagonally between the lengthwise and crosswise grain. True bias is approximately 45 degrees to both directions. On many satin, silk-like, viscose, and lightweight crepe dresses, bias orientation allows the fabric to follow curves more naturally and creates longer, softer folds than the same cloth would produce on straight grain. That extra mechanical give is especially useful in slip-inspired dresses and fluid occasionwear.
Bias construction also introduces risks that do not exist to the same degree on straight grain. Panels can lengthen after cutting, side seams may shift, hems can become uneven, and glossy fabrics can show directional shade differences when pieces are rotated. For a long dress, the growth may not be obvious immediately after sewing. Development teams often observe the garment after 12-24 hours of hanging before finalizing the hem, with longer observation used when the fabric remains unstable. The exact time is material-dependent, but the principle is to let gravity reveal the real length before the hem is locked.
Not every cowl neckline must be fully bias cut. Jersey can create substantial drape through knitted stretch, and some designs use a straight-grain bodice with a separate cowl collar or overlay. The useful question is therefore not “Is every cowl bias cut?” but “Which grain or stretch direction gives this fabric the fold, recovery, and stability the design requires?” That question leads to a construction choice based on behavior rather than a fixed rule.
Common Cowl Structures
Cowl neck construction can be shallow, deep, integrated, separate, front-facing, back-facing, or asymmetric, and those choices change where the garment carries weight. A shallow integrated cowl usually needs moderate extra volume and is relatively easy to control. A deep front cowl contains more fabric and requires closer attention to bust coverage, shoulder loading, and movement. A separate cowl gives the developer more freedom to control grain and finishing, but the attachment seam can add bulk to delicate fabric if it is not designed carefully.
Back cowls introduce a different set of concerns. The neckline may interact with narrow straps, low armholes, an open back, or a fitted waist, so extra back drape can pull the upper bodice out of balance. In asymmetric designs, one side may carry more visual and mechanical weight than the other, making shoulder placement and seam tension especially important. The visual depth of the neckline should also be separated from structural volume, because two cowls can look equally low while using different amounts of fabric and different fold distributions.
| Cowl Type | Typical Structure | Main Development Risk | Useful Check |
| Shallow front cowl | Moderate integrated volume | Fold looks flat | Cowl drop and neckline width |
| Deep front cowl | Higher integrated volume | Gaping or excess exposure | Bust coverage in movement |
| Separate cowl | Independent neckline piece | Attachment bulk | Seam thickness and roll-out |
| Back cowl | Draped back neckline | Strap or upper-back instability | Strap migration and armhole shape |
| Asymmetric cowl | Uneven left/right volume | Twisting or imbalance | Shoulder and side-seam alignment |
When the Construction Is Production-Ready
A visually attractive sample is not automatically ready for production. Before a cowl style is approved, the development team should be able to define the intended grain direction, finished neckline opening, shoulder or strap position, approximate lowest cowl point, acceptable bust coverage, lining or facing method, and any stabilization used around load-bearing areas. The fold itself does not need to sit in exactly the same place on every garment, because fabric is flexible, but the overall depth, coverage, proportion, and character should remain within an approved range.
This distinction becomes more important when the style moves from one carefully handled sample to a production line. Operators should not be asked to “make the fold look like the sample” by eye without clear construction standards. A better process controls the variables that create the fold, then uses the approved sample as a visual reference. When grain, shoulder, neckline dimensions, lining, and handling are controlled, the cowl can retain a natural appearance without relying on constant manual adjustment.
How Is a Cowl Neck Pattern Drafted?
A cowl neck pattern is usually created by opening a basic bodice to introduce controlled neckline volume. Slash-and-spread, pivot manipulation, and draping are common methods. The draft must balance cowl depth with bust coverage, shoulder length, grain direction, armhole shape, and grading. A technically correct paper pattern still needs fitting because fabric weight and body shape determine how that added volume behaves in three dimensions.
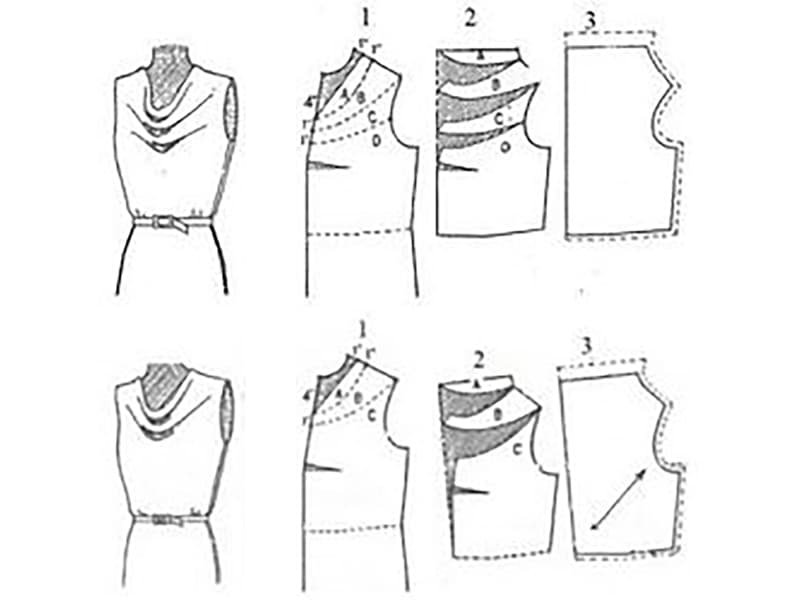
Adding Volume to the Bodice
One common method starts with a fitted or semi-fitted front bodice. Several lines are drawn from the neckline toward the bust, waist, or lower bodice, then cut and opened to add width at the neckline while keeping much of the original side seam and armhole geometry under control. Some or all bust-dart intake can be transferred into the cowl so the added fold also contributes to three-dimensional bust shaping. This can create a clean front, but it means the neckline is doing both an aesthetic and a fitting job.
The location of each spread matters as much as the total amount of spread. Concentrating most of the opening near center front tends to create a deeper central fold, while distributing volume across several points can create broader, softer folds. During development, changing individual spread points by approximately 10-20 mm at a time is often more informative than making a large change in one step. The goal is not to maximize extra fabric; it is to create enough volume for the intended visual effect without creating uncontrolled looseness.
Draping on a form is another useful approach when the desired cowl is highly visual or difficult to describe with measurements. The fabric can be positioned on the intended grain and manipulated until the fold, coverage, and shoulder behavior feel right, then transferred back to paper for pattern refinement. Whether the developer starts flat or on a form, the final pattern should be judged on a fit model in the intended material because a paper draft cannot fully predict the interaction between gravity, fabric, and the body.
Controlling Cowl Depth
Cowl depth should not be managed with a single center-front measurement. The most useful development checks combine the shoulder-to-lowest-fold distance, total neckline opening, distance between shoulder anchor points, center-front coverage, and the relationship between the fold and the bust apex. A neckline that appears only 20 mm deeper on the pattern can fall much more than 20 mm lower in a heavy, fluid satin, while a firmer cloth may resist the extra volume and keep the folds higher on the chest.
This is one reason mock-ups in an unrelated fabric can create false confidence. A calico or firm toile may help confirm basic pattern geometry, but it cannot validate the final cowl behavior of a lightweight satin, stretch jersey, or viscose. As soon as the basic shape is working, the development sample should move into a material that is reasonably close to the planned production fabric. That allows the team to see whether the neckline depth, fold width, and shoulder loading remain appropriate.
For low necklines, movement should be part of the depth decision rather than a final afterthought. The garment should be checked while standing, walking, sitting, and leaning forward. If the cowl opens significantly only in motion, the issue may involve shoulder balance or internal control rather than total pattern depth. Making the neckline smaller can hide the symptom while flattening the design, so corrections should target the actual source of instability.
Grain Placement and Pattern Balance
Once a bodice has been opened for a cowl, the original grain line may no longer produce the intended result. The pattern maker has to decide whether to keep the original direction, rotate the front toward the bias, or engineer a different grain position. That decision affects drape, garment length, side-seam stability, cutting efficiency, and surface appearance. On satin, velvet, and some printed fabrics, grain rotation can also alter how light reflects from the panel, making pieces from the same dye lot appear different.
For long bias-oriented dresses, grain placement should be recorded directly on the production pattern and cutting marker rather than left to visual interpretation. During sampling, the team can measure panel length immediately after cutting and again after a controlled relaxation period. A 12-24 hour check is commonly useful for many fluid woven styles, while heavier or particularly unstable fabrics may need longer observation. The purpose is not to follow a universal waiting time but to understand the actual growth behavior of the chosen cloth.
Pattern balance also includes the relationship between front and back. A heavy front cowl can pull the entire upper bodice forward if the back neckline, shoulder, or strap structure does not counter the load. When a fitting shows the front neckline deepening over time, the cause may not be the front pattern alone. Checking shoulder slope, back balance, and strap angle can reveal whether the whole garment is rotating rather than the cowl simply being too large.
Grading the Cowl
Grading a cowl is more complex than enlarging every dimension at the same rate used for a basic bodice. Bust dimensions change across sizes, but the visual character of the neckline usually needs to remain recognizably the same. If cowl volume grows too aggressively, larger sizes may become much deeper and more exposed. If the cowl volume remains nearly fixed while the bust and shoulder increase, the neckline can become flatter and visually tighter.
A useful size-set review compares structural and visual measurements together. Shoulder length, neckline opening, cowl drop, side-bust coverage, armhole coverage, and fold character should all be checked. For a broad commercial range, reviewing only the base development size is rarely enough. At minimum, one smaller or larger size and one more distant endpoint can reveal whether the grade is preserving the intended relationship between the neck, bust, armhole, and shoulder.
The aim is not to force each size to produce the same number of folds. Fabric does not behave that mechanically, and body shape changes across sizes. The goal is a consistent visual family: similar depth, similar coverage, and similar overall character. When the grading logic is established at the pattern stage, the sewing line is not forced to compensate for size-specific problems that should have been solved before cutting.
Which Fabrics Work Best for Cowl Neck Dresses?
The best cowl-neck fabrics are fluid enough to form smooth folds but stable enough to maintain neckline control. Satin, silk blends, viscose, crepe, chiffon, and selected jerseys are common choices, but fiber name alone is not enough. Weight, thickness, stretch, recovery, surface friction, opacity, and lining compatibility can change the behavior of the same pattern dramatically, so fabric should be evaluated in motion as well as by hand feel.

Drape, Weight, and Surface
Fabric selection should start with behavior rather than appearance alone. A soft cloth with low bending resistance tends to form narrow, flowing folds, while a firmer fabric creates broader, more architectural shapes. Weight determines how strongly gravity pulls the cowl downward, thickness affects fold bulk, and surface friction affects whether layers slide smoothly over one another or hold in place. These variables explain why two fabrics with a similar fiber content and GSM can still produce very different necklines.
As practical development references rather than universal specifications, lightweight satin used for fluid dresses often falls around 80-140 g/m2, many viscose wovens and crepes around 90-170 g/m2, chiffon around 40-80 g/m2, and dress jerseys around 150-220 g/m2. These ranges overlap substantially, and finishing can change the behavior as much as weight. They are best used to narrow sampling options rather than to approve a fabric by specification alone.
| Fabric Type | Common Development Range* | Typical Cowl Behavior | Main Risk |
| Lightweight satin | 80-140 g/m2 | Smooth, fluid folds | Bias growth and seam puckering |
| Crepe | 90-170 g/m2 | Soft but more controlled | Surface drag or bulky folds |
| Chiffon | 40-80 g/m2 | Very light, floating drape | Transparency and instability |
| Viscose woven | 90-160 g/m2 | Relaxed, fluid fall | Growth and handling distortion |
| Dress jersey | 150-220 g/m2 | Stretch-driven drape | Gaping if recovery is weak |
*These are broad sampling references only. Fiber, weave or knit structure, finishing, supplier specification, and garment design can move suitable weights outside these ranges.
A useful comparison is to hang equal-size fabric pieces under the same conditions and observe fold radius, vertical fall, recovery, and surface behavior. This simple test can reveal differences that are difficult to feel from a small swatch. The most luxurious fabric on a table is not always the one that produces the best cowl once gravity, movement, and lining are involved.
Satin and Silk-Like Fabrics
Satin is closely associated with cowl dresses because a smooth surface and fluid structure allow the folds to settle with little resistance. The reflective surface also emphasizes the shape of the drape, which is why satin cowl dresses appear frequently in occasionwear, partywear, slip dresses, and evening-inspired collections. When the construction is balanced, a simple neckline can look refined without requiring heavy decoration.
The same surface that makes satin attractive also exposes construction faults. Seam puckering, needle marks, uneven pressing, grain mismatch, and differential feeding can become highly visible under side lighting. A seam that would disappear on matte crepe may show as a bright ripple on glossy satin. Directional sheen is another issue: rotating a panel to improve marker efficiency can make one section look lighter or darker even when the fabric is from the same roll.
Development should therefore include both construction tests and lighting tests. Review the sample under frontal and side lighting, then move the garment to see whether the fold catches light consistently. For deep cowls, also check how fabric weight affects narrow straps or shoulder seams over time. A heavier satin may create beautiful long folds but gradually pull the neckline lower if the upper bodice has not been designed to carry that load.
Jersey and Stretch Fabrics
Jersey creates cowl volume differently because the fabric structure already provides stretch. A woven cowl pattern transferred directly to a high-stretch jersey can become too deep, too wide, or unstable, even when the visual sketch is identical. The developer should evaluate both stretch percentage and recovery. A fabric that stretches far but returns close to its original length can behave more predictably than a fabric with lower stretch that remains permanently extended after wear.
A simple workshop test starts with a 100 mm marked section in the main stretch direction. Stretch it to the intended working range, release it, and measure again. If it returns close to 100 mm, recovery is relatively strong; if it remains at 105 or 110 mm, the neckline may continue opening during wear. The exact acceptable result depends on the style, but the test helps distinguish temporary stretch from permanent growth.
Stretch cowls often need less added pattern volume than woven cowls because part of the drape comes from fabric extension. Shoulder length, armhole shape, and stabilization may also need revision, especially when the garment is heavy. Clear elastic or another reinforcement can improve control, but it should not be used as a late rescue for an oversized pattern. The cleanest result usually comes from designing the pattern, stretch direction, and stabilization as one system.
Lining Compatibility
Lining can improve coverage, comfort, and internal finish, but it can also change the cowl if its mechanical behavior does not match the shell. A lining that is shorter or stiffer can pull the outer neckline upward, while a lining that is heavier can deepen the drape. If the shell stretches and the lining does not, the lining may act like a hidden restraint and create wrinkles or distort the side seams.
A useful sample check is to measure the lowest cowl point before and after the lining is attached. A change of 5-10 mm can be visually noticeable on a low neckline. The lining should also be evaluated for stretch compatibility, opacity, seam bulk, surface friction, and recovery. In very deep cowls, a separate modesty panel or partial lining can sometimes provide coverage with less interference than attaching a full lining directly into every fold.
The best lining is not necessarily the lightest possible option. It should move with the shell while still supporting the intended coverage and internal quality. When the shell and lining are tested together during sampling rather than combined at the end, the finished neckline is far less likely to change unexpectedly after approval.
How Do You Control Cowl Neck Fit and Drape?
Cowl neck fit is controlled by balancing neckline volume, shoulder position, bust shape, fabric weight, and internal support. The aim is not to stop the neckline from moving, because movement is part of the design. The goal is to prevent uncontrolled gaping, excessive exposure, armhole distortion, twisting, or fold collapse while allowing the fabric to settle back into an intentional shape after normal wear.

Preventing Neckline Gaping
Gaping is often treated as one problem even though several faults can produce the same visual symptom. Excess neckline volume is one cause, but the neckline can also open because the shoulder is too long, the bust balance is wrong, the garment is rotating toward the back, the fabric has weak recovery, or the grain direction allows more stretch than expected. Shortening the neckline without understanding the cause may remove the gap while also flattening the cowl.
The timing of the problem gives useful information. If the neckline gaps while the wearer stands still, pattern balance and total opening should be checked first. If the issue appears mainly when leaning forward, bust coverage and internal control may be more relevant. If the neckline becomes looser after several minutes, fabric growth or shoulder stretch may be involved. If one side consistently opens more than the other, inspect shoulder position, sewing tension, grain placement, and body asymmetry before redrafting the entire front.
A strong fitting process records the conditions under which the problem appears. Photograph the garment from the same front, side, and three-quarter angles, and note whether the cowl changes after movement. That makes the correction more precise and helps prevent the next sample from solving one problem while creating another.
Bust Coverage and Visual Depth
The bust changes the three-dimensional path of the fabric, so cowl coverage should be judged on the intended fit model rather than only on a mannequin. Two people with a similar bust circumference can produce different neckline behavior because bust projection, shoulder slope, torso length, and bust-point position differ. A pattern that appears secure on one body can open noticeably more on another even when the nominal measurements are close.
Useful development checks include the center-front lowest point, horizontal opening width, side-bust coverage, distance from the cowl edge to the bust apex, and neckline behavior when the wearer bends forward. The lowest point alone does not describe coverage accurately. A wide cowl can expose more area than a narrow cowl with a slightly deeper central point, so visual review should accompany dimensional checks.
For occasionwear and going-out dresses, the target neckline may intentionally be low. The technical objective is not to make it conservative; it is to make the intended exposure predictable. Front, side, and three-quarter photographs of the approved sample can communicate that visual target more clearly than a measurement chart alone and can become a useful reference during size-set fitting and first-piece inspection.
Shoulder and Armhole Stability
The shoulder is often the hidden control point of the entire cowl. Extra neckline fabric has weight, and that load has to be carried by the shoulder seam, straps, upper back, or some combination of those areas. If the shoulder stretches, the cowl becomes deeper. If a narrow strap migrates inward, the armhole may open and reveal more side bust. If the upper bodice rotates backward, the front neckline may appear to gape even when the front pattern itself has not changed.
Narrow straps are especially sensitive. A movement of only about 5 mm can be noticeable on a strap that is 8-10 mm wide. During fitting, the intended strap position can be marked on the fit model or undergarment, then checked again after walking and arm movement. If the strap moves, shortening it is not always the correct solution. The cause may be cowl weight, attachment angle, fabric stretch, shoulder slope, or armhole balance.
Reinforcement can help at the strap attachment or shoulder seam, but it needs to remain discreet. A stiff patch under a lightweight satin can become visible from the outside or create an abrupt change in drape. The most effective support is usually placed only where the garment carries load, leaving the visible cowl free enough to move naturally.
Testing the Dress in Motion
A cowl neckline should not be approved from a static dress-form review. Gravity changes its effect every time the wearer changes position, and many fit problems only appear when the body moves. A simple repeatable movement sequence gives development teams a much clearer picture of whether the neckline is merely photogenic or genuinely wearable.
A practical test can include standing naturally for 30 seconds, walking 10-15 steps, turning in both directions, raising both arms to shoulder height, sitting and standing once, and leaning forward about 30-45 degrees. After the sequence, check whether the shoulder has migrated, the armhole has opened, the lining has become visible, or the cowl has moved into a position that requires manual adjustment.
| Movement Test | What to Watch | Warning Sign |
| Standing | Natural fold balance | Persistent asymmetry or collapse |
| Walking | Cowl recovery | Fold remains displaced |
| Arms raised | Strap and armhole stability | Side-bust opening |
| Sitting | Front coverage | Cowl turns outward |
| Leaning forward | Neckline security | Unintended exposure |
| Return to standing | Recovery | Neckline does not resettle |
The fold does not need to return to the exact same arrangement every time. Natural variation is part of a fluid garment. What matters is whether the neckline returns to the approved visual range without the wearer constantly pulling it back into place. This is especially important for deep satin cowls, where a single static fitting can hide problems that quickly become obvious during real wear.
How Is a Cowl Neck Dress Sewn and Finished?
A cowl neck dress should be sewn with careful control of bias and stretch-sensitive edges. Stitch tension, handling, stabilization, lining, and pressing can all change the drape. Good finishing supports the shoulder, seams, and internal structure while leaving the visible cowl flexible. Over-handling or over-stabilizing the neckline can flatten or distort the fold just as easily as insufficient support can make it gape.

Sewing Without Stretching the Neckline
Bias-cut woven fabric can stretch simply through handling. A long panel lifted from one corner may distort before it reaches the sewing machine, and a neckline that is repeatedly picked up, pressed, and repositioned can lengthen even when the pattern is correct. Cut pieces should therefore remain supported on the table or be moved in a way that does not leave the full garment weight hanging from one edge.
Machine settings should be tested on the actual production fabric and in the same grain direction as the garment seam. For many lightweight woven dresses, a stitch length around 2.0-2.5 mm is a reasonable sampling starting point, but the correct setting depends on fabric density, needle size, thread, seam construction, and machine feeding. A straight-grain test seam says little about how the same tension will behave on a bias side seam.
A useful quality check is to measure a controlled seam before and after sewing. If a 400 mm test seam becomes 407 mm, the 7 mm growth is evidence that feeding, tension, or handling needs attention. Pressing should also be conservative. Heavy steam can temporarily reshape some fabrics and hide distortion until the garment cools, so the goal is to prevent stretch rather than rely on pressing to correct it later.
Strategic Stabilization
Many cowl dresses need stabilization, but reinforcement should be placed where the garment carries load rather than across every moving edge. Common control areas include shoulder seams, narrow strap attachments, the back neckline, selected armhole sections, and stretch-sensitive attachment seams. Stay tape, lightweight interfacing, or clear elastic may all be appropriate depending on the material and design.
The application method must be defined clearly for production. An instruction such as “add clear elastic” is incomplete because elastic applied at 1:1 length behaves differently from elastic sewn slightly shorter than the seam. Even a few percent of tension can change the opening, shoulder balance, or edge appearance. The sample should therefore establish both the material and the application ratio before the method is released to bulk production.
Over-stabilization is a common overcorrection. A rigid front neckline may stop gaping but also stop behaving like a cowl, creating a structured collar instead of a soft drape. The better principle is to stabilize the support points and allow the visible fold to remain fluid. That approach protects the design while still giving the garment enough control for repeated wear.
Lining and Internal Finishing
The lining should support coverage and cleanliness without fighting the outer shell. Before permanent attachment, it is useful to baste the lining into the sample and compare the neckline with the unlined version. Check whether the cowl becomes shallower or deeper, whether the side seams pull, and whether the lining rolls outward when the wearer moves. These changes reveal tension that can be difficult to diagnose once the garment is fully finished.
Facing width also matters. A broad fused facing can create a visible stiff band behind lightweight satin, while a narrower, softer facing may preserve the natural drape. Understitching can help prevent a facing or lining from rolling outward, but the stitch line should not create visible tension on the shell. On a deep cowl, part of the inside may become visible during normal movement, so internal seam quality and clean finishing contribute directly to the perceived quality of the dress.
For pale or sheer fabrics, the lining color, seam allowances, and internal attachment points should be reviewed under strong lighting. A construction that looks clean in a normal workroom can become obvious under studio photography. Testing the full shell-and-lining combination early is more reliable than approving the outer sample first and treating lining as a separate finishing decision later.
Bias Growth and Hem Leveling
Bias-sensitive dresses frequently become longer after assembly because different areas of the garment stretch under their own weight. The effect is particularly visible in maxi dresses, long satin slips, asymmetric skirts, heavy cowls, and styles with substantial flare. If the hem is finished immediately after sewing, a section that continues growing can become visibly longer after the garment has already been packed or worn.
During development, allowing the garment to hang for roughly 12-24 hours can reveal whether the hem is still moving. Some fabrics stabilize quickly, while others need a longer observation period, so the actual production method should be based on what the sample fabric demonstrates. The important point is that the relaxation process used to approve the sample should also be practical enough to reproduce during bulk production.
Hem checking should use multiple points around the circumference rather than only center front and center back. Eight positions – front, back, both side seams, and four intermediate quarter points – give a clearer picture of asymmetric growth. If one section drops 12 mm while another moves only 2 mm, trimming too early can simply create another uneven hem later. Once the fabric has stabilized, the final finishing method should be selected to avoid flaring, roping, or additional stretching.
How Do Manufacturers Keep Cowl Necks Consistent in Production?
Manufacturers keep cowl necklines consistent by converting the approved sample into measurable production controls. Grain direction, fabric lot, neckline opening, cowl depth, shoulder placement, lining, stabilization, grading, relaxation, and sewing standards should be locked before volume cutting. Consistency comes from controlling the variables that create the drape, then using the approved sample as the visual reference instead of asking operators to arrange folds by eye.

Sampling and Approval Controls
A production-ready sample should answer more than whether the design looks attractive. It should confirm whether the product can be repeated with the intended fabric, construction, size range, and finishing method. For a cowl dress, useful recorded checkpoints include finished neckline opening, shoulder width or strap position, cowl drop, side-bust coverage, armhole dimensions, grain direction, lining interaction, and garment length after any required relaxation.
Fit photographs are valuable because not every characteristic can be described by measurements. Front, side, back, and three-quarter images of the approved sample on the correct fit model can show the intended depth, fold direction, and coverage. For deeper cowls, a movement review can also be retained so the production team understands the acceptable behavior when the garment is worn rather than only how it looks on a hanger.
The sample should be made from material that is genuinely representative of production. A neckline approved in one satin cannot automatically validate another satin with different weight, friction, or finishing. The closer the sample is to the final combination of shell, lining, thread, reinforcement, and trims, the more reliable the approval becomes. When a brand is developing a technically sensitive cowl style, discussing these points with the development team before final approval can prevent expensive correction later.
Size-Set Consistency
A cowl that works in the development size may change character after grading, so size-set review should include visual proportion as well as standard body measurements. If the approved medium has a controlled two-fold neckline but the larger size produces one very deep fold, the garment may still meet bust and length measurements while the design itself has changed. That is a grading issue, not a sewing-line issue.
The review should compare shoulder position, finished neckline opening, cowl drop, side-bust coverage, armhole shape, and overall fold character. The aim is not to force the same fold count in every size, because body shape and fabric response will naturally vary. Instead, the range should maintain a similar visual family with comparable depth, coverage, and balance.
For wider size ranges, it is sensible to review more than the base size before bulk release. A base size plus at least one smaller and one larger size can reveal many grading problems, while checking an endpoint adds more confidence when the range extends substantially. These samples cost time during development, but correcting a grade before bulk cutting is far less expensive than repairing or remaking a large quantity of finished garments.
Bias Control During Bulk
Bias garments require disciplined cutting and handling. The production marker should define grain orientation clearly, and pattern pieces should not be rotated independently to improve fabric yield unless the development team has approved the change. A rotated panel may still fit physically into the marker but behave differently after sewing, especially when the fabric has directional sheen, mechanical give, or asymmetric growth.
Bulk fabric should also be compared with the approved sample material for finished weight, width, hand feel, stretch or give, shade, surface appearance, and relaxation behavior. If the production lot grows differently from the sample lot, the pattern length or process may need review before full cutting. This is one reason a small pilot run can be useful for new bias-sensitive styles: it tests cutting, handling, sewing, pressing, hanging, and finishing as one complete process.
Side seams benefit from clear matching points so operators do not stretch one panel against the other. Long fluid dresses may need more frequent notches than a basic stable woven style. The final hem should also follow the same relaxation logic approved during sampling. When these controls are built into the process, bias growth becomes manageable rather than a surprise discovered only at final inspection.
Bulk Quality Checkpoints
A cowl neckline should be inspected as a system rather than as one isolated measurement. Material confirmation should happen before cutting, first-piece or pre-production review should happen before full line release, and inline inspection should occur while corrections are still practical. The approved sample remains important, but measurable limits make it easier for multiple operators and inspectors to judge the same style consistently.
| Control Point | Production Check | Main Risk if Uncontrolled |
| Fabric lot | Compare weight, hand feel, shade, and drape | Cowl character changes |
| Grain direction | Verify marker and cut panels | Twisting or uneven fall |
| Shoulder/strap | Measure and compare visually | Cowl depth changes |
| Neck opening | Finished measurement | Gaping or restricted drape |
| Cowl drop | Compare with approved sample | Too shallow or too deep |
| Lining | Check movement and roll-out | Restricted drape or exposure |
| Side seams | Hanging and alignment check | Bias twisting |
| Hem | Recheck after relaxation | Uneven finished length |
| Size set | Multi-size fit review | Grading inconsistency |
| First piece | Line-start approval | Repeated construction error |
Measurements define the boundaries, while the approved sample and fit images define the intended character. This combination is particularly important for a cowl because a garment can be dimensionally correct and still look wrong if fabric behavior, grain, fold balance, or shoulder position changes. When a brand is preparing a cowl-neck style for production, a development partner should be able to discuss these variables before the line starts rather than relying on final inspection to catch them later. For projects that need support from pattern through sampling and bulk readiness, Duolan can be approached at the development stage so the construction method is resolved before volume production.
A well-developed cowl neck should look spontaneous even though very little about its construction is accidental. The neckline works because pattern volume, fabric behavior, grain direction, shoulder support, bust coverage, lining, sewing, grading, and relaxation have been balanced before the garment reaches full production. That is also why the best cowl dresses usually feel simple to wear: the technical decisions have already been made behind the scenes. When those decisions are documented and tested, the style can move from one attractive sample to a consistent commercial product without losing the fluid character that made the design desirable in the first place.
Frequently Asked Questions
Is a cowl neck dress always cut on the bias?
No. Bias cutting is common in woven cowl dresses because fabric positioned near 45 degrees to the lengthwise and crosswise grain gains additional mechanical flexibility and can produce softer folds. However, jersey cowls can rely on knitted stretch, and some woven designs use a separate cowl piece on a conventionally cut bodice. The correct grain choice depends on the fabric, fold depth, support, and desired movement rather than on a universal rule that every cowl must be fully bias cut.
How much fabric should be added to create a cowl neckline?
There is no single amount that works for every cowl because the required volume depends on the neckline width, intended depth, bust shape, fabric weight, and whether the volume is concentrated or distributed through the pattern. During development, small controlled changes such as 10-20 mm at selected spread points can be more informative than a large adjustment. The sample should be judged by cowl drop, coverage, shoulder balance, and fold character rather than by added width alone.
What fabric is easiest to use for a cowl neck dress?
For a fluid fashion cowl, lightweight satin, viscose, crepe, silk blends, and selected dress jerseys are common starting points because they can form soft folds without excessive bulk. The easiest fabric is not necessarily the lightest one; it should combine drape with enough stability and recovery to keep the neckline under control. Before approval, compare fabric weight, surface friction, stretch, recovery, opacity, and lining compatibility, because those properties can change the same pattern dramatically.
How do you stop a cowl neck from gaping?
Start by identifying when and where the gap appears rather than immediately reducing the neckline. Gaping can result from excessive pattern volume, a long shoulder, poor bust balance, weak fabric recovery, garment rotation, or inadequate support. Check the dress while standing, walking, sitting, and leaning forward. If the problem appears only in motion, the correction may involve shoulder balance or internal stabilization rather than simply removing fabric from the cowl and flattening the intended drape.
Do cowl neck dresses need lining or facing?
Many do, but the internal construction should support the garment without restricting the fold. A full lining can improve coverage and comfort, while a facing can provide a clean edge, yet either one can change the cowl if it is too stiff, heavy, short, or tightly attached. During sampling, compare the neckline before and after the lining or facing is installed and check whether the lowest fold position, side seams, or neckline recovery changes during movement.
How long should a bias-cut cowl dress hang before hemming?
A 12-24 hour hanging period is a useful development reference for many lightweight bias-sensitive dresses, but it is not a fixed rule. Some fabrics stabilize sooner, while heavier or more unstable constructions may continue growing longer. The important practice is to measure the garment after a controlled relaxation period and use the same process when production begins. Checking multiple hem points is more reliable than measuring only center front and center back because bias growth can be uneven around the garment.