Skip to content

A cross-neck dress can look deceptively simple in a campaign image. Two sections cross over the upper body, the neckline becomes the visual focus, and the finished silhouette often appears cleaner than a corset or heavily paneled bodice. In development, however, that single crossing point affects bust coverage, neckline tension, shoulder or neck load, grain direction, waist balance, lining behavior, closure placement, and size grading. A style that looks perfectly balanced on one sample can start to gape after ten minutes of wear, twist after the lining is attached, or shift noticeably when the same pattern is graded into a larger size. That is why strong cross-neck construction is less about making two pieces intersect and more about controlling the relationship between pattern geometry, fabric behavior, body shape, and sewing sequence. The most reliable results come from deciding where the crossover must sit on the body, how the dress will be anchored, and how much movement the neckline should tolerate before the first production pattern is finalized.
A cross-neck dress is constructed by shaping two bodice sections so they cross or overlap at the front, then controlling that geometry through bust shaping, grain direction, stretch, neckline stabilization, lining, and secure anchoring at the neck, shoulder, side seam, waist, or back. A sound development process fixes the crossover position first, tests fit on the body, stabilizes vulnerable edges, and only then locks the construction for production.
The real test begins when the sample leaves the cutting table. A crossover that sits beautifully while the garment is flat may open when the wearer raises her arms, while a halter that looks secure from the front can pull sharply at the back of the neck after the wearer walks for a few minutes. Those are not random defects. They are usually clues that the pattern, material, tension path, or assembly sequence is not working as one system. Once those relationships are understood, the style becomes much easier to develop, fit, grade, and reproduce consistently.
What Is Cross-neck Dress Construction?
Cross-neck dress construction is the pattern and sewing system used to create a neckline or bodice in which two sections cross, overlap, or wrap across the upper body. The design succeeds when the crossover position, bust volume, neckline length, grain direction, anchoring points, and fabric behavior are balanced together so the dress remains secure, symmetrical, comfortable, and visually consistent during normal movement.
The Cross Is a Structure, Not Just a Style Line
A cross-neck dress is often identified first by its visual effect: two diagonal lines meet, overlap, or pass over each other across the front of the torso. Technically, however, the visible cross is only the final expression of a much larger structure. One panel may run from the right waist toward the left shoulder, another may move in the opposite direction, or two elongated bodice sections may cross over the bust before continuing toward the back neck. In each version, the patternmaker needs to know exactly where every panel begins, where it changes direction, where it is allowed to move, and where it becomes permanently anchored. Those decisions determine whether the finished neckline stays close to the body or gradually drifts out of position.
Five control areas deserve particular attention during development: the upper neckline edge, the visible crossover point, the bust apex area, the under-bust or waist connection, and the final neck, shoulder, side-seam, or back anchor. These points work together. Moving the crossover upward may increase coverage but also shorten the effective neckline and increase tension over the bust. Lowering it can produce a softer, more open appearance but may reduce security. A well-developed pattern treats these locations as linked coordinates on the body rather than isolated styling details, which is especially important in fitted party, occasion, halter, and going-out dresses where small changes are easy to see.
Cross-neck, Crossover, and Criss-cross
Fashion terminology is not completely standardized, so “cross-neck,” “crossover,” “cross-front,” and “criss-cross halter” are sometimes used for garments that look related but are built very differently. A conventional crossover bodice normally has one front panel overlapping another and is stabilized mainly through the waist, side seam, or shoulder. A criss-cross halter transfers more of its tension upward because the crossed sections continue toward the neck. A cross-front cutout may have limited overlap and instead rely on several narrow anchoring points around an intentional opening. These differences matter because the same visual neckline can require a different pattern, lining system, closure, and fitting strategy.
The most reliable way to classify the construction is by following the load path when the dress is worn. If most of the tension is carried through the waist and side seams, the garment behaves more like a crossover bodice. If the crossed panels pull toward the neck, it behaves more like a halter. If open areas are held by several smaller connections, it behaves more like a cutout bodice. This way of thinking prevents a common development mistake: copying the visible shape from a reference image without understanding what is actually holding the garment in place. Two dresses may look almost identical from the front but require very different internal engineering to remain stable in wear.
What Makes a Cross-neck Dress Difficult?
The difficulty comes largely from diagonal edges and three-dimensional body volume. In woven fabrics, diagonal or bias-oriented neckline sections can lengthen during cutting, handling, pressing, hanging, or sewing even when the fabric contains no elastane. In stretch fabrics, the problem can be the opposite: the material may extend easily but recover too slowly, leaving the neckline larger after repeated movement. Bust projection adds another variable because a flat paper pattern must travel outward and around the body before it returns toward the waist. If the pattern does not supply enough length and volume, the garment will borrow it from another area, often by lifting the waist seam, pulling the side seam forward, or opening the neckline.
Small adjustments can therefore produce surprisingly large visual changes. A 5-10 mm correction at a neckline edge, strap, or crossover point can sometimes alter the angle of the entire front bodice, especially on a fitted halter or cutout style. That does not mean every issue should be solved by shortening an edge. It means the fitter must identify whether the problem comes from excess edge length, insufficient bust volume, poor recovery, incorrect anchoring, or sewing distortion before changing the pattern. The best cross-neck samples are not simply tighter; they are balanced so the panels follow the body without needing one area to compensate for another.
Which Cross-neck Structures Are Used in Dresses?
Most commercial cross-neck dresses fall into three useful construction families: crossover bodices, criss-cross halters, and cross-front cutout designs. The visible result can be similar, but the support systems are different. The right construction depends on neckline depth, coverage, bust support, back exposure, fabric behavior, closure choice, and how much movement the garment must tolerate without losing its intended shape.
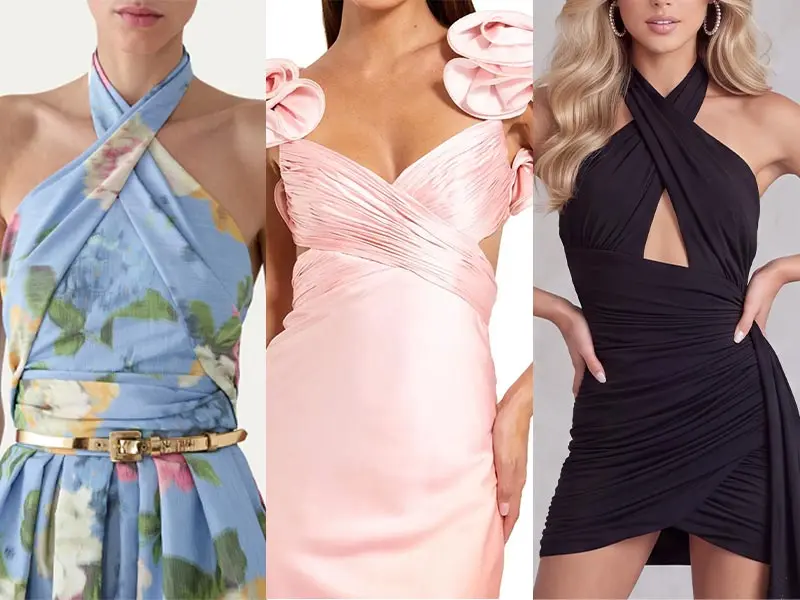
Cross-over Bodice
A cross-over bodice uses two front sections that pass diagonally across the body and overlap. The overlap may be functional, as in a true wrap dress, or permanently fixed so the dress only looks wrapped. Fixed crossover construction is common in fitted fashion and occasion dresses because it allows the development team to set an exact neckline depth, overlap amount, and waist position rather than relying on the wearer to tie or adjust the garment consistently. The pattern still needs enough hidden underlap to protect coverage during walking, sitting, and torso rotation, while avoiding so much overlap that the front becomes bulky or visually heavy.
Bust shaping can come from darts, princess seams, pleats, gathers, panel seams, or controlled stretch. When too much bust volume is forced into the diagonal neckline, the edge often becomes long and starts to gape. When the underlapping panel is too short, the upper panel can pull the entire bodice toward one side. The waist seam or waistband is usually one of the strongest stabilizing points because it locks both front sections into a fixed relationship. For that reason, the crossover should be checked before the waist is permanently sewn. Once several layers of outer fabric, lining, seam allowance, and overlap are enclosed in the waist seam, correcting the position becomes slower and more expensive.
Criss-cross Halter
A criss-cross halter uses elongated front sections that cross over the torso and continue toward the neck, transferring more tension upward than a standard crossover bodice. Strap or panel length is therefore highly sensitive. If the halter section is too short, the neckline may feel secure at first but pull uncomfortably on the back of the neck and lift the bust or waist position. If it is too long, the upper edge may open, the cross can slide outward, and the front bodice may lose the intended support. Back design also affects the load: a higher back can share the tension, while an open-back version relies more heavily on the neck anchor, under-bust shaping, waist fit, and internal support.
The fit should be judged from several directions. A front view can look balanced while the side view reveals that the neckline is pulling backward or the front waist is climbing upward. Arm movement is equally important because raising and rotating the arms changes the upper chest and shoulder position. A commercially reliable halter should remain within its intended coverage range through these movements without depending on extreme neck tension. For structured woven versions, lining, lightweight reinforcement, an invisible zipper, or a small hook-and-eye can help stabilize the system, but those components cannot compensate for a fundamentally incorrect torso or strap length.
Cross-front Cutout
A cross-front cutout dress uses crossed panels while deliberately leaving part of the front torso open. The cutout can sit at center front, above the waist, under the bust, or between crossed halter sections. Removing fabric from the center of the bodice creates a stronger fashion statement, but it also removes material that would normally help distribute tension. The remaining edges and anchors must therefore control more movement. A cutout that is stable on a mannequin can still distort on a moving body if the pattern depends on only one narrow point or if the outer fabric has weak recovery.
The opening should be treated as a closed tension loop. If one side becomes longer, shorter, softer, or more elastic than the other, the visual shape of the opening changes. Fitting should include relaxed standing, arm movement, torso rotation, sitting, and slight forward bending. The goal is not to make the cutout completely immobile; the garment should still move naturally. The important question is whether it returns to the intended position and preserves acceptable coverage afterward. This is especially important for bodycon, party, and social-event styles where the cutout is deliberately prominent and any distortion is immediately visible in photography.
| Cross-neck structure | Typical anchors | Coverage tendency | Main fit risk | Common dress applications |
| Fixed crossover bodice | Waist, side seam, shoulder | Medium to high | Gaping or overlap migration | Occasion, midi, fitted dresses |
| True wrap crossover | Waist tie and side seam | Adjustable | Uneven overlap during wear | Day, resort, wrap dresses |
| Criss-cross halter | Neck, waist, back | Medium | Neck tension or twisting | Party, occasion, going-out dresses |
| Cross-front cutout | Neck/shoulder, side seam, waist | Low to medium | Opening distortion | Fashion-forward fitted styles |
| Stretch cross-front | Fabric recovery plus neck/shoulder anchors | Medium | Stretch-out or edge rolling | Bodycon and jersey dresses |
How Is a Cross-neck Pattern Drafted?
A cross-neck pattern is drafted by fixing the intended crossover location first, then building enough length and width around the bust, waist, neckline, and anchoring points to preserve that position on the body. Pattern development must account for overlap depth, bust projection, torso length, grain direction, stretch and recovery, neckline tension, and grading rather than simply drawing diagonal lines across a standard bodice block.

Setting the Overlap
The visible crossover point and the actual overlap depth are not the same thing. A dress may appear to cross at center front while one panel continues several centimeters farther underneath the opposite side. That hidden underlap is what protects coverage when the wearer walks, turns, sits, or raises her arms. The amount needed depends on neckline depth, bust shape, fabric stretch, body movement, and whether the panels are fixed or adjustable. Too little underlap creates exposure risk; too much can add bulk, flatten the intended drape, and make the center front feel heavy.
A useful development method is to mark three references separately: the visible crossover point, the minimum safe coverage line, and the hidden underlap edge. These marks let the fitter diagnose the sample more accurately. The visible cross may look perfect while the underlap is already too close to the bust center, meaning the dress can fail in movement. Conversely, the underlap can be generous while the visible cross is positioned too high and changes the design. The most reliable overlap is not the largest possible amount but the smallest amount that preserves the intended visual line and coverage under expected wear conditions.
Balancing Bust and Waist
Bust balance is one of the most important parts of cross-neck pattern development because a diagonal panel must travel both across the torso and outward over bust projection. If the pattern lacks enough length or shaping, the garment often borrows that missing volume from somewhere else. Common symptoms include the waist seam lifting at center front, the side seam moving forward, the neckline opening near the bust, diagonal drag lines, or the crossover point shifting sideways. These symptoms are connected, so correcting one area without understanding the cause can create a new problem elsewhere.
Five relationships should be reviewed together during fitting: bust apex position, neckline contact, crossover location, under-bust shaping, and waist level. Suppose the neckline gaps by approximately 8 mm near the bust. Shortening the neckline by the same amount may close the gap, but if the real cause is insufficient bust projection, the correction may also pull the crossover upward and make the front too tight. A better solution may be to redistribute volume through a dart, pleat, panel seam, or controlled shaping change. Experienced fitting distinguishes between excess edge length and missing body volume because they can look similar but require very different pattern corrections.
Grainline and Stretch Direction
Cross-neck panels frequently contain long diagonal edges, so grain direction has a stronger influence than it would on a basic straight neckline. Woven fabric can stretch significantly on the bias even when it has no elastane, and the amount varies with weave density, yarn, finishing, and fabric weight. Soft rayon, viscose, loosely woven crepe, and some satins can change shape quickly during handling. Stretch fabrics introduce a different problem because widthwise stretch, lengthwise stretch, and recovery may not be equal. Placing the weakest recovery direction along a long neckline can make the sample look correct initially and loose after repeated wear.
Before the production pattern is finalized, the sample room should know the dominant stretch direction, whether the material behaves as two-way or four-way stretch, how quickly it recovers, whether the bias edge grows after hanging, and whether pressing changes the edge length. Fiber content alone is not enough. Two fabrics with the same nominal composition can behave very differently because knit structure, weave, finishing, and weight influence recovery. The grainline and stretch plan should therefore be part of the pattern decision, not a cutting-room detail added after the design has already been approved.
Grading the Cross
Cross-neck styles should not be graded as though every part of the upper body increases at the same rate. Bust circumference, bust projection, shoulder width, torso length, neckline depth, and neck-to-bust distance change differently across sizes. A simple horizontal enlargement can therefore move the visual cross, reduce coverage, or make a halter strap disproportionately long or short. Grading should preserve the relationship between important landmarks rather than only adding circumference according to a standard rule.
At minimum, the grade should be reviewed at the crossover point, minimum coverage line, bust apex relationship, and waist intersection. For halter versions, neck strap length and the vertical distance between bust and neck should also be checked. Testing a small, middle, and larger size before bulk is often more informative than inspecting only the base size. The purpose is not just to hit a measurement chart. It is to preserve the same silhouette, neckline depth, coverage logic, and overall balance across the size range so the design still looks like the same dress rather than a progressively altered version of the original.
Which Fabrics and Support Materials Work Best?
Cross-neck dresses work best with fabrics that match the intended balance of drape, support, stretch, and recovery. Fluid materials suit soft crossover effects, structured fabrics create cleaner neckline shapes, and stretch fabrics work well for fitted designs when recovery is strong enough. Lining, elastic, stay tape, interfacing, cups, or localized support should be selected according to the tension path rather than added automatically.

Fabric Behavior Matters More Than Fabric Name
It is easy to choose fabric by category: satin for occasionwear, jersey for bodycon, mesh for layered party dresses, or crepe for softer drape. In practice, the technical behavior within each family varies too much for the name alone to be reliable. A lightweight satin can be fluid and bias-sensitive, while a heavier satin can hold a sharp neckline but create bulky overlap seams. A soft stretch mesh may need strong internal support, while a dense power mesh can contribute meaningful control itself. A rayon jersey may drape beautifully but lengthen during wear if its recovery is weak.
A practical material review should consider at least six properties: weight, drape, stretch, recovery, opacity, and structural stability. The same crossover pattern that sits cleanly in stable crepe may gape in a soft jersey, twist in a bias-sensitive satin, or feel overly rigid in a heavy woven. Small test pieces can prevent repeated sample rounds. Sewing and hanging a short section of the planned neckline finish for several hours can reveal whether the edge grows, rolls, ripples, or remains stable. The most useful fabric is not simply the most attractive one on the swatch card; it is the one that supports the intended silhouette without forcing the pattern or internal construction to work against the material.
Stretch and Recovery
Stretch and recovery are related but they are not the same property. A fabric can extend easily and still recover poorly. In a fitted cross-front dress, high stretch may make the first sample comfortable and easy to put on, but weak recovery can leave the neckline larger after repeated movement. That is why a material should not be judged only by how far it can stretch. The more important question is how closely and how quickly it returns to the original dimension after tension is removed.
A simple sample-room comparison can be made by marking a measured section, extending it to a controlled length, releasing it, and observing the residual growth after several cycles. This does not replace laboratory testing, but it is useful for comparing candidate fabrics during development. Direction also matters. Many knits stretch much more horizontally than vertically, and some so-called four-way stretch materials still show clear differences between directions. The pattern should place the strongest and most reliable recovery where the garment needs it. If the weaker direction runs along a long diagonal neckline, additional stabilization may be required even when the fabric feels elastic in the hand.
Lining, Tape, and Internal Support
Support materials should control specific zones without making the dress unnecessarily stiff. A soft woven crossover may need only a compatible lining and narrow stay support. A fitted party dress may need elastic, cups, power mesh, localized boning, or a more stable underlayer. A structured halter may use lightweight interfacing around selected anchors. The objective is not to reinforce every edge. It is to identify where the garment is carrying tension and prevent those areas from stretching farther than the design allows.
Four support zones are worth checking: the neckline edge, crossover point, bust or under-bust area, and final neck, shoulder, side, or waist anchor. Lining compatibility is especially important. A stable lining attached to a highly elastic outer fabric can restrict movement and create pulling, while a very stretchy lining inside a stable bodice may provide almost no control. Support materials also have their own shrinkage, stretch, adhesive, and heat-response characteristics. They should be sampled together with the actual shell fabric because a tape or fusible that works on one satin, jersey, or mesh may change the hand feel or appearance of another.
| Component | Common development range* | Typical purpose | Main caution |
| Narrow stay tape | 6-10 mm wide | Control diagonal neckline growth | Excess rigidity can create puckering |
| Clear or knit elastic | 4-8 mm wide | Add controlled recovery | Too much tension can curl the edge |
| Lightweight fusible | Roughly 20-40 g/m² class | Local reinforcement | Test bonding, shine, and hand feel |
| Soft tricot lining | Roughly 50-90 g/m² | Light support and coverage | Recovery must suit the shell fabric |
| Power mesh support | Roughly 100-180 g/m² | Stronger fitted control | Can noticeably increase compression |
| Flexible boning, if required | Commonly 4-8 mm wide | Local shape support | Not suitable or necessary for every style |
*These are practical starting ranges often seen in development, not universal standards. Final specifications should be confirmed against fabric weight, stretch, desired hand feel, dress category, and the approved sample.
How Is a Cross-neck Dress Sewn and Finished?
A cross-neck dress is usually sewn by completing the individual front sections first, stabilizing vulnerable diagonal edges, establishing the correct crossover, and temporarily locking the structure before joining it to the waist, lining, skirt, and closure. The order matters because once a neckline has stretched or twisted and is fully enclosed, correcting the geometry becomes much more difficult and can affect several later operations.

Build the Panels Before Locking the Cross
Each front panel should remain a separate shaped component until its darts, pleats, gathers, princess seams, or other volume-building features are complete. Left and right pieces should be clearly identified because mirrored panels can look almost identical when flat while differing in underlap direction, lining opening, strap orientation, or final attachment point. Notches are useful, but they should not be treated as proof that the entire edge remains correct. A notch tells the operator where two points are intended to meet; it does not show whether the fabric between those points has stretched during handling.
A reliable sequence is to prepare each panel, complete shaping, stabilize critical edges, attach or prepare lining where required, position the left and right sections according to the approved crossover marks, check the total edge length, temporarily baste or tack the cross, compare it with the pattern or approved sample, and only then lock the structure into the waist or lower bodice. This sequence creates several chances to catch an error before it becomes expensive. If the cross is wrong before the waist is joined, it can still be corrected cleanly. If it is discovered after lining, zipper, waistband, and skirt assembly, the same correction may require partial disassembly of the garment.
Stabilize Before the Edge Grows
Long diagonal necklines should be handled as little as possible before stabilization. On sensitive woven materials, simply moving cut panels through several operations can change edge length. Heat and steam can also influence the shape, especially on rayon, viscose, satin, crepe, and loosely constructed fabrics. Depending on the style, the edge may be controlled with stay-stitching, narrow tape, elastic, lightweight fusible, or a stable lining. The correct method is the one that preserves the intended pattern length without changing the drape or making the neckline feel hard against the body.
A well-stabilized neckline should meet three practical conditions: it stays close to the intended seam length, lies flat without visible rippling, and follows the body naturally. Over-stabilization is a genuine defect because a shortened or rigid edge can cut into the body and push the fabric below it outward. Sewing-machine setup matters too. Presser-foot pressure, differential feed, stitch density, needle choice, and operator handling can all stretch or compress an edge. When the same rippling appears repeatedly, the pattern should not automatically be blamed. The development team should compare paper length, cut-panel length, and sewn length to identify where the distortion actually enters the process.
Lining and Clean Finishes
The lining should support the outer bodice without competing with it. Before the layers are joined, actual seam lengths should be compared rather than assuming they remain identical because the paper patterns match. One layer may have stretched more than the other during cutting or handling. Understitching can help prevent lining from rolling outward where the construction allows it, while selective internal tacking can control movement in other areas. The aim is a clean internal finish that stays hidden without adding unnecessary stiffness to the front of the dress.
Halter panels require particular attention because long crossed pieces can accidentally twist before the neckline is closed. A half-turn can remain unnoticed while the garment is inside out and become obvious only after turning. The left-right orientation should therefore be checked immediately before final closure. Seam allowance bulk also matters. A soft draped cross-front can lose its elegance if too many layers of shell, lining, tape, interfacing, and overlap are stacked at the same point. Clean construction is not the same as adding more components. The best internal finish uses the minimum structure needed to control the garment while preserving the fabric behavior that made the design attractive in the first place.
Closures and Waist Connection
The closure should be selected according to how the wearer enters the garment and how much the cross-neck structure can safely open. Fitted woven designs often use an invisible zipper at center back or the side seam so the front crossover can remain permanently fixed. Halter styles may also use a button, loop, hook-and-eye, buckle, or tie at the neck. Stretch versions may avoid a zipper entirely if the garment has enough controlled extension to pass over the body without permanently enlarging the neckline or stressing the seams.
The crossover should normally be fully confirmed before it is locked into the waist because the waist seam becomes one of the strongest anchors in the entire construction. Left and right panel positions can be measured from a fixed reference such as center front, side seam, or a designated notch rather than judged only by eye. If outer fabric, lining, interfacing, and two overlapping front pieces all meet at the waist, seam allowances may need grading or trimming to prevent a visible ridge. These finishing decisions look small on a specification sheet, but they can determine whether the final dress appears clean and refined or bulky around the most visible part of the silhouette.
How Do You Control Fit, Defects, and Bulk Consistency?
Cross-neck fit and production consistency are controlled by turning the neckline, crossover, bust coverage, anchoring tension, waist balance, and material behavior into repeatable checkpoints. Gaping, twisting, asymmetry, and shifting should be diagnosed from pattern, fabric, and sewing evidence rather than corrected by simply tightening the neckline. The approved sample must then be translated into measurable references for cutting, sewing, fitting, and inspection.
Diagnose the Cause Before Changing the Pattern
Neckline gaping is one of the most common cross-neck complaints, but it does not have one single cause. Excessive neckline length is only one possibility. The edge may have stretched during handling, the pattern may lack bust volume, the fabric may have weak recovery, the crossover may sit too low, a halter anchor may be too long, the lining may be longer than the shell, or the sewing feed may be distorting the edge. Twisting has a similarly broad set of causes, including unequal panel length, inconsistent grain direction, different strap tension, incorrect assembly, or one layer pulling against another.
Before altering the paper pattern, four questions should be answered in sequence: Does the paper pattern measure correctly? Do the cut panels still match the paper pattern? Does the garment provide enough three-dimensional bust volume? Are the left and right anchors carrying similar tension? This process prevents a factory from repeatedly taking in a neckline when the actual issue is elsewhere. If the paper pattern is correct but the sewn edge is 10 mm longer than intended, reducing the paper pattern by another 10 mm only hides the production problem. Good diagnosis isolates the stage where the geometry changed and corrects the process at that point.
Fit in Movement, Not Just Standing
A cross-neck dress should be evaluated on a moving body rather than only in a straight front photograph. The wearer should stand naturally, walk several steps, raise the arms, rotate the torso, sit, and bend forward slightly. Each action changes the relationship between bust, shoulder, neck, waist, and back, so it can expose weaknesses that are invisible during a static fitting. A neckline may open during arm movement, a hidden underlap may migrate during sitting, or a cutout may stretch into a different shape after the torso rotates.
The goal is not zero movement. Clothing should move with the wearer. The important question is whether the dress stays within the intended coverage range and returns to an acceptable position afterward. For low-coverage or fitted styles, “acceptable” should be defined during development rather than expressed later as a vague comment such as “make it more secure.” Front, side, and back photographs taken at the same fitting stage are useful because tension problems often appear away from the neckline itself. A rising front waist, rotating side seam, or pulling back neckline can reveal the real cause of a fit issue before the team starts altering the most visible area.
Convert the Approved Sample Into Production Controls
An approved sample should not remain only as a physical garment hanging in the sample room. Its critical features need to become production information that can be checked by pattern, cutting, sewing, and quality teams. For a cross-neck dress, useful controls include neckline seam length, crossover distance from a fixed reference, minimum underlap depth, strap or halter length, waist attachment position, left-right symmetry, and selected finished measurements. Critical construction points can also be photographed so operators and inspectors have a clear visual reference rather than relying on verbal descriptions.
For highly sensitive styles, checking a first production piece or a small pilot quantity before releasing the full run can prevent the same defect from being repeated across hundreds of garments. Inline inspection should focus on operations that permanently alter geometry, particularly neckline stabilization, crossover placement, strap construction, and waist locking. The earlier an edge-length or alignment issue is found, the less expensive it is to correct. Once the bodice is lined, zipped, joined to the skirt, and finished, a small error that began in the first neckline operation may require major rework.
| Control point | Practical production check | Warning sign | Likely area to investigate |
| Neckline edge | Compare with approved seam/pattern length | Edge becomes progressively longer | Handling, feed, stabilization |
| Crossover point | Measure from a fixed reference | Cross shifts left, right, up, or down | Panel length or assembly |
| Underlap | Check minimum coverage position | Hidden edge becomes visible | Pattern width or panel stretch |
| Halter/strap length | Compare left and right before final closure | Unequal neck tension | Cutting, turning, or sewing |
| Waist join | Confirm both panels before permanent seam | Bodice rotates after waist assembly | Incorrect anchoring |
| Symmetry | Compare diagonal angles and reference points | One side sits higher | Grain, cutting, or crossover placement |
| Final fit | Repeat the approved movement test | Gaping or migration after movement | Recovery, fit, or anchor tension |
Keep Repeat Orders From Drifting
Repeat production is not automatically safer than the first order. Styles often drift when teams remember the visual appearance of the previous garment but stop referring to the technical conditions that made it work. The approved pattern, material specification, measurement chart, construction method, and sealed reference should remain the starting point. Any change in fabric source, fabric lot, lining, elastic, interfacing, zipper, pressing method, or production line should be considered for its effect on the upper bodice because a small difference in hand feel or recovery can alter a cross-neck fit.
A short revalidation before a repeat run is usually more efficient than discovering a problem after full production has started. One pre-production garment can be checked for neckline length, crossover position, material recovery, waist balance, and movement against the original approval. The same principle applies when a successful style expands into new colors or additional sizes. Reproducing the measurements alone is not enough. The goal is to reproduce the relationship between pattern, material, construction, and body. That relationship is what makes the design look intentional and controlled rather than simply similar to the original sample.
Conclusion
A strong cross-neck dress is not defined by whether two panels cross neatly in a flat photograph. It is defined by whether the same crossover keeps its intended neckline, coverage, balance, and visual character when the garment moves from inspiration to paper pattern, from pattern to first sample, from one sample size to a graded range, and from an approved prototype into production and repeat orders. The most reliable development process treats fabric behavior, bust shaping, anchoring, stabilization, sewing sequence, and fit testing as parts of the same system rather than separate problems handled by different teams.
For fashion brands, product teams, and designers developing halter, crossover, cutout, bodycon, party, or occasion dresses, the most valuable manufacturing partner is usually the one that can identify these risks before they become bulk-production problems. When a reference image or tech pack contains a cross-neck structure that is difficult to balance, an early development review can clarify the pattern route, fabric requirements, internal support, sample priorities, and production checkpoints before unnecessary sample rounds accumulate. Duolan can be approached at that stage when a project needs practical dress-development input rather than simple execution from an image.
Frequently Asked Questions
What is the difference between a cross-neck dress and a wrap dress?
A wrap dress usually uses one front side to overlap the other as part of the garment’s fastening system, often with ties around the waist. A cross-neck dress is a broader design category. Its crossed effect may come from a fixed crossover bodice, criss-cross halter panels, or a cross-front cutout that does not open like a true wrap. The key difference is therefore not the diagonal neckline itself but how the panels are anchored, whether the overlap is adjustable, and where the garment carries tension during wear.
How do you stop a cross-neck dress from gaping at the bust?
Start by identifying the cause rather than automatically shortening the neckline. Gaping can result from excessive edge length, stretched bias fabric, insufficient bust volume, weak recovery, an overly low crossover, incorrect halter length, or lining that is longer than the shell. Compare the paper pattern, cut-panel length, and sewn edge first. Then check bust shaping and anchoring on the body. The best correction may be added bust volume, stabilization, or adjusted crossover geometry rather than simply making the neckline tighter.
Which fabric is best for a cross-neck dress?
There is no single best fabric because the right choice depends on whether the design needs soft drape, clean structure, stretch-led fit, or strong recovery. Crepe and softer rayon fabrics can create fluid crossovers, while sateen or other stable wovens give a cleaner shape. Jersey and stretch mesh can work well for fitted cross-front styles when recovery is strong enough. Evaluate weight, drape, stretch, recovery, opacity, and bias stability together, and test the planned neckline construction before committing to bulk fabric.
Does a cross-neck dress always need lining?
No. Lining depends on fabric, opacity, neckline finish, support needs, and the intended hand feel. A stable jersey cross-front dress may use binding or a clean self-finish without full lining, while a woven occasion or halter dress may benefit from lining to improve coverage and control internal seams. Some styles need only partial lining or localized support. The lining should be compatible with the outer material, because a lining that is much more stable or much more elastic than the shell can create pulling, rolling, or uneven tension.
How should a cross-neck dress be graded for different sizes?
The pattern should preserve the crossover position, coverage line, bust relationship, neckline depth, and waist intersection rather than simply adding the same amount around the upper body. Bust projection, torso length, shoulder width, and neck-to-bust distance do not increase at identical rates. For halter styles, strap length also needs separate review. Testing at least a small, middle, and larger size is useful because a grade can meet measurement specifications while still producing a visibly different neckline or coverage level from the approved base-size design.
What production defects are most common in cross-neck dresses?
Common defects include neckline gaping, asymmetric crossover placement, twisting, unequal halter tension, visible underlap edges, wavy seams, lining roll-out, distorted cutouts, rising front waist seams, and inconsistent coverage between sizes. Many of these defects are connected rather than independent. A longer neckline can change crossover position, while incorrect bust volume can pull the waist and side seams. Production control is more effective when the factory tracks the critical geometry from cutting through first-piece approval instead of relying only on a final visual inspection.
When should a cross-neck style be tested before bulk production?
Testing is especially valuable when the design is fitted, low-coverage, heavily bias-oriented, made in soft satin or rayon, uses stretch with uncertain recovery, includes a cutout, or transfers significant tension through a halter neck. A first-piece or small pilot check can confirm neckline length, crossover position, strap tension, waist balance, and movement before the full run is released. It is also worth rechecking a repeat order when fabric source, color lot, lining, elastic, or other production-critical materials have changed from the approved version.