
How to Prevent Backless Dresses from Gaping: What Fit and Construction Fixes Work?
Your trusted Women’s Apparel Development & Manufacturing Partner from China
- Jerry
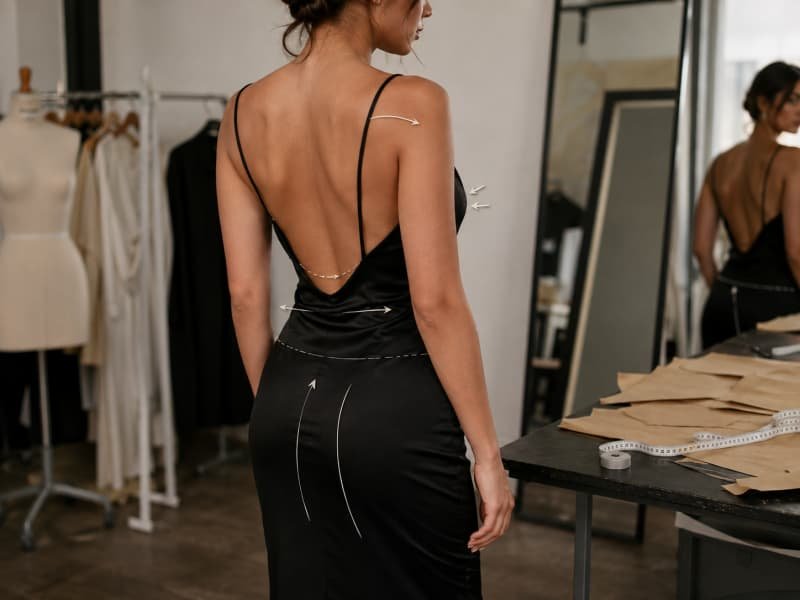
A backless dress can look beautifully fitted while the wearer stands in front of a mirror and then pull away from the body the moment she sits, reaches forward, turns, or begins dancing. That change is what makes gaping difficult to solve: the visible opening is often only the final symptom. The actual cause may be excess back length, an incorrect bust-to-waist relationship, a skirt that is pushing the bodice upward, weak fabric recovery, poorly positioned straps, an unstable lining, or missing internal anchoring. Treating every gap with tighter ties or stronger tape can hide the problem for a few minutes while creating new pressure, distortion, or exposure elsewhere.
To prevent a backless dress from gaping, identify where and when the edge lifts away from the body. Minor movement may be controlled with fashion tape or careful strap adjustment, but repeated or wide gaping usually needs pattern correction, better waist anchoring, suitable fabric recovery, controlled elastic, or internal support that matches the silhouette.
The right solution depends on whether the dress needs to work for one evening or remain dependable across an entire production run. A wearer may need a safe temporary fix before an event, while a brand must make sure the approved fit survives grading, material changes, sewing variation, and repeat orders. One studio fitting can illustrate the difference: a dress may appear flawless under still photography, yet reveal a noticeable lower-back opening as soon as the model sits for a campaign shot. By then, the location, crew, and schedule are already booked, and the cost of a small development oversight becomes much larger than the alteration itself.
What Causes Backless Dress Gaping?
Backless dresses gape when the opening edge does not match the wearer’s body curve or cannot hold its position during movement. Common causes include excess back length, incorrect bust-to-waist shaping, tight hips pushing the garment upward, unstable fabric, poorly positioned straps, and insufficient support. The visible gap usually reflects several fit and construction factors working together.
Lower-Back Excess
Lower-back gaping often appears above the zipper, around the back waist, or at the lowest point of the open-back curve. The bodice may contain more vertical length or horizontal width than the wearer needs, and the missing upper-back panel leaves little structure to hold that excess against the spine. Start by checking whether the garment waist sits at the natural waist. When it falls below that point, extra length can collapse toward the opening. When it rises while walking or sitting, the skirt may be pushing the bodice upward because the upper hip, seat, or lining is too restrictive.
The shape of the opening matters just as much as the measurement. A line that is too straight cannot follow the inward curve of the lower back, even when the waist circumference appears correct. During a fitting, leave the straps in a comfortable position and pin a small horizontal fold or wedge at the problem area. If the opening settles smoothly while the side seams and zipper remain stable, excess back length or insufficient contouring is the likely cause. If diagonal lines remain, the hips, front bodice, or overall balance should be checked before the back is reduced.
Body Proportions
Backless fit depends on the relationship between bust, waist, rib cage, and hips rather than one isolated circumference. Two wearers may share the same bust measurement but need different front lengths, cup positions, waist shaping, and back lengths. A fuller bust needs enough volume and vertical length across the front; otherwise, the bodice can be pulled upward and the back waist can shift. A more defined waist needs stronger contouring, while fuller hips require enough room so the skirt does not climb and send fabric toward the open back.
This is why choosing a smaller size is not a reliable universal fix. It may close the back slightly while creating side-bust exposure, tight hips, distorted seams, or excessive strap pressure. Mark the natural waist on the wearer and compare it with the garment waist while standing, sitting, and raising the arms. Even a shift of several millimeters can show where tension is travelling. A localized pattern correction usually protects the intended silhouette better than reducing every circumference simply because the gap is visible at the back.
Fabric Behavior
Fabric determines whether an opening follows the body, stretches away from it, or loses its shape after repeated wear. Stable woven materials can produce a crisp edge, but they require accurate contouring because they will not naturally mold around the lower back. Stretch jersey may feel forgiving during the first fitting, yet poor recovery can allow the edge to grow. Satin makes small drag lines obvious because reflected light highlights every ripple, while bias-cut satin may lengthen after hanging, steaming, or sitting. Mesh can stretch differently from its binding or lining, and heavy beading can pull an unsupported bodice downward.
Material | Typical Gaping Risk | Practical Development Check | Main Control |
Stable woven | Edge stands away from a curved body | Compare the sewn opening with the fitted pattern line | Contoured seams, darts, stable facing |
Stretch jersey | Opening grows during wear | Measure before and after repeated movement | Recovery testing, elastic support, stable stitching |
Satin | Rippling and visible drag lines | Recheck after pressing and a 24-hour hang | Grain control, light interfacing, careful pressing |
Bias-cut fabric | Lengthening, twisting, uneven fall | Hang the sample before final balance review | Stabilized edges and balanced cutting |
Mesh | Uneven tension around binding | Compare shell, lining, and trim stretch | Compatible layers and controlled tension |
Sequins or beading | Garment weight pulls the bodice down | Fit with the full embellishment weight | Internal support and secure waist anchoring |
These checks are practical starting points rather than universal standards. Fiber content, knit or weave structure, finishing, seam method, and the amount of support built into the dress can change the result. The important principle is that fabric should be chosen as part of the structure, not as a decorative decision made after the pattern is approved. Replacing an approved material with a heavier, softer, or stretchier option without reviewing the pattern and lining can turn a secure sample into a garment that gaps in production.
Strap Tension
Straps influence the neckline, bust position, side seam, waistline, and open-back edge at the same time. In a halter dress, the neck tie lifts the front bodice and pulls the side panels inward. Cross-back straps can draw the opening toward the body, while a lace-up closure distributes tension over several points. Trouble begins when straps are expected to remove excess fabric elsewhere. Shortening a halter tie may close the upper opening but lift the waist, increase neck pressure, and make the lower-back gap wider.
Position the bust and waist correctly before changing strap length. Shorten adjustable straps in small, even steps, often no more than a few millimeters at a time during a professional fitting, and then repeat the movement test. Watch whether the waist seam moves as the straps tighten. If it rises, the adjustment is repositioning the whole dress rather than correcting the opening. A well-developed adjustable strap should keep the dress secure near the middle of its usable range, rather than forcing the wearer to use the shortest possible setting.
How Do You Diagnose the Gaping?
Diagnose gaping by locating the exact area, observing when it appears, and checking how the rest of the dress moves. Neckline, side-bust, lower-back, and waist-level gaps usually have different causes. Static mirror checks are not enough; movement, seam direction, waist position, fabric recovery, and strap tension reveal whether the problem comes from sizing, balance, material, or construction.
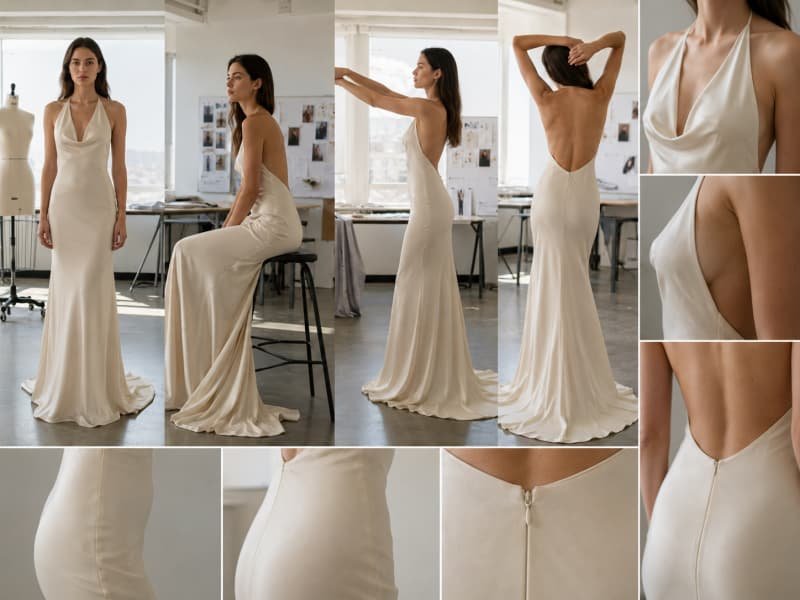
Find the Gap
The location of the gap is the fastest clue to its cause. A front neckline that lifts away may indicate excess neckline length, insufficient bust shaping, or weak anchoring at the waist. Side-bust gaping usually points toward armhole shape, cup coverage, bust volume, or strap placement. A lower-back opening is more often connected with excess back length, a shallow curve, loose waist shaping, or pressure from the skirt below. Treating all of these as the same problem leads to alterations that close one area while disturbing another.
Divide the open-back shape into clear zones: upper edge, side back, waist, zipper area, and lowest point. A symmetrical gap is more likely to come from the pattern or material, while a one-sided gap may result from uneven straps, body asymmetry, a twisted seam, or an off-center zipper. Fold direction also tells a story. Horizontal folds usually suggest excess vertical length, diagonal lines from the hip suggest upward pressure, and a clean edge that simply stands away may be too long or too straight for the body curve.
Gap Location | Likely Causes | First Check | Useful Evidence |
Front neckline | Excess neckline length, low bust position | Bust placement and waist anchoring | Edge lifts mainly when bending forward |
Side bust | Armhole shape, limited cup coverage | Strap position and side seam direction | Exposure increases as the arm moves |
Upper back | Strap angle, oversized upper bodice | Shoulder width and strap length | Gap changes immediately with strap adjustment |
Lower back | Long back bodice, shallow curve | Natural waist and opening contour | Horizontal folds or a smooth standing edge |
Above zipper | Loose waist, tight hips, zipper distortion | Hip allowance and zipper position | Gap widens after sitting or walking |
One side only | Uneven strap tension, asymmetry, sewing twist | Left-right measurements and seam alignment | Different behavior on each side |
Test Movement
A backless dress must be assessed in motion because the torso changes shape throughout normal wear. Sitting shortens the back, reaching forward changes the shoulder blades and neckline, raising the arms lifts the rib cage, and turning redistributes tension between the side seams and opening edge. A useful fitting sequence includes sitting upright, leaning forward, raising both arms, reaching one arm overhead, rotating the torso, walking, taking a longer step, and then returning to a neutral stance.
Observe whether separation is temporary or remains after the wearer stands normally. A brief opening during an extreme movement may be acceptable depending on the intended coverage, but a gap that stays open indicates displacement, fabric growth, or weak recovery. The test should match the occasion. A party dress needs to tolerate dancing and raised arms, while a dinner dress must remain secure when sitting and leaning over a table. Short video clips from the side and back often reveal the sequence of failure more clearly than still photographs.
Check Garment Balance
A generally oversized dress tends to show excess in several places: the bust feels loose, the waist drops, the straps run long, and the garment may rotate around the body. In that situation, a smaller base size may help if the hips and bust coverage remain comfortable. A balance problem behaves differently. The bust and waist measurements may appear correct while the back still opens because the front length, back length, hip allowance, or opening curve is wrong. Reducing the entire garment can then create discomfort without removing the cause.
Check whether the side seams stay close to vertical. A seam pulling toward the back can indicate that the front needs more room, while a seam pulling forward may point to insufficient back or seat allowance. Mark the natural waist and compare it with the garment waist while standing and sitting. Also inspect the shell and lining together. A short lining can pull the bodice upward, while a long or unstable lining can push the opening outward. The zipper should remain centered and flat rather than bowing away from the body.
Read the Warning Signs
Pattern problems usually repeat after the dress has been repositioned and the straps have been adjusted to a comfortable setting. The same gap may appear on several samples made from the same pattern. Watch for an opening edge that is consistently longer than the body curve, a waist seam that shifts during movement, rotating side seams, diagonal drag lines, or a lining that does not sit at the same length as the shell. If tightening the straps creates new folds instead of removing excess, the problem is not primarily strap length.
A pin test helps separate localized excess from material instability. Pin a small wedge at the opening or back waist, then repeat the full movement sequence. If the gap disappears without pulling the neckline, zipper, or side seams out of position, contouring may solve the problem. If the edge stretches open again, recovery and stabilization need attention as well. Do not approve a correction only because the back looks flatter in one pose; the wearer must still breathe, sit, turn, and raise the arms without pressure or distortion.
How Can You Stop Gaping Without Sewing?
Minor gaping can often be controlled with fashion tape, body adhesive, supportive breast tape, or careful strap adjustment. These options work best when the dress already fits and only a small section of the edge moves. They cannot reliably correct major excess fabric, an incorrect back curve, tight hips, poor material recovery, or a bodice that lacks adequate structural support.
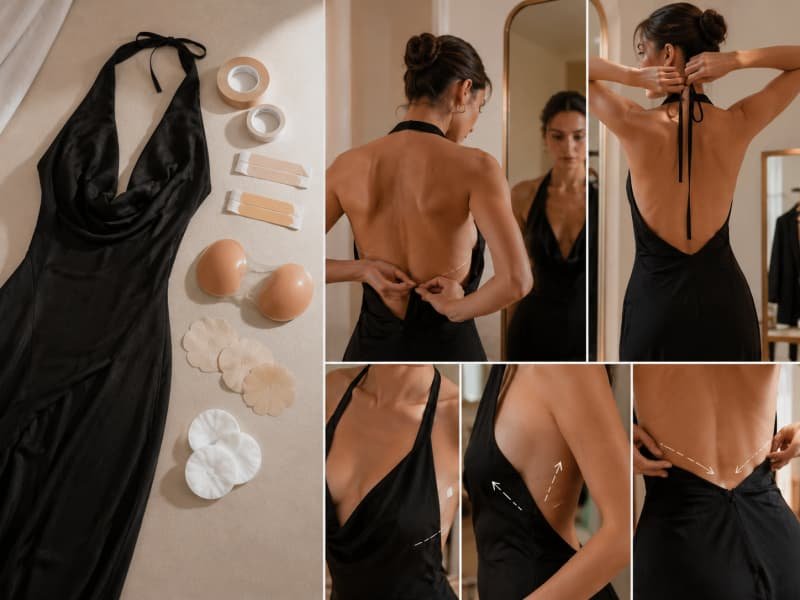
Fashion Tape
Fashion tape is useful when the edge already follows the body but lifts slightly during movement. It works best along a short neckline section, side-bust edge, or localized part of the back. The dress should first be positioned correctly at the bust and waist so the tape is stabilizing an edge rather than carrying the weight of the garment. Apply it to clean, dry skin in short sections that can follow the curve, and press the fabric down without stretching either the skin or the opening.
Tape cannot remove pattern excess. When the opening forms a fold, stands noticeably away from the body, or pulls free every time the wearer sits, stronger adhesive will not correct the back length or waist balance. Test the complete setup before the event and include the movements expected during wear. Heat, perspiration, body lotion, sunscreen, and some fabric finishes can reduce adhesion. A practical trial of at least thirty to sixty minutes is more informative than checking the dress for a few minutes in front of a mirror.
Adhesive Options
Different adhesive products solve different problems. Double-sided fashion tape joins a garment edge to the skin. Liquid body adhesive can provide more continuous contact around a curve, but application and removal require extra care. Breast tape supports or repositions the bust, which may improve neckline and side-bust fit without changing the dress. Adhesive bras provide coverage and light shaping but usually do not anchor the opening. The safest approach is to use the least aggressive option that gives enough control for the intended activity.
Temporary Method | Best Use | Main Limitation | Fabric or Wear Caution |
Double-sided fashion tape | Small neckline or back-edge lift | Cannot remove excess fabric | May mark satin or delicate finishes |
Body adhesive | Curved edge needing broader contact | Requires careful application and removal | Test for residue and discoloration |
Breast tape | Bust lifting and repositioning | Does not correct waist or back length | Keep adhesive away from fragile dress surfaces |
Adhesive bra | Coverage and light shaping | Usually does not secure the garment edge | Can change bust position inside fitted cups |
Silicone garment grip | Repeated edge control in suitable designs | Works only with compatible construction | May show through very thin fabric |
Strap adjustment | Minor vertical positioning | Can lift the waist or create neck pressure | Does not fix an incorrect pattern curve |
Fabric compatibility is as important as skin comfort. Mesh can stretch around the secured point, sequins reduce the surface available for attachment, velvet pile can be disturbed, and satin may show pressure or residue marks. The product instructions should always take priority because formulations and safe wear times vary. Temporary control is successful when it preserves coverage and comfort without changing the drape or damaging the textile.
Strap Adjustment
Place the bust and waist correctly before tightening any strap. The bust should sit inside the intended shaping or cup area, the waist should align with the body, and the side seams should stay in position. For a halter dress, adjust the neck tie while the wearer keeps her shoulders relaxed and can still turn her head, breathe deeply, and raise her arms comfortably. If the tie must be painfully tight to keep the lower back closed, the pattern or waist anchoring is doing too little.
Cross-back straps should carry similar working tension unless the design intentionally allows different lengths. Mark the comfortable setting so it can be repeated, then sit and move again. Watch whether the waist rises as the straps shorten. When that happens, the adjustment is lifting the whole garment rather than improving the back curve. Adjustable hardware is valuable for normal body variation, but it should refine a good base fit rather than rescue a bodice that only works at the shortest possible setting.
Skin and Fabric Safety
Adhesive products should be patch-tested before extended wear because skin sensitivity, perspiration, heat, sunscreen, lotion, recent shaving, and previous irritation can change the reaction. Do not place adhesive over broken, sunburned, or inflamed skin. The attachment area should be clean and dry, and removal should be slow, with the skin and fabric supported. Pulling the dress away quickly can irritate the skin, stretch a delicate edge, or loosen embellishments.
The garment needs its own hidden-area test. Adhesive can affect foil prints, satin finishes, mesh fibers, velvet pile, glued trims, and certain dyes. Rented, borrowed, couture, or heavily decorated dresses should not be treated without permission from the owner or guidance from a qualified cleaner. Comfort and garment preservation are part of the solution. A method that keeps the opening closed but causes pain, visible marks, or fabric damage is not an acceptable practical fix.
Which Alterations Fix Gaping Permanently?
Permanent fixes may include reducing side seams, adding or reshaping darts, shortening the back bodice, correcting the opening curve, relocating straps, or adding controlled elastic and internal support. The alteration should remove excess at its source without changing bust coverage, waist position, side-seam balance, or comfort. Simply tightening the visible edge can transfer the problem elsewhere.
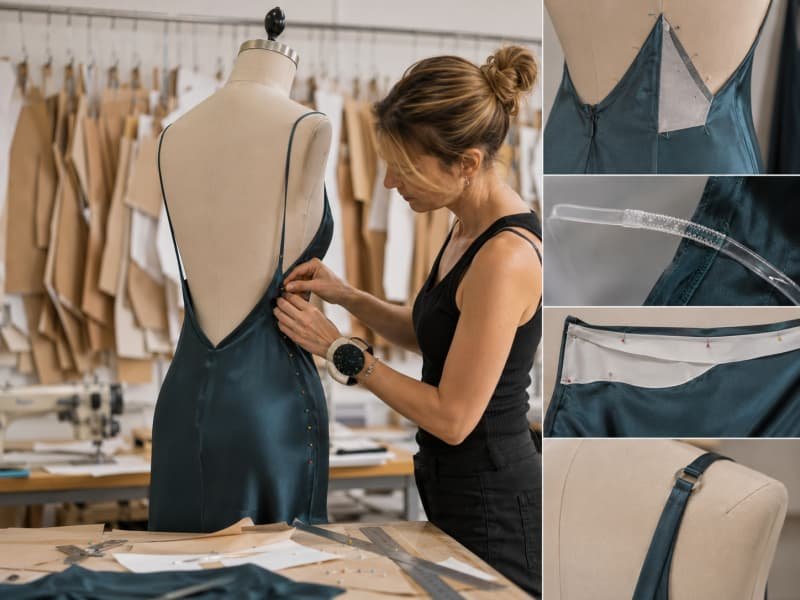
Side Seams and Darts
Reducing the side seams works when excess width is distributed around the bodice rather than concentrated at one point. The reduction should be divided between both sides and blended into areas that already fit. Removing too much near the bust can flatten the shape, reduce coverage, or pull the side seam forward. Removing too much at the waist can make breathing and sitting uncomfortable. Pin the proposed change first and check the front, side, and back together rather than judging the opening alone.
A dart or wedge is more suitable when the excess is localized. A small back-waist dart can follow the inward curve above the waist, while a wedge may be removed from the open edge and transferred into an existing seam. The best location depends on the design lines, zipper, lining, and available seam allowance. Alter the shell and lining consistently: an oversized lining can push the shell outward, while an overly tight lining can distort the surface or restrict movement even when the outer layer looks smooth.
Elastic Stabilization
Elastic can help an opening follow the body and recover after movement, but it should provide controlled stabilization rather than visible gathering. Clear elastic is often used in lightweight or stretch garments because it adds recovery without a bulky casing. Narrow knitted elastic may provide more support where the construction can conceal it, while stay tape controls growth without contracting. The correct working length should be established through sampling because fabric stretch, opening shape, seam method, and body curve all influence the result.
A useful development trial is to sew several controlled variants rather than guess one tension. The team may compare a neutral length with small reductions such as three and six percent, then assess edge smoothness, comfort, and recovery on the fit model. These figures are trial points, not fixed rules. Too little tension leaves the gap; too much creates gathers, pressure marks, curling, or stress at the zipper and side panels. The approved edge should return smoothly after sitting and turning without looking obviously elasticated.
Back-Curve Correction
Some openings need to be reshaped rather than shortened evenly. The total edge length may be close to correct, yet the line still stands away because the curve is too shallow, too convex, or placed at the wrong angle. Mark where contact is lost and where the edge remains stable. A lower-back gap may require a small wedge near the waist, while an upper side gap may need armhole reshaping or a different strap attachment point. Reducing the whole opening equally can make sections that already fit uncomfortably tight.
After removing the excess, redraw one smooth line so the correction does not introduce a point or bump. The finishing method must be reviewed at the same time because a facing, binding, lining, fold-over elastic, and narrow hem behave differently around curves. Seam allowance clipping, under-stitching, interfacing, and pressing all affect whether the edge turns cleanly. A correction that works in a stable fitting toile should be repeated in the intended fabric because mesh, stretch satin, jersey, and embellished materials can respond very differently.
Professional Alteration
Professional help is advisable when the dress includes built-in cups, boning, waist tape, several lining layers, lace appliqué, beading, sequins, an invisible zipper, or bias-cut fabric. In a corset-style bodice, tension moves through the cups, under-bust seams, boning, waist, and side panels. Removing fabric from the back can alter bust position and pressure elsewhere. Beaded or sequin garments may require decoration to be removed, stored, and reapplied before a seam can be opened safely.
Bias satin is particularly unforgiving because it can grow, twist, and show needle or press marks. Very low backs also leave little seam allowance for trial and error. Bring the shoes, bra, shapewear, and accessories intended for the event to the fitting because they affect posture and garment position. A competent alteration specialist should pin the change, explain what other areas may be affected, and arrange a second fitting before final completion. That process is usually safer than making a large permanent reduction from one static mirror check.
How Do Brands Prevent Gaping Before Production?
Brands prevent gaping by approving the pattern, fabric, lining, straps, support components, grading, and movement performance as one system. Static photographs are not enough. Critical measurements, fit videos, movement tests, first-piece checks, and production tolerances are needed so the approved back shape remains secure across sizes, colorways, material lots, sewing lines, and repeat orders.
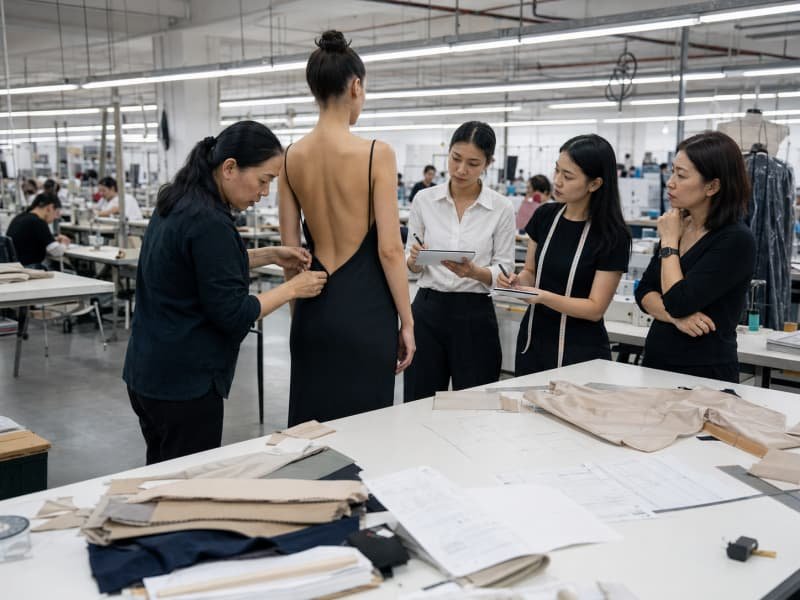
Sample-Stage Checks
The sample stage should confirm both measurements and three-dimensional balance. Check front and back bodice lengths, bust placement, waist position, side-seam direction, strap attachment, zipper alignment, and the complete back-opening contour. A sample can meet a measurement chart and still hang incorrectly because the lengths are distributed in the wrong places. Mark control points at the top of the opening, side-back transition, natural waist, lowest open-back point, zipper start, and strap attachments so each revision can be compared with the previous version.
Fit comments should describe the required action rather than only the symptom. A note such as ‘back is loose’ leaves too much room for interpretation, while ‘remove vertical excess at center back while keeping the waist level and side seam unchanged’ gives the pattern team a measurable target. Review the inside of the sample as carefully as the outside. Lining length, seam allowance bulk, facing stiffness, cup placement, boning endpoints, and strap reinforcement can all create a visible gap even when the outer pattern line appears correct.
Material and Support Selection
Material choice should reflect the function of the silhouette. A soft draped back may need limited support, while a fitted low-back style must replace the stability lost when the upper back panel is removed. Review stretch, recovery, weight, drape, opacity, shrinkage, dimensional change after pressing, and the interaction between shell and lining. A rigid lining inside a stretch shell can force the edge outward, while an overly stretchy lining may provide little control and allow the entire bodice to grow during wear.
Support components may include cups, boning, waist tape, elastic, stay tape, lightweight fusible reinforcement, silicone grip, shaped facings, hooks, and adjustable straps. More structure is not automatically better. Heavy cups can pull down a light bodice, stiff boning can show through a soft fabric, and a firm facing can make a curved edge stand away. Test the complete construction with the intended zipper, lining, trims, and embellishment weight because a partially finished sample may look secure before those elements are added.
Movement Approval
Fit samples should pass a consistent movement sequence on the intended fit model, using the same type of shoes and undergarments expected for the final product. Heel height, bra shape, and shapewear can change posture and torso length. Record the dress before movement, during the most demanding positions, and after returning to neutral. The approval standard should reflect actual use: a dance or party dress must tolerate arm movement and turning, while a dinner or occasion dress must remain secure while sitting and leaning forward.
Test | Main Observation | Warning Sign | Possible Cause |
Neutral standing | Opening follows the body curve | Edge already lifted | Incorrect contour or excess length |
Sitting | Waist and lower-back position | Gap widens and remains open | Long back bodice or tight hips |
Forward reach | Neckline and side-bust coverage | Sudden exposure | Weak bust anchoring or excess edge length |
Arms raised | Strap and waist movement | Waist seam lifts | Short straps or restrictive skirt |
Torso rotation | Left-right recovery | One side remains displaced | Asymmetry or uneven tension |
Walking and turning | Skirt-bodice interaction | Bodice is pushed upward | Insufficient hip or seat allowance |
Rest after movement | Material recovery | Opening remains stretched | Weak recovery or poor stabilization |
The movement sequence should be repeated after every meaningful pattern or material revision, not only at final approval. A change that improves the lower back may affect the neckline or side bust, and a new lining may alter recovery. Short videos linked to the sample record are particularly useful for overseas development teams because they show exactly when the edge lifts and whether it returns. This evidence is more reliable than a single photograph taken in the most flattering pose.
Grading and Bulk Control
A secure base-size sample can fail after grading if the open-back curve is enlarged automatically in every direction. Larger sizes may need more bust volume and stronger support without a proportional increase in exposed edge length, while smaller sizes may need shorter straps and different cup placement. For a high-risk fitted style, review the base size and at least one smaller and one larger size before full release whenever the size range and schedule allow. The goal is to preserve the same visual balance, not simply add circumference.
Before bulk cutting, lock the approved pattern version, graded nest, fabric direction, lining, support components, elastic working length, strap measurements, opening measurements, and allowed tolerances. A first-piece or pilot review should be completed before the full order is released. Inline checks should focus on operations that change fit directly, including strap attachment, elastic application, zipper insertion, lining assembly, side-seam accuracy, and finished opening length. Production pieces should be compared with both the specification and the approved fit sample.
- Approved fit sample with dated comments and revision history
- Final pattern and graded-nest identification for every released size
- Fabric stretch, recovery, shrinkage, and approved lot information
- Critical opening, strap, elastic, waist, and zipper measurements
- First-piece photographs, fit observations, and corrective action record
- Inline and final inspection results tied to the approved sample standard
This documentation turns fit from an individual operator’s judgment into a repeatable production standard. Duolan Apparel’s dress-focused development model brings pattern, fabric, sample, technical, and bulk coordination into the same workflow, which is especially important for backless, halter, bodycon, corset, satin, mesh, party, occasion, and vacation styles. The objective is not only to make one sample look secure; it is to keep the same balance when the style moves through grading, colorways, production lines, and repeat orders.
A Practical Next Step for Custom Development
A backless dress should not depend on the wearer standing still, tightening a neck tie until it hurts, or carrying emergency tape throughout an event. Secure fit comes from understanding how body proportions, pattern shape, fabric behavior, support, construction, and movement interact. Temporary products can manage a small edge lift, and a skilled alteration can rescue an existing garment, but recurring fit complaints are best prevented during development and protected through grading and production control.
For a custom backless dress or coordinated dress collection, send Duolan Apparel a tech pack or reference sample, target size specification, preferred fabric or performance requirements, planned colorways, order expectations, and the movements the dress must support. The development team can assess the back contour, bust and waist balance, strap system, lining, cups, boning, elastic, fabric recovery, and sample-to-bulk risks before production begins. Early technical clarity usually saves more time than correcting a finished campaign sample or a completed order.
Share:
Our Services
Categories
Table of Contents
Here, developing fashion collections is more than manufacturing garments — it’s a collaborative process focused on transforming ideas into well-executed, market-ready products. From fabric sourcing and sample development to scalable production and delivery coordination, every stage is built to support quality, consistency, and efficient collection launches across global markets.
