 Skip to content
How to Inspect Bodycon Dresses : A Professional Quality Control Guide for Fashion Brands
Your trusted Women’s Apparel Development & Manufacturing Partner from China
- Jerry

A bodycon dress can look perfect on a hanger and still fail the moment someone walks, sits, bends, or raises her arms. Close-fitting garments leave very little room for error. A small change in fabric recovery can loosen the hip area. A narrow seam can break under movement. A grading mistake can make one size comfortable and the next size almost unwearable. Even a technically correct flat measurement may produce the wrong result when fabric stretch, negative ease, lining, pattern shape, and construction have not been evaluated together.
To inspect a bodycon dress, compare it with the approved sample and specification, then verify fabric stretch and recovery, opacity under tension, key body measurements, seam elasticity, fit balance, movement performance, labels, and packing. Inspect first pieces and production in line, classify defects by severity, and release shipment only when measurements, workmanship, function, and packaging meet the agreed acceptance plan.
The most effective inspection process begins long before finished dresses reach the packing area. It starts when the brand and manufacturer agree on how the dress should look, feel, stretch, fit, and perform. Imagine approving 20,000 dresses because the flat measurements appear correct, only to discover that the fabric grows after thirty minutes of wear. A well-designed inspection plan exists to prevent exactly that kind of expensive surprise – and to give both the brand and the production team a clear, defensible standard for every decision that follows.

What Should You Prepare Before Inspection?
A reliable bodycon dress inspection starts with controlled references: the latest tech pack, approved measurements, sealed sample, material standards, construction details, packaging instructions, and defect criteria. Inspectors should confirm document revisions, measurement methods, sample status, and buyer-specific tolerances before checking garments. Without an agreed standard, inspection becomes subjective and inconsistent.
Control the Reference Pack
The inspection team should work from one approved reference pack. It must reflect the final decisions made after fitting, material approval, costing, and pre-production review. Fast-fashion programs often include several rounds of changes before bulk cutting begins. A neckline may be raised, the hip measurement reduced, the lining lengthened, or a zipper replaced. If the cutting room, sewing line, quality team, and brand are using different revisions, the resulting inspection has little value.
Every document should show a revision number or approval date. Changes discussed through email or messaging platforms should be transferred into the controlled file rather than left in separate conversations. Inspectors should confirm that the approved measurement chart matches the pattern, size set, and production marker. This sounds basic, but revision confusion remains one of the most common causes of avoidable disputes between product teams and factories.
The measurement specification must explain exactly how each point is taken. “Waist width” is not sufficiently clear unless the document identifies its vertical position. The same applies to bust width, high hip, full hip, armhole depth, neckline opening, strap length, slit length, and body length. A point-of-measure sketch often prevents more disagreement than a long written note.
Inspection reference | What must be confirmed | Risk when missing |
Tech pack | Style details, construction, revision date | Production follows an outdated design |
Measurement chart | Points of measure, grading and tolerances | Inspectors measure from different positions |
Approved sample | Fit, silhouette, workmanship and trim placement | Flat measurements pass while appearance fails |
Fabric approval | Composition, weight, stretch, shade and hand feel | Bulk material performs differently from the sample |
Trim standard | Zipper, elastic, cups, boning and labels | Function, support or fit changes in production |
Packing guide | Folding, polybag, barcode and carton ratio | Correct garments become commercially unusable |
Defect criteria | Critical, major and minor definitions | Pass-or-fail decisions become inconsistent |
Confirm the Approved Sample
The approved sample provides information that written specifications cannot fully express. It shows how closely the dress should follow the body, where the waist should sit, how the neckline should lie, how side seams should hang, and how the fabric should recover after movement. For highly fitted products, visual and functional references are just as important as numbers.
The quality team should identify which sample controls production. A fit sample may define shape, while a pre-production sample defines final materials and construction. A size-set sample may define grading. If several samples exist, their purposes must be clearly marked. Each approved sample should carry the style number, size, color, approval date, and status. Any accepted deviation should be documented rather than remembered verbally.
Production garments should be compared with the sample in three conditions: flat on a table, displayed on a suitable form, and worn by an approved fit model when possible. A bodycon dress can appear acceptable while flat yet show twisting, transparency, neckline gaping, uneven tension, or poor cup placement when worn. Inspectors should pay particular attention to ruching density, bust shaping, mesh transparency, zipper flatness, seam appearance, lining coverage, and overall compression.
Prepare the Right Tools
A tape measure alone is not enough for fitted stretch garments. Inspectors should have a flat measurement surface, calibrated measuring tape, rigid ruler, adequate lighting, approved color standard, camera, barcode scanner, and suitable equipment for checking stretch or seam performance. Where the buyer requires fabric weight, attachment strength, metal detection, or needle control, those tools and methods should be defined before production begins.
The measuring tape should be checked regularly because worn tapes can stretch and create systematic errors. Garments should be allowed to relax before measurement, especially after compression in bundles, cartons, or transport bags. Measuring immediately after unpacking can produce misleading results. Knit garments must lie naturally without being pulled, smoothed aggressively, or forced into tolerance.
A practical inspection station provides neutral lighting, enough table space to lay the garment flat, and room to compare several sizes or colors. Strong backlighting helps identify transparency, needle holes, fabric thinning, and shade variation. Tools only add value when the method is repeatable: another trained inspector using the same references and procedure should reach a comparable result.
Set the Inspection Plan
Inspection depth should reflect the style’s risk rather than follow the same routine for every dress. A simple double-knit sleeveless bodycon style may require fewer checkpoints than a lined mesh dress with underwire cups, boning, cut-outs, adjustable straps, and hand-applied stones. The plan should be written before production, not invented after defects appear.
High-risk conditions include new fabrics, light colors, high stretch, wide size ranges, complex bust structures, mixed materials, new production lines, large order quantities, and short delivery schedules. These styles benefit from earlier first-piece approval and more frequent inline measurement and workmanship checks. Low-risk styles still need control, but resources should be concentrated where failure would be most expensive.
The inspection plan should identify when measurements will be taken, which sizes and colors will be reviewed, how units will be selected, and who has authority to release production or shipment. It should also define when a failed result requires sorting, repair, technical review, or reinspection. Strong quality systems do not rely on finding defects at the end; they stop defects from spreading through the order.
How Do You Check Fabric Performance?
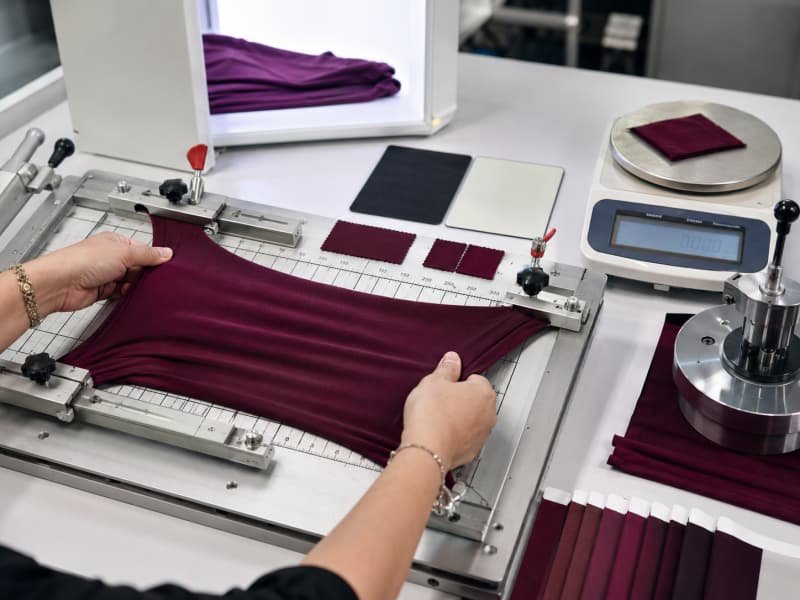
Fabric performance should be checked in both relaxed and stretched conditions. Confirm the approved composition, weight, structure, shade, stretch direction, recovery, opacity, shrinkage, and surface stability. Bodycon dresses place continuous tension on the material, so a fabric that looks acceptable on a roll may still fail after wearing, washing, or repeated movement.
Verify the Material
Start by comparing the bulk fabric with the approved swatch, lab dip, strike-off, or pre-production sample. The check should include color, weight, usable width, surface, luster, hand feel, stretch direction, and construction. Fiber composition alone does not predict performance. Two fabrics labeled polyester and elastane may have very different recovery, density, opacity, compression, and sewing behavior because of differences in yarn, knit structure, elastane ratio, heat setting, or finishing.
Inspect multiple rolls and several positions within each roll. Shade can vary from roll to roll, edge to center, or beginning to end. A fitted dress makes these differences more visible because the fabric stretches over the body and reflects light differently. Rolls should be shade grouped before cutting so that front, back, sleeves, and panels within one garment come from compatible lots.
Fabric faults such as barre marks, dropped stitches, holes, creases, oil marks, and uneven dyeing should be identified before cutting. A small defect that is difficult to see on relaxed fabric may become obvious across the bust, seat, or thigh. Directional fabrics also need control. Velvet, brushed knits, satin surfaces, and materials with directional shine must be cut consistently or panels may appear to be different colors even when they come from the same roll.
Measure Stretch and Recovery
Stretch indicates how far a fabric extends; recovery shows whether it returns to its original dimension. Both must be considered together. Stretch percentage can be calculated as: (extended length – original length) ÷ original length × 100. If a 10-centimeter specimen extends to 14 centimeters, it has 40% stretch in that direction. Widthwise and lengthwise values should be tested separately because most knits do not behave equally in both directions.
Recovery should be checked after the fabric is held at a defined extension and then released. If the same 10-centimeter specimen returns to 10.3 centimeters, it has 3% residual growth. The acceptable result must follow the approved material standard, but lower residual growth generally indicates better shape retention. Test conditions should define the specimen size, target extension or force, holding time, recovery time, and number of cycles.
Many commercial bodycon fabrics may provide roughly 20% to 60% stretch in at least one direction, but that range is not a universal acceptance standard. The right value depends on pattern reduction, intended compression, lining, construction, size range, and wearer comfort. A fabric with high stretch but weak recovery may fit initially and then become loose. A firmer fabric with moderate stretch may produce a better silhouette when the pattern is engineered correctly.
Performance check | Practical method | What failure may cause |
Width stretch | Extend a marked specimen across the course direction | Excessive tightness, transparency or poor hip fit |
Length stretch | Extend vertically along the wale direction | Body-length distortion or shoulder pulling |
Immediate recovery | Measure shortly after release | Bagging at hips, seat, elbows or waist |
Cyclic recovery | Repeat the approved extension several times | Loss of compression during wear |
Seam extension | Stretch the sewn seam in its wear direction | Thread cracking, seam grinning or opening |
Edge recovery | Extend neckline, armhole or hem edge | Wavy openings or permanent flare |
Check Opacity Under Tension
Opacity must be evaluated while the fabric is stretched to its approximate wear condition. A material that looks solid on the cutting table may become transparent across the bust, full hip, seat, or upper thigh. Check the fabric over both light and dark backgrounds, then inspect the completed garment under normal indoor lighting and stronger backlighting. Light colors, low-density jerseys, mesh combinations, and fabrics with strong surface shine deserve extra attention.
The evaluation should distinguish between intentional and unintended transparency. A mesh waist panel may be a design feature, while visible underwear through the main skirt body is usually a product failure unless clearly approved. Photographs should be taken under controlled, repeatable lighting because exposure settings can exaggerate or hide the problem.
Lining must be assessed with the shell. A lining that is too short can create a visible horizontal line. A lining with inadequate stretch can restrict the garment and cause ride-up. A lining that is too dark may show through a pale outer layer. Needle holes and seam openings should also be checked under tension. Even when the main fabric is opaque, enlarged stitch holes can create visible lines along side seams, darts, or zipper areas.
Test Stability and Color
Dimensional-stability testing should follow the care method intended for the finished garment. Record critical measurements before and after washing, drying, steaming, or dry cleaning, depending on the care label. Review length and width change, skew, spirality, seam puckering, surface change, and lining movement. Shell fabric, lining, elastic, binding, interfacing, and thread should respond compatibly.
When one component changes more than another, necklines may roll, hems may twist, and seams may pucker. A flexible shell paired with a rigid or unstable lining can also change fit after care. Testing the complete garment is especially valuable for styles with multiple materials, heat-bonded components, glued stones, or structured bust details.
Color performance should reflect actual use. Dark fitted dresses experience close contact and repeated friction, so rubbing and perspiration resistance may be important. Color transfer can affect underwear, skin, furniture, packaging, or adjacent light-colored panels. Contrasting materials should be evaluated together: black lining beneath white mesh, dark binding on a pale dress, or printed panels beside solids may create migration risks during heat exposure or storage.

How Do You Inspect Fit and Shape?
Bodycon fit should be assessed through measurements, fabric behavior, body balance, comfort, and movement. Measure the garment flat, then review it on the approved body size. A correct fit follows the intended silhouette without uncontrolled pulling, gaping, twisting, transparency, excessive pressure, or permanent deformation after wear.
Check Critical Measurements
The most important measurements are those that control body contour and garment position. Bust, underbust, waist, high hip, full hip, shoulder, armhole, body length, and hem opening usually carry more fit risk than minor decorative dimensions. The garment should be relaxed and placed flat without pulling. Inspectors should follow the approved point-of-measure method and avoid stretching the garment into tolerance.
Curved edges, elastic openings, ruched panels, and lined sections require consistent handling. A repeated result outside tolerance should be confirmed by a second measurement, but the fabric should not be massaged or pulled until it passes. Record the garment’s natural condition. For elasticated points, the specification should state whether the measurement is relaxed, extended, or both.
A failure at one point can create symptoms elsewhere. An undersized hip may push the entire dress upward, making the body length appear too short. Excessive bust tension may pull the neckline open or move the side seam forward. Repeated deviations across one size usually indicate a pattern, grading, cutting, or elastic-control issue rather than isolated sewing variation.
Measurement point | Typical fit effect | What to inspect |
Bust | Compression, flattening or gaping | Width, shaping, cup position and fabric tension |
Underbust | Support and bodice stability | Seam position, circumference and elastic control |
Waist | Silhouette and garment anchoring | Width, level and recovery |
High hip | Transition from waist to seat | Smooth contour without horizontal folds |
Full hip | Mobility, opacity and ride-up | Width, extension and recovery |
Armhole | Comfort and coverage | Gaping, cutting and binding tension |
Strap length | Neckline height and support | Finished length, symmetry and adjustability |
Body length | Waist and hem position | High shoulder point to hem |
Hem opening | Walking comfort | Circumference and seam elasticity |
Slit length | Coverage and movement | Opening position and reinforcement |
Evaluate Negative Ease
Negative ease means the garment is smaller than the wearer’s corresponding body measurement. This allows the fabric to stretch and create a fitted silhouette. The amount of reduction must be matched to fabric extension and recovery. It should not be applied as one fixed percentage across every material. A dense compression knit, a soft rayon jersey, and a lined mesh fabric behave differently even when their flat measurements are similar.
Too little negative ease can produce a loose sheath shape. Too much can create shine, transparency, seam strain, restricted breathing, visible pressure lines, or constant ride-up. Inspectors should review not only circumference but also where the tension is distributed. Deep horizontal folds, opening needle holes, strained zipper teeth, or strong pulling at the front armhole often show that one area is absorbing too much force.
The shell and lining should be evaluated separately and together. A flexible shell can still feel unwearable if the lining is too small or lacks stretch. Internal components such as power mesh, elastic, cups, boning, and stay tape can change the effective fit. Negative ease is correct only when the dress looks intentional, feels wearable, supports the design, and returns to shape after movement.
Review Body Balance
A balanced dress remains centered and level on the body. The center front and center back should stay aligned, side seams should remain near the natural side, and the waist and hem should sit as intended. Inspect from the front, back, and both sides. Check whether one shoulder is higher, the neckline rotates, the waist rises, the center-back zipper curves, or one side seam moves forward.
Balance problems may come from pattern shape, cutting direction, sewing, fabric recovery, or fit distribution. Pressing can temporarily hide some issues, so the dress should be reviewed again after walking and sitting. A side seam that moves forward may indicate insufficient front width or excess back width. A hem that rises at the back may result from inadequate seat shaping rather than an uneven hem.
Ruching, cut-outs, cups, and panel seams should appear balanced relative to the body, not merely symmetrical while flat. Photographs should be taken from consistent distances and angles. Comparing images from sample rounds often reveals small changes in posture, garment position, or tension that are difficult to remember accurately during a long development cycle.
Run a Wear Test
A wear test should include more than standing in front of a mirror. The fit model should walk at least ten steps, sit on a standard-height chair, stand without adjusting the garment, raise both arms, bend moderately, rotate the upper body, and take a longer step. The team should observe what happens before movement, during movement, and after the fabric has had time to recover.
For mini bodycon dresses, upward movement is a major commercial concern. Marking or photographing the hem position before and after walking can provide useful evidence. Strapless styles should be checked for downward movement, while long-sleeve styles need attention at the underarm and elbow. Zippers should remain flat, cups should remain positioned, and straps should not slip or cut into the body.
Comfort comments should be specific. “Too tight” is less useful than “pressure is concentrated at the front armhole” or “the lining restricts movement at the high hip.” A practical test also reviews breathing, sitting comfort, coverage, transparency, and the need for repeated adjustment. A dress that looks attractive only while the wearer remains still is not ready for bulk approval.

Which Construction Defects Matter Most?
Construction defects matter most where the dress is exposed to stretch, pressure, friction, and movement. Inspect seam elasticity, stitch quality, symmetry, zipper function, trim security, lining, and internal finishing. A seam may look clean while relaxed yet fail when the wearer moves, so appearance and performance should always be checked together.
Test Seam Compatibility
The seam must stretch with the fabric without cracking, breaking, opening, or creating permanent waviness. Stitch type, thread, needle, tension, seam allowance, differential feed, and machine settings all influence performance. Depending on the design, construction may use overlock seams, coverstitching, chain stitch, stretch-adjusted lockstitch, elastic application, binding, or reinforced joining.
Inspectors should extend the seam in the same direction it will be stressed during wear. Listen for thread cracking and look for skipped stitches, enlarged needle holes, seam grinning, or broken thread. The test should be controlled rather than aggressive; the purpose is to reproduce realistic garment extension, not to tear the product beyond its intended use.
High-risk areas include underarms, side seams, zipper ends, slit tops, strap attachments, mesh joins, ruching anchors, cup seams, and tight sleeve openings. Very dense stitching can perforate delicate fabric, while low stitch density may weaken the seam. Excessive thread tension restricts extension; loose tension creates poor appearance and unstable joining. Reinforcement should be strong but discreet because bulky bartacks and patches can show through smooth bodycon fabrics.
Identify Sewing Defects
Close-fitting dresses make small sewing problems more visible. Seam puckering, uneven feeding, or minor twisting can become pronounced when the garment stretches over the body. Inspect both sides for broken stitches, skipped stitches, open seams, uneven seam allowance, needle damage, raw edges, untrimmed threads, wavy seams, oil marks, shine, and press impressions.
Seam puckering should not be accepted simply because it can be pressed flat temporarily. If it returns under tension, the underlying issue may involve thread tension, differential feeding, material shrinkage, or operator handling. Pressing is a finishing process, not a substitute for correct sewing settings.
Needle damage requires careful attention in fine jersey and mesh. Tiny holes can expand during wear or laundering. Apply gentle tension around suspicious areas and inspect under suitable light. Repeated defects should be traced to the operation, machine, line, or bundle. “Skipped stitches found” is less useful than “skipped stitches repeatedly found at the left underarm overlock operation.” Inline data should lead to correction while production is still running.
Check Symmetry and Placement
Compare left and right shoulder lines, straps, armholes, bust seams, darts, princess seams, ruching, cut-outs, mesh panels, slits, and hem curves. Symmetry should be measured from fixed reference points. A garment may look balanced at first glance while one strap is longer, one cup sits higher, or one side seam begins at a different position.
Ruching requires control of elastic length, gather density, start point, end point, and visual distribution. Two sides can have identical finished lengths but still look different because the gathers are unevenly spread. Decorative placement should also be checked under tension. Crystals, sequins, prints, and appliqués may separate differently when the fabric stretches.
Engineered prints, stripes, and central motifs require agreed alignment standards, particularly at center front, bust seams, and side joins. Asymmetrical designs must still be consistent. One-shoulder necklines, diagonal cut-outs, and uneven hems should reproduce the approved pattern rather than vary freely from garment to garment. Intentional asymmetry is controlled design, not an exemption from measurement.
Inspect Trims and Inside Work
Operate zippers repeatedly through their full length. Check whether the slider catches, the teeth separate, or the zipper creates rippling. Invisible zippers should lie flat without being stitched so closely that the slider traps fabric. Hooks, snaps, rings, sliders, cups, boning, elastic, and decorative components should be checked for placement, security, comfort, and function.
Strap adjusters should hold their position under tension. Boning ends should be covered and secured. Cups should not crease, shift, or show unevenly through the outer fabric. Attachment tests should follow the buyer’s requirement, especially for stones, beads, metal trims, and narrow straps that carry significant load.
Turn the garment inside out. The lining should not twist, hang below the shell, restrict stretch, or create bulky ridges. Seam ends, zipper backing, elastic joins, label edges, and repair areas should be clean and secure. A stiff care label at the waist or side seam can become uncomfortable because the garment holds it close to the skin. Interior quality often reveals whether the dress was produced with control or only made to look acceptable from the outside.

How Should Bulk Inspection Be Run?
Bulk inspection should be carried out in stages: first-piece approval, inline inspection, end-line review, and final random inspection. Each stage serves a different purpose. Early checks prevent repeated defects, inline checks control process variation, end-line checks confirm finished quality, and final inspection determines whether the packed lot meets the agreed acceptance standard.
Approve the First Piece
The first completed production garment should be checked before unrestricted sewing begins. This review confirms that the production line can reproduce the approved sample using actual bulk materials, machines, operators, folders, guides, and settings. It is the bridge between sample-room craftsmanship and repeatable production.
Check measurements, seam construction, thread, elastic length, zipper position, lining, labels, pressing, and overall appearance. For high-stretch styles, test seam extension and review the garment on a form or fit model. The review should focus on differences between sample and production conditions. Sample machinists may use different equipment or handling methods, and a detail that worked at sample speed may become unstable on a production line.
Comments must be specific. “Improve workmanship” is not an instruction. State the affected operation, required correction, and approval condition. The corrected first piece should be checked again before release. Approval should be signed or digitally recorded by the authorized technical or quality representative. This control is especially important for new fabrics, new lines, complex bust structures, unusual trims, and tight delivery schedules.
Inspect Production In Line
Inline inspection should occur while garments are being assembled, not only after they are complete. This allows the team to identify defects at the operation where they begin. Useful checkpoints include panel joining, bust shaping, strap attachment, elastic application, zipper insertion, side seams, ruching, mesh joining, hemming, decoration, and labeling.
Inspectors should record the defect type, operation, line, bundle, size, color, and quantity. This makes it possible to separate a one-off mistake from a repeated process problem. Measurements should also be checked during production. Fabric handling, elastic tension, incorrect notches, or feeding differences can cause dimensions to drift even when the cutting components started correctly.
A practical corrective cycle is to isolate affected work, identify the source, adjust the machine or method, approve a corrected example, and review earlier production that may contain the same fault. Inspection frequency should increase when repeated defects appear. Once the process is stable, the interval can return to the planned level. The purpose is not to collect defect numbers; it is to stop bad production before it becomes a large repair problem.
Complete End-Line Checks
End-line inspection evaluates completed garments before packing. The inspector should confirm appearance, measurements, seam quality, symmetry, closure function, cleanliness, labels, and pressing. Zippers, hooks, snaps, and adjustable straps should be operated. Relevant seams should be extended gently, and the lining should be checked for twisting, restriction, or exposure.
Light-colored garments require careful review for oil, chalk, dirt, pen marks, discoloration, and unintended transparency. Pressing should improve presentation without altering dimensions or damaging elastane. Excessive heat can produce shine, flatten texture, activate adhesive, distort cups, or reduce fabric recovery.
Failed garments should be physically separated into repairable, rejected, and passed groups. Clear identification prevents defective pieces from returning to the packing flow. End-line data should be reviewed by production management. A high repair percentage often shows that inline control was too late or corrective action was ineffective. Repair teams have a role, but they should not become the factory’s primary quality-control system.
Conduct Final Random Inspection
Final inspection should take place when the agreed percentage of production is finished and packed. Samples must be selected randomly across cartons, sizes, colors, production lines, and packing positions. The plan should define the lot size, inspection level, sample quantity, critical-defect tolerance, major and minor AQL limits, and acceptance or rejection numbers.
A commonly used commercial arrangement may apply zero tolerance to critical defects and separate AQL values such as 2.5 for major defects and 4.0 for minor defects. These values are examples, not universal rules. The brand’s approved quality agreement always controls the decision. Inspectors should not accept cartons specially prepared for inspection because random selection protects the credibility of the result.
Final inspection should include quantity verification, measurements, workmanship, function, labels, barcode scanning, packaging, carton assortment, and shipping marks. A failed result should place the lot on hold. Depending on the problem, the next step may involve sorting, repair, replacement, technical review, or reinspection. Delivery pressure should never quietly change the acceptance standard after production is complete.

What Makes a Bodycon Dress Pass?
A bodycon dress passes when it meets approved requirements for measurements, fit, fabric performance, workmanship, function, labeling, and packaging without exceeding the agreed defect limits. The decision should be based on recorded inspection evidence, not personal preference or shipment urgency. Any unresolved safety, fit, or commercial issue should be closed before release.
Classify Defects Correctly
Defect classification should consider safety, function, appearance, durability, location, and customer impact. The same condition can carry different severity depending on where it appears and how it affects the garment. A small hole at center front is not equivalent to a minor internal stitch irregularity. A loose thread is not equivalent to an opening seam at the hip.
Critical defects normally involve safety, legal, or serious compliance risk and require immediate escalation. Major defects affect fit, function, durability, or saleability and are likely to cause a return or rejection. Minor defects are smaller deviations that do not materially reduce use, but they still count because numerous small issues can damage perceived quality and reveal weak process discipline.
Inspectors should use an approved defect library with photographs and definitions. This improves consistency across factories, lines, regions, and third-party inspection teams. When classification is uncertain, the observation should be documented and escalated to the authorized quality representative instead of being guessed or downgraded for convenience.
Defect class | Practical meaning | Bodycon dress examples |
Critical | Safety, legal or serious compliance risk | Sharp exposed boning, broken needle, prohibited component or serious contamination |
Major | Likely to cause return, rejection or inability to wear | Broken seam, wrong size, zipper failure, severe transparency or major fit imbalance |
Minor | Small deviation without major effect on use | Loose thread, slight hidden stitch irregularity or minor pressing variation |
Observation | Not a defect yet, but worth monitoring | Early seam waviness or a shade trend still within the approved range |
Decide Pass or Fail
A garment should not pass simply because most measurements are within tolerance. Fit, function, appearance, and material performance must be considered together. A dress can measure correctly but fail because the fabric becomes transparent. It can look attractive while standing but fail because the hem rises excessively during walking. It can have clean-looking seams but fail because the thread cracks under realistic extension.
The lot decision should reflect the agreed sampling plan and buyer-specific requirements. Critical issues, systematic measurement failures, or repeated construction problems may require action even when the numerical defect count has not yet exceeded the standard. Inspectors should separate isolated defects from systemic problems. One uneven hem may be a sewing error; the same imbalance across multiple sizes may indicate a pattern or cutting issue.
A pass decision means the sampled lot meets the agreed commercial standard. It does not mean no imperfection exists. A hold decision is appropriate when technical clarification, testing, repair, or additional sampling is required. Releasing or rejecting immediately is not always the only responsible choice, but unresolved risks should never be hidden behind schedule pressure.
Correct Failed Garments
Correction should address both the affected units and the process that produced them. First, isolate the potentially affected quantity. Identify the defect, production period, operation, line, size, and color. Review whether the issue comes from material, pattern, cutting, sewing, finishing, packing, or an unclear specification.
The repair method should be approved before mass rework. Opening a seam can reduce seam allowance, leave needle holes, damage mesh, disturb embellishment, or change measurements. In some cases, replacement is safer than repair. After rework, inspect the original defect and every new risk created by the correction. A repaired zipper may function but leave puckering; a shortened strap may correct the neckline while creating uneven reinforcement.
Corrective records should state the root cause, immediate action, affected quantity, reinspection result, and preventive measure. Where the problem is systematic, production should not resume until a corrected example has been approved. Repeated repair without process correction wastes time, reduces margin, and hides a weak production system rather than improving it.
Provide Clear Evidence
Inspection reports should allow the brand team to understand the result without being physically present. The report should include the style, order, color, size range, inspection date, location, completion percentage, reference documents, sample quantity, measurement results, defect counts, photographs, packing status, and final decision.
Measurement reports should show the specification, tolerance, actual result, and pass-or-fail status. Repeated failures should be highlighted by size or point of measure. Photographs should show both detail and location. A close-up of a broken stitch is more useful when another image shows whether it appears at the side seam, underarm, hem, or zipper.
Fit observations should describe what happened during movement rather than use vague phrases. “Hem moved upward by approximately 4 centimeters after walking and did not fully return” is more actionable than “dress rides up.” Clear evidence protects the brand, manufacturer, and quality team. It also becomes a valuable reference for repeat orders, claims, supplier evaluation, and continuous product improvement.
Plan Quality Before Production Starts
Bodycon dress quality cannot be inspected into a product after every unit is sewn. It must be built into the tech pack, material selection, pattern, sample approval, production settings, and inspection plan. The strongest programs connect fabric behavior with negative ease, fit balance, seam extension, movement, grading, and packing rather than treating each item as an isolated checklist point.
For brand teams, the practical question is not whether a factory can make one attractive sample. It is whether the manufacturer can repeat the approved fit and appearance across sizes, colors, production lines, and later replenishment orders. That requires disciplined references, early technical review, production-stage inspection, and evidence-based release decisions.
Duolan Apparel focuses on fashion dresses, occasion dresses, party dresses, body-conscious and fitted silhouettes, fashion sets, and refined fashion tops. Its documented manufacturing system is supported by more than 30 years of dress-development experience, 16 owned apparel factories, 20+ coordinated satellite factories, 300 sewing lines, and 50+ flexible production lines. These resources are organized around product development, sampling, fit correction, bulk manufacturing, quality control, and repeat-production support for established fashion brands and product teams.
Share:
Our Services
Categories
Table of Contents
Here, developing fashion collections is more than manufacturing garments — it’s a collaborative process focused on transforming ideas into well-executed, market-ready products. From fabric sourcing and sample development to scalable production and delivery coordination, every stage is built to support quality, consistency, and efficient collection launches across global markets.

