Skip to content

Fit-and-Flare Dress Construction: How Is the Silhouette Built from Pattern to Bulk Production?
Your trusted Women’s Apparel Development & Manufacturing Partner from China
- Jerry
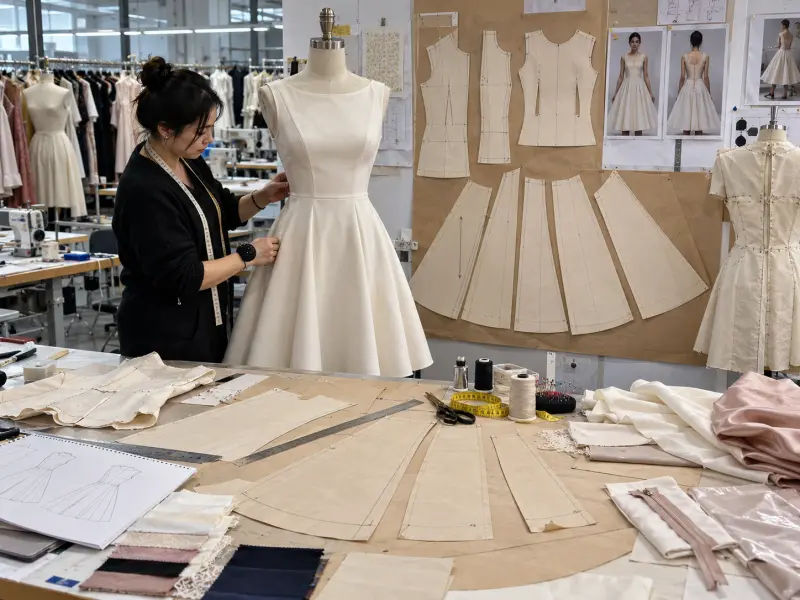
A fit-and-flare dress looks uncomplicated on a hanger: the upper body appears neat and controlled, the waist looks defined, and the skirt opens into an easy, feminine shape. On a fitting model, however, that simple outline becomes a chain of technical decisions. A bodice that is 10 mm too long can lower the waist visually; a soft fabric can collapse flare that looked generous on paper; a princess seam can technically match its measurement while still pulling forward because the bust volume sits in the wrong place. Construction is therefore less about joining a fitted top to a wide skirt and more about balancing shape, fabric behavior, grain, seam placement, internal support, and production repeatability.
Fit-and-flare dress construction combines a shaped bodice with deliberately increasing volume below the waist or high hip. The silhouette is built through darts or panel seams, controlled bust and waist balance, skirt geometry, grain direction, fabric drape, lining, closures, and finishing. A successful pattern keeps those elements working together so the dress remains fitted above, fluid or structured below, and visually consistent across sizes and production runs.
The most revealing moment often comes after the first sample is finished. Two dresses can share nearly the same sketch, yet one hangs cleanly while the other twists, drops at the front hem, loses waist definition, or develops zipper rippling. The difference is rarely one dramatic error. It is usually several small decisions adding up. Understanding those decisions is what turns fit-and-flare construction from a sewing method into a reliable product-development system.
What Defines Fit-and-Flare Dress Construction?
Fit-and-flare construction uses controlled shaping above the flare point and deliberate volume below it. The fitted area can come from darts, princess seams, panels, stretch, or a combination of these methods, while the skirt can use A-line, circular, gored, or continuous-panel geometry. What defines the style is the visible transition from upper-body control to lower-body expansion, not one mandatory seam or pattern formula.
What Creates the Fit-and-Flare Silhouette?
The silhouette begins with contrast. The upper part of the dress must follow the torso closely enough to establish a clear bust and waist shape, while the lower section must move away from the body with enough volume to be read as flare. That does not mean the bodice has to be skin-tight. A structured woven dress may include comfortable positive ease and still look fitted when the darts, princess lines, side seams, and waist position are balanced correctly. A stretch version may sit much closer to the body, but the same visual principle applies: the upper section establishes control before the skirt releases into greater volume.
Pattern geometry determines where that change becomes visible. A natural-waist construction creates the classic shape, with an obvious difference between bodice and skirt. A lower flare point lengthens the torso visually and can make the style feel more streamlined. On a mini dress with roughly 400-500 mm between waist and finished hem, moving the flare point by only 20-30 mm can noticeably change proportion because that adjustment uses a meaningful share of the available skirt length. On midi and maxi styles, the same movement may be less obvious near the waist but can still alter how the skirt falls over the hip and how much sweep is perceived at the hem.
The most useful development references are not limited to bust, waist, and total length. Teams should also record waist level, high-hip circumference, flare-start position, side-seam length, and finished hem sweep. Those measurements create a repeatable description of the silhouette. Without them, comments such as “make it fuller” or “make the waist more fitted” can trigger unnecessary changes because different people may interpret the same visual request in different ways.
Is a Waist Seam Always Required?
A visible waist seam is common, but it is not essential. Separating the bodice and skirt is popular because it gives the pattern maker two manageable systems. The bodice can be refined for bust shape, waist suppression, neckline stability, and closure placement, while the skirt can be developed independently for flare, movement, and hem sweep. Once both sections are approved, they are joined at a fixed waist reference. This approach also makes it easier to create related styles by combining one approved bodice with several skirt shapes during collection development.
Continuous-panel construction creates the same general silhouette without a horizontal waist seam. Princess lines or shaped vertical panels can continue from the shoulder or armhole through the waist and open gradually toward the hem. Visually, this can make the body appear longer and cleaner because there is no horizontal break. Technically, however, it transfers more responsibility to the vertical seams. Grain direction, panel curvature, seam feeding, and pressing have to remain controlled over a much greater length. If one panel grows during sewing, the imbalance can travel from the bodice into the skirt rather than being contained below a separate waist join.
Construction Type | Typical Flare Start | Practical Advantage | Main Development Risk |
Separate bodice + A-line skirt | Natural waist | Easy fit and skirt control | Waist seam mismatch |
Separate bodice + circular skirt | Natural waist | Strong movement and sweep | Bias growth and uneven hem |
6-8 gore construction | Waist or high hip | Precise volume distribution | Panel imbalance |
Continuous princess panels | Waist through hip | Clean uninterrupted silhouette | Twisting or uneven seam growth |
The choice should therefore be made from the product backward. A style that needs fast, repeatable production in a firm woven may benefit from a separate waist seam. A cleaner occasion dress may justify continuous panels if the fabric and production team can control them reliably. Neither method is inherently more premium; the stronger construction is the one that supports the intended fit, fabric, and manufacturing process without creating avoidable instability.
How Does Fit-and-Flare Differ from A-Line?
An A-line dress usually widens gradually from the upper body, waist, or high hip and may use relatively little waist suppression. A fit-and-flare dress creates a stronger visual contrast between the controlled upper section and fuller lower section. In retail language the categories can overlap, but the distinction remains useful in product development because a fit-and-flare silhouette is generally more sensitive to bust position, waist level, bodice length, and the exact point where the skirt begins to open.
This difference becomes especially important during grading. An A-line dress can tolerate a little more waist ease and still preserve its identity because gradual expansion is already part of the silhouette. A fit-and-flare dress can lose its character if waist increments become too generous relative to the bust and skirt. The larger sizes may begin to read as straight or loose even when every individual measurement follows the size chart. Maintaining the design therefore requires attention to proportional relationships, not only absolute measurement increases.
The skirt should also be judged together with the bodice. More hem circumference does not automatically create a better fit-and-flare shape. If the upper body is too loose, adding a larger circle or wider gore can actually make the lack of waist definition more obvious. The strongest silhouette usually comes from approving the upper-body balance first, then refining the transition area, and only then deciding how much lower volume is needed for the intended visual effect.
How Is the Fitted Bodice Constructed?
A fitted bodice is built by placing shape where the body needs it rather than simply reducing circumference. Darts, princess seams, panel seams, stretch, and internal support distribute bust projection and waist suppression while keeping the shoulder, side seam, neckline, and center lines balanced. A bodice can match the measurement chart and still fit poorly when that volume is positioned incorrectly.

Which Shaping Method Works Best?
Darts are one of the most efficient methods for shaping a woven bodice. A side bust dart, waist dart, or combination of both can remove excess fabric while keeping the outer surface visually simple. This approach works well for minimal day dresses and clean occasion styles where the design should not be dominated by seam lines. Darts also reduce the number of pattern pieces and sewing operations, which can help control labor and variation when the fabric presses cleanly and the required bust shaping is not extreme.
Princess seams distribute shaping over a longer line and offer more local control. Because the seam can pass through or close to the bust apex and continue toward the waist, the pattern maker can alter bust projection without changing the entire side seam. Waist contour can also be refined independently. This is particularly useful on close-fitting occasion dresses where a smooth three-dimensional body shape matters more than a flat, minimal surface. The same principle explains why princess seams are often used on styles that need more cup accommodation or more exact control over front-body balance.
Panel construction extends the idea further. A six-panel or eight-panel bodice can distribute shaping around the torso so no single seam has to carry a large amount of suppression. The benefit is a smoother contour and greater design flexibility. The cost is complexity. More panels mean more cutting operations, more seam allowances, more matching points, and more opportunities for feed variation. A design should therefore earn its seam count. A simple commercial dress may not need eight panels, while a structured style with a sculpted waist may justify them because the extra control visibly improves the garment.
How Is Bust and Waist Balance Controlled?
Bust and waist balance is not simply the numerical difference between two circumferences. The pattern must place the required volume at the correct height and distribute suppression without pulling the garment off its natural balance. Bust apex height, bust-point spacing, front length, back length, side-seam shape, and the amount removed at each dart or panel all influence how the dress sits. When these relationships are wrong, the garment can feel tight in one area and loose in another even though total measurements appear acceptable.
A common fitting mistake is removing too much waist width at the side seam because the side seam is easy to reach during adjustment. The waist may become smaller, but the seam can rotate toward the front and the bust may lose the projection it needs. Concentrating too much shaping in one princess seam can create a sharp ridge or hollow instead of a smooth contour. Similarly, insufficient front length over the bust may cause the waist seam to rise at center front while remaining level at the side, making the entire dress appear tilted.
For close-fitting styles, adjustments of 5-10 mm can be visually meaningful around the bust apex, side seam, waist level, or neckline. That does not mean every finished measurement should automatically be assigned a 5 mm production tolerance. It means these locations are sensitive enough to deserve careful fitting and clear comments. Instead of writing “waist too loose,” a stronger fit comment identifies where the extra room sits: center back, side waist, front princess seam, or evenly around the body. That level of detail reduces unnecessary pattern changes and often shortens sample revision cycles.
How Do Necklines and Closures Affect Fit?
Necklines and closures are often treated as finishing details, but on a fitted bodice they are part of the structure. A high round neckline retains more fabric around the upper torso, while a deep V-neck, wide square neck, sweetheart neckline, or off-shoulder shape removes support from areas that would otherwise help stabilize the garment. As the neckline opens, the remaining shoulder, side, lining, facing, or internal support has to carry more of the job of keeping the bodice in place.
Stabilization should match the material rather than follow a single recipe. A lightweight woven may need narrow fusible support or stay tape at a neckline, while a stretch style may use elastic support in carefully controlled tension. A facing should be wide enough to remain stable but not so heavy that it creates a visible hard edge. On very fluid fabrics, even a narrow support strip can change hand feel, so testing is more useful than assuming that additional reinforcement always improves quality.
The zipper also affects fit. Zipper tape is more stable than many fashion fabrics, and installing it into soft satin, crepe, or a slightly bias-prone seam can create rippling when tension is not controlled. Waist matching where an invisible zipper crosses a seam is especially visible. On a clean solid-colored dress, a 3-5 mm step can already attract attention even if the overall garment is within a broad measurement tolerance. Closure length matters too: a zipper that is technically functional but too short can make a strongly fitted waist difficult to put on, creating a usability problem that may not appear during flat inspection.
How Is the Bodice Adjusted for Different Fabrics?
A paper pattern does not have one fixed fit independent of fabric. Firm wovens create shape mainly through pattern geometry because the material contributes little stretch, while stretch wovens and jerseys can accommodate the body through both shaping and extension. The important measurement is not only how far a fabric stretches, but how well it returns after being stretched. A material with generous extension but weak recovery may look excellent during the first fitting and become progressively looser around the waist, armhole, or neckline after several hours of wear.
A simple development reference can begin with a 100 mm marked length. If the fabric reaches 120 mm under a consistent hand test, it shows approximately 20% extension in that direction. This does not replace laboratory testing, but it gives the sample and pattern teams a common language that is more useful than describing the material as “quite stretchy.” The test should be repeated in both directions when relevant, because many fabrics behave differently across width and length.
Weight and drape should be reviewed at the same time. A heavy fabric creates more vertical load and can pull the bodice downward, while a light fabric may expose excess ease because it lacks the weight that was previously helping the garment settle. When a brand changes from one fabric to another after sample approval, the safest assumption is that the pattern needs to be reviewed again. Treating fabric substitution as a purchasing decision only can create avoidable fit changes in the next sample or production batch.
Which Skirt Construction Creates the Right Flare?
The right skirt construction creates the intended amount of volume in the intended location without making the garment difficult to control. A-line patterns give restrained expansion, circular patterns create stronger movement, and gored or panelled skirts allow flare to be distributed with more precision. The decision should consider flare start, hem sweep, grain direction, fabric behavior, skirt length, and production repeatability together.

How Do A-Line and Circle Skirts Differ?
An A-line skirt widens gradually through angled side seams or shaped panels. Much of the pattern remains relatively close to straight grain, so the skirt is generally easier to cut, sew, press, and hem consistently. This makes A-line construction useful when the design needs visible flare without dramatic movement, or when the fabric is sensitive to bias growth. It can also be more economical because pattern pieces are often easier to place efficiently within the usable fabric width than large circular sections.
Circular skirts create volume through geometry. A quarter-circle, half-circle, three-quarter-circle, or full-circle pattern progressively increases sweep and movement. As the circle becomes fuller, more of the hem is cut on bias or near-bias grain. That produces the fluid swing many designers want, but it also makes the finished length more sensitive to gravity. Viscose, rayon, lightweight satin, and other fluid fabrics can lengthen unevenly as bias sections relax, even when the raw pattern pieces were cut to identical lengths.
For development samples, allowing a circular or strongly bias-oriented skirt to hang for roughly 12-24 hours is a useful practical check before final hem leveling. Very fluid, long, or heavy garments may need more time. This is not a universal production rule; the actual resting requirement depends on fabric construction, weight, skirt length, and finishing. The important principle is to observe material behavior before locking the final hem. A-line construction is easier to stabilize, while circular construction offers more dramatic movement, so the best choice depends on the desired visual payoff and the level of manufacturing control available.
How Do Gored and Panel Skirts Create Flare?
Gored skirts divide the lower garment into several vertical sections that stay relatively narrow near the waist or high hip and open toward the hem. Four, six, eight, or more gores can be used depending on the design. The major advantage is distribution. A pattern maker can add more volume at the side or back while keeping the center front flatter, which is useful when a dress needs strong movement without adding excessive fullness across the abdomen.
Panel construction also works well when the upper bodice already uses princess seams. Continuing those seam lines through the skirt can make the body appear longer and create a cleaner visual flow. The technical challenge is cumulative accuracy. If an eight-panel skirt gains only 2 mm of unintended width at each joining seam, the total circumference can increase by roughly 16 mm. The exact visual effect will depend on panel placement and fabric behavior, but the example shows how small sewing differences can become measurable when repeated around the garment.
Accurate notches, grain markings, panel numbering, and bundle control become increasingly important as the panel count rises. Similar-looking pieces should not rely on operator memory. A reversed side-back panel or a panel cut on a different grain direction may not be obvious during early assembly, yet the finished skirt can twist or hang asymmetrically. Gored construction offers excellent silhouette control, but only when the production system treats each panel as a precisely identified component rather than just another piece of fabric.
Where Should the Flare Begin?
The flare point changes how the body is perceived before it changes total volume. A skirt opening directly from the natural waist creates the strongest classic fit-and-flare effect because the narrowest point of the torso immediately transitions into a wider lower shape. Moving the flare 30-60 mm below the waist creates a longer torso and a more controlled upper skirt. Extending the fitted area toward the high hip creates an even leaner line before the fabric releases, which can suit cleaner occasion silhouettes or more modern panelled designs.
The effect is particularly visible on short dresses. If the finished distance from waist to hem is around 450 mm, moving the flare point by 30 mm changes roughly 6.7% of that vertical area. The wearer may not describe the difference numerically, but the eye can read it as a shorter or longer torso, a fuller or slimmer hip, or a more youthful versus more polished silhouette. On longer dresses, the proportional effect is smaller at the top, although the change can still influence movement and how the fabric clears the hip.
The flare point should therefore be assessed on a fitting model or mannequin rather than only on the flat pattern. It is also wise to approve bodice balance first. A skirt that appears to pull forward may actually be reacting to insufficient front bodice length or incorrect waist positioning. Altering the skirt before correcting the upper body can create a second problem while leaving the original cause untouched.
How Is Skirt Volume Controlled?
Hem circumference is important, but it is not a complete description of volume. Two skirts can share the same 2.2 m finished sweep and still look very different if one introduces most of its width near the waist and the other keeps the upper hip controlled before opening gradually lower down. The first will appear fuller immediately, while the second may look cleaner around the body and more dramatic only in movement.
Four measurements are especially useful when comparing development samples: flare-start position, high-hip circumference, finished hem sweep, and side-seam or panel length. Recording these references gives the team a stable way to discuss changes. A comment such as “increase hem sweep by 150 mm while keeping high hip unchanged” is far more actionable than “make the skirt fuller,” because it tells the pattern maker exactly where the extra volume should and should not appear.
Fabric stiffness changes the visual result. A crisp taffeta can hold away from the body with relatively modest pattern width, while a fluid crepe may require more sweep to create an equally visible flare because much of the fabric falls vertically. Chiffon may use several layers with controlled individual volume instead of one extremely wide layer, balancing opacity, movement, and seam bulk. For grading, the same principle applies: the relationship between waist, hip, flare point, and hem must remain visually balanced rather than simply increasing every dimension by a fixed amount.
Which Fabrics Work for Fit-and-Flare Dresses?
Fit-and-flare dresses can work in structured wovens, fluid fabrics, stretch wovens, and knits, but the pattern must be developed around the chosen material. Structure controls how far the skirt stands from the body, drape controls how flare falls, stretch changes bodice ease, recovery affects long-term fit, and weight influences vertical pull. Fabric choice and pattern development should therefore be treated as one connected decision.

Which Fabrics Create More Structure?
Taffeta, cotton sateen, jacquard, faille, structured crepe, ponte, and selected stretch wovens are common choices when the design needs clear waist definition and a skirt that holds visible shape. Structure should not be confused with thickness. A relatively lightweight fabric can remain firm because of yarn type and weave density, while a heavier textile can still collapse softly if its construction produces high drape. Evaluating only GSM can therefore lead to poor material decisions.
Structured fabrics make some production issues easier to control but make others more visible. A firm skirt is less likely to grow dramatically on bias, yet a poorly sewn princess seam may produce an obvious ridge because the material does not soften the error. A thick waist seam can create a visible horizontal shelf, and aggressive pressing can leave shine or hard creases. Pressing should be treated as part of shape development, with temperature, moisture, pressure, and support forms selected for the material rather than applied as a generic finishing step.
Internal support can also be used selectively instead of choosing an excessively stiff shell. Localized interfacing, a stable bodice lining, or a light interlining can add control at the neckline, waist, zipper, or bust while allowing the outer fabric to retain a more refined hand. The useful development question is where the structure should come from: shell fabric, pattern geometry, internal layers, or a combination of all three. A balanced solution usually feels more natural on the body than relying on one material to do every job.
Which Fabrics Create Softer Movement?
Soft crepe, viscose, chiffon, georgette, lightweight satin, and selected jerseys are useful when the skirt should move rather than hold a rigid outline. These fabrics make flare look effortless, but they shift the technical challenge from creating movement to controlling it. The bodice still needs stability, the waist still needs to stay level, and the skirt panels still need to hang symmetrically even though the design is intended to feel fluid.
Satin illustrates the problem well because “satin” describes a surface structure rather than one predictable performance profile. One satin may be dense, relatively firm, and easy to stabilize; another may be lightweight, slippery, and highly responsive to tension. The cutting and sewing method should therefore be based on the actual fabric article, not the word on the swatch label. Lightweight satin may need extra care at the zipper seam, neckline, and waist, while the skirt should remain free enough to preserve movement.
Grain control becomes especially important with soft fabrics. Two visually identical panels cut several degrees apart can relax differently after sewing. The issue may be difficult to see while the pieces are flat, but it can become obvious once the dress hangs. Fabric relaxation before critical cutting, careful spreading, accurate grain alignment, and reduced handling between cutting and sewing can all help. Fast fashion depends on speed, but skipping these checks often creates more delay later through repeated sample corrections, uneven hems, or bulk rework.
How Do Weight and Drape Change the Pattern?
Fabric properties affect both fit and flare, so pattern adjustments should reflect measurable behavior rather than composition alone. The figures below are practical development references, not universal standards. Stretch percentage, recovery, fabric weight, finishing, yarn structure, and even color treatment can change how a material behaves. Two fabrics that both contain elastane can require different bodice ease, while two fabrics at a similar GSM can create very different skirt volume because their drape is not the same.
Fabric Behavior | Typical Construction Effect | Practical Development Check |
Firm, low-drape woven | Holds flare away from body | Waist bulk and seam shaping |
Fluid woven | Falls closer to body | Additional sweep and bias growth |
15-25% width stretch | May allow closer bodice fit | Stretch and recovery comparison |
High stretch, weak recovery | Can loosen during wear | Wear and recovery test |
Heavy fabric | Adds vertical pull | Bodice length and waist support |
Lightweight sheer fabric | Exposes seams and layers | Lining and opacity review |
Slippery satin surface | Increases cutting movement | Grain and layer control |
A numeric stretch value should never be read in isolation. A fabric with 25% extension and strong recovery may be more suitable for a fitted bodice than one with 35% extension that remains permanently elongated after loading. Weight can alter waist position as well. A long, heavy skirt creates downward force on the bodice, so a sample that looks correct flat on a table may sit slightly lower when worn for a longer period. Drape changes visual volume too: the same hem sweep may appear dramatic in crisp taffeta and restrained in soft crepe.
When a material is substituted, comparing the original and alternative on the same mannequin under the same conditions is more informative than comparing swatches only. Check the waist, bust contour, skirt stand-away, hem movement, opacity, and recovery after handling. A fabric replacement that seems equivalent in cost and color may still require changes to ease, flare, lining, or internal support before it becomes a true product substitute.
When Are Lining and Interfacing Needed?
Lining can provide opacity, comfort, clean internal finishing, and additional stability, but it should not simply duplicate the outer shell without thought. A skirt lining often does not need the full sweep of a large circle or heavily flared shell. Reducing lining volume can control cost and bulk while still providing coverage, as long as the lining remains wide enough for movement and does not pull the outer skirt inward. A lining that is too narrow can quietly destroy the silhouette even when the shell pattern itself is correct.
Bodice lining behaves differently because it often becomes part of the support system. It may follow the outer shape closely, but small adjustments can still be required for seam turn, zipper finishing, neckline roll, and the thickness of the shell. The lining should be fitted with the dress rather than treated as an invisible afterthought. A beautiful outer bodice can still feel uncomfortable or look distorted if the inner layer is too tight across the bust or too loose around the neckline.
Interfacing is usually most effective when localized. Facings, neckline edges, zipper areas, waist sections, and other stress points may need additional stability, but reinforcing the entire bodice can make a fashion dress feel stiff and inexpensive. Fusible materials should also be tested with the shell under realistic pressing conditions. If the fusible and outer fabric shrink differently, bubbling or distortion may appear later even when the bond looked smooth immediately after pressing. Testing the shell, support material, temperature, pressure, and dwell time as one system is safer than approving each component separately.
How Is a Fit-and-Flare Dress Assembled?
A fit-and-flare dress is usually assembled by stabilizing and constructing the bodice, preparing the skirt separately, joining both sections at controlled balance points, installing the closure and lining, and finishing the hem after the garment has settled. The exact sequence changes with fabric, neckline, sleeve, and lining method, but every stage should protect the approved grain, waist level, seam alignment, and three-dimensional shape.

How Is the Bodice Sewn?
Accurate sewing starts with accurate cutting and marking. Grain lines, notches, drill points, dart locations, princess-seam balance points, and center lines should be transferred clearly enough that operators do not need to infer them. Unstable neckline and armhole edges may need stay stitching or support soon after cutting because repeated handling can change their length before the main seams are assembled. Once that growth happens, later sewing can only disguise the problem rather than fully restore the original shape.
Darts should be sewn so the shaping disappears smoothly into the garment rather than creating a bubble at the bust. Princess seams require even more control because a convex section often has to join a concave one. The objective is to distribute three-dimensional shape without stretching the seam line or creating pleats. Clipping, notching, grading, and progressive pressing help the seam settle around the body. Pressing on a curved form is often more effective than forcing a shaped seam flat on a standard board.
Shoulder and side seams should be checked against the approved fitting balance. The side seam normally needs to hang in its intended position rather than drifting visibly forward or backward. If it moves consistently, the cause may be a pattern-balance problem rather than operator error. This is an important distinction because changing the sewing method will not correct a pattern that has insufficient front length or incorrectly distributed bust volume. Construction should reinforce the approved fit, not become a substitute for correct pattern development.
How Are the Bodice and Skirt Joined?
The waist join is a high-value control point because it connects two sections with very different geometry. Center front, center back, side seams, princess seams, and panel notches should match according to the pattern. If the skirt seam is longer than the bodice seam without intentional easing or gathering, the operator should not simply stretch one side until the pieces meet. Doing so can move side seams, distort the waist, and change how the skirt hangs below the body.
A mismatch of 10 mm may seem small when distributed around an entire garment, but it can become very visible if most of that difference is forced into one area. The skirt can pull toward one side, a princess line can miss its corresponding panel, or the center front can drop. The seam allowance also affects appearance. In lightweight fabric, several layers may remain almost invisible, while in thick jacquard or ponte the same construction can create a noticeable ridge at the waist.
Solutions should be tested during sampling rather than improvised during bulk production. Seam allowances may be graded, lining bulk may be reduced locally, or pressing direction may be changed. The approved construction should also state whether the waist seam is pressed upward, downward, open, or secured in another way. Two production lines using different seam-handling methods can produce garments that technically share the same pattern yet look slightly different on the body.
How Is the Zipper Installed?
Invisible zippers are popular in woven fit-and-flare dresses because they provide access without interrupting the visual line, but good installation depends on fabric stability and controlled tension. Soft satin, crepe, and fabrics cut near bias may need a narrow stabilizing strip along the zipper seam. Without support, the garment can stretch while the zipper tape remains stable, creating waves that are difficult to press out after the zipper is fully installed.
Waist alignment is particularly important when the zipper crosses a horizontal seam. A 3-5 mm step may already be noticeable on a clean solid-colored dress, especially at center back. Operators should therefore match the waist before completing the full zipper seam rather than hoping final pressing will hide an offset. Stitching too close to the coil can affect zipper movement, while stitching too far away can expose tape and reduce the clean invisible effect.
Zipper length should also support dressing. A strongly fitted waist needs enough opening for the wearer to get into the dress comfortably. A shorter zipper can save a small amount of material or labor but may create an awkward customer experience. The lining must be finished so it stays clear of the teeth and does not pull the zipper inward. The best installation is evaluated with the zipper closed on a body or mannequin, where rippling, waist mismatch, and seam twisting are easier to see than during flat inspection.
How Are Necklines and Hems Finished?
Necklines can be finished with facings, full lining, binding, or more specialized internal constructions, but the finish should support the edge without changing its intended appearance. Understitching is useful when a facing or lining should roll slightly toward the inside rather than become visible at the outer edge. Curved seam allowances may need clipping or grading to remove bulk, while delicate fabrics may require very narrow reinforcement so the neckline remains stable without developing a noticeably hard hand.
Hems need a different type of control because grain direction and gravity have a stronger influence. Straight or mildly flared skirts are generally stable, while circular, bias, or very fluid skirts should be checked for length change before final leveling. Measuring upward from the raw edge does not always guarantee an even finished hem because different parts of the skirt may have relaxed by different amounts. The dress should be judged while hanging naturally under conditions similar to wear.
The finishing method should match the material and silhouette. A narrow rolled hem preserves movement in chiffon or georgette, while a blind hem may suit a structured woven when the outer surface needs to remain clean. Satin may show pressing marks, so temperature and pressure should be tested. The approved sample should clearly establish finished hem depth, appearance, and pressing standard so bulk production does not interpret the same design through several different finishing methods.
How Is Fit-and-Flare Construction Controlled in Bulk?
Bulk consistency starts before the first production unit is sewn. The approved pattern, fabric, trims, measurements, grading, workmanship, and critical silhouette points need to be locked and translated into repeatable instructions. Size-set review, pre-production confirmation, early-line measurement checks, inline inspection, and final review then verify that the fitted bodice, waist position, skirt balance, and hem remain consistent as volume increases.
How Is Fit Graded Across Sizes?
Good grading preserves visual proportion rather than simply enlarging every dimension. The pattern maker needs to decide how bust, waist, hip, shoulder, armhole, bodice length, flare point, and hem sweep change through the range. If waist increments grow too quickly relative to the bust and skirt, larger sizes can lose the defining fit-and-flare contrast. If skirt sweep grows too slowly, the style can become visually straighter even though the garment still meets the numerical size chart.
Different brands use different grading systems, so generic increments should never override the approved specification. A common commercial approach may use circumference changes of several centimeters between sizes, but the way that increase is distributed across front, back, side seams, and panel lines matters as much as the total. The base size alone cannot reveal whether the visual relationship remains intact. For a broader range, a practical size-set review usually includes the base size plus at least one smaller and one larger size, with additional review near the extremes when the range is especially wide.
Photographing size-set samples under consistent conditions can reveal proportion changes that are easy to miss in measurement tables. Look at waist location, neckline width, bust placement, side-seam position, flare start, and the amount of space between skirt and body. A graded pattern can be mathematically correct and visually wrong. The goal is that every size still looks like the same design, not like a series of related but increasingly different silhouettes.
Which Construction Points Need Tolerances?
Not every measurement deserves the same attention because not every deviation has the same visual consequence. A small difference in total skirt sweep may be difficult to see, while the same difference at a waist join, zipper match, center-front bodice length, or princess-seam position can be obvious. For this reason, mature production control separates critical silhouette points from general measurements and watches the most sensitive areas earlier in the sewing process.
Common high-priority checks include bust circumference, waist circumference, center-front bodice length, center-back bodice length, waist-seam level, side-seam balance, zipper alignment, princess-seam position, and finished dress length. Internal process targets can sometimes be tighter than the final customer tolerance. For example, a line may aim to keep visible seam matching within roughly 3-5 mm even when broader garment measurements allow more variation. Those figures are process examples rather than universal acceptance standards; the approved specification always takes priority.
Timing is as important as the number. Measuring the first 20-50 production pieces can expose a consistent drift while correction is still relatively inexpensive. If the waist is gradually widening because one seam is being stretched, waiting until final inspection means the same error may already exist in hundreds of garments. Early measurement data should therefore be used as a process-control tool, not only as a record of whether finished pieces passed or failed.
How Is an Approved Sample Transferred to Bulk?
An approved sample should become a manufacturing reference rather than a beautiful garment hanging in the sample room. Before production begins, the final pattern revision, measurement chart, grading rules, fabric, lining, zipper, trims, seam construction, pressing method, finishing details, and critical visual points should be aligned. The objective is to remove interpretation from the production floor wherever interpretation could change the approved silhouette.
This is particularly important when sample makers have made manual adjustments during development. A princess seam may have been eased differently, a lining edge trimmed, a waist seam graded more aggressively, or a hem corrected after hanging. Those actions can disappear from the record unless they are deliberately transferred into the pattern, specification, workmanship instructions, or approved sample comments. What looked like craftsmanship in one prototype becomes inconsistency in bulk if the next team has no way to reproduce it.
A practical pre-production handover should connect the approved sample with pattern version, size specification, fabric and color lot, lining and trim references, stitch and seam requirements, pressing standards, grading confirmation, visual checkpoints, and packaging instructions. It is also the right moment to challenge any detail that worked in one handmade sample but is likely to be unstable at scale. Raising that concern before cutting protects both the design and the production schedule more effectively than trying to repair it during final inspection.
How Are Bulk Defects Prevented?
Most bulk problems begin as small variations that accumulate. A panel can be cut slightly off grain, a waist seam can grow during joining, one zipper operator can use more tension than another, or a circular skirt can be hemmed before bias sections have settled. Each difference may look minor in isolation, but several of them together can change the entire silhouette. Effective quality control therefore checks each risk at the earliest stage where it can reasonably be detected.
Production Stage | Practical Check | Typical Risk Prevented |
Fabric inspection | Width, shade, stretch, hand feel | Lot-to-lot appearance change |
Cutting | Grain, notches, panel identity | Twisting and asymmetric flare |
First 20-50 pieces | Bust, waist, bodice and dress length | Early measurement drift |
Waist joining | Notch and seam alignment | Shifted panels and uneven waist |
Zipper operation | Tension and seam matching | Rippling and waist mismatch |
Size-set review | Proportion and key measurements | Grading distortion |
Hem preparation | Hanging balance and length | Uneven hem |
Final inspection | Measurement and visual comparison | Shipment-level inconsistency |
Inline inspection is most useful when it is linked to the construction process rather than treated as a final policing exercise. A repeated zipper ripple should trigger a review of seam stability, operator tension, machine settings, and fabric behavior, not just a request to press the garment harder. A recurring uneven hem should lead back to grain, relaxation, panel length, and hanging conditions. When the cause is understood, correction becomes repeatable instead of depending on individual repair skills.
For a brand developing fit-and-flare dresses across multiple styles or seasons, the practical value of a manufacturing partner lies in this transition from attractive sample to repeatable product. The approved silhouette has to survive different sizes, colorways, fabric lots, sewing operators, production lines, and repeat orders. That requires more than sewing capacity. It requires a development process in which pattern, material, construction, and quality checkpoints are treated as one connected system from the first prototype onward.
A well-built fit-and-flare dress is ultimately a chain of controlled relationships. The bust shape influences the waist, the waist influences the skirt transition, the fabric changes how both sections behave, and production methods determine whether the original balance survives at scale. The best development teams do not wait for one dramatic defect to reveal a problem; they look for the small shifts that can eventually change the entire garment. When those relationships are understood and documented early, the result is not only a better sample but a dress that can remain recognizably the same product from the first fitting through repeat production.
Frequently Asked Questions
Is a fit-and-flare dress the same as an A-line dress?
No. The two silhouettes can overlap, but they are not identical from a construction point of view. An A-line dress usually widens gradually and may have relatively little waist suppression, while a fit-and-flare dress creates a clearer contrast between a controlled bodice and a fuller skirt. The distinction matters in pattern making because fit-and-flare styles are generally more sensitive to bust placement, waist level, flare start, and the relationship between upper-body fit and lower-volume distribution.
What fabric is best for a fit-and-flare dress?
There is no single best fabric because the right choice depends on the intended silhouette. Taffeta, jacquard, cotton sateen, structured crepe, ponte, and selected stretch wovens can create a more architectural shape, while chiffon, viscose, soft crepe, lightweight satin, and certain jerseys create greater movement. The pattern should be tested with the actual fabric because drape, weight, stretch, recovery, and opacity can change both bodice fit and skirt flare even when two materials have similar compositions.
How much flare should a fit-and-flare skirt have?
Flare should be determined by silhouette rather than one universal hem measurement. A controlled A-line may need only moderate expansion from the high hip, while a half-circle or fuller circular skirt can create much larger sweep. Development teams should compare flare-start position, high-hip circumference, hem sweep, skirt length, and fabric stiffness together. A 2.2 m hem can look dramatic in a crisp fabric and comparatively restrained in a fluid crepe, so the visual target matters more than one isolated number.
Do fit-and-flare dresses need princess seams?
No. Princess seams are useful because they provide detailed control over bust projection, waist contour, and vertical balance, but darts, shaped side seams, stretch, waist seams, and multi-panel systems can also create a fitted bodice. The best construction depends on the design language, fabric, cup requirements, and production complexity. A minimal dress may look better with discreet darts, while a structured occasion style may benefit from princess seams because they allow smaller, more localized fit adjustments without changing the entire bodice.
How do you stop a fit-and-flare skirt from having an uneven hem?
Start by controlling grain direction, cutting accuracy, panel length, and fabric relaxation. Circular and bias-heavy skirts are especially likely to grow unevenly because different areas hang at different grain angles. During development, allowing a fluid skirt to hang for roughly 12-24 hours before final leveling can reveal differential growth, although the exact time depends on material and garment length. Bulk production should also confirm that panels are cut, bundled, sewn, and hung consistently before the hem is finalized.
How should fit-and-flare dresses be graded across sizes?
Grading should preserve proportion rather than simply add the same amount everywhere. Bust, waist, hip, bodice length, flare start, and hem sweep need coordinated increments so the larger and smaller sizes retain the original silhouette. A useful commercial review includes the base size and at least one size on either side, with additional checks toward the extremes of a wide range. Measurement compliance matters, but visual comparison is equally important because a mathematically correct grade can still lose waist definition or skirt balance.
What should be checked before fit-and-flare dresses enter bulk production?
Before bulk cutting, the team should confirm the approved pattern revision, size specification, grading, fabric and color lot, lining, zipper and trims, seam construction, pressing method, critical measurements, flare shape, and hem-finishing standard. Size-set or pre-production review should also verify that the silhouette remains stable outside the base size. Early production pieces should then be measured and visually compared with the approved reference so drift can be corrected before it spreads through a larger quantity.
Share:
Our Services
Categories
Table of Contents
Here, developing fashion collections is more than manufacturing garments — it’s a collaborative process focused on transforming ideas into well-executed, market-ready products. From fabric sourcing and sample development to scalable production and delivery coordination, every stage is built to support quality, consistency, and efficient collection launches across global markets.