 Skip to content
How Is a Halter Dress Constructed : Patterns, Support, Fit, and Finishing Explained
Your trusted Women’s Apparel Development & Manufacturing Partner from China
- Jerry
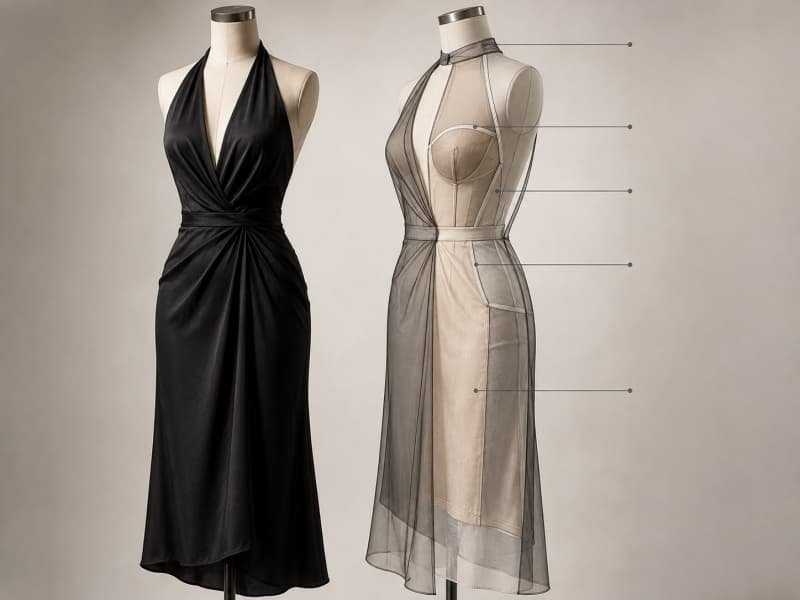
A halter dress often looks simpler than it is. The shoulders are open, the back may be low, and the front seems to rise cleanly into a tie or fitted neckband. Yet removing a conventional shoulder seam changes the entire balance of the garment. The neckline, bust, armhole, back and waist must now share the work of keeping the dress secure. When those areas are not developed as one system, the result may gape at the chest, cut into the neck, expose the side bust, twist at the waist or lose shape after a few hours of wear.
A halter dress is constructed by redirecting upper-body support toward the neck, bust, underarm, back and waist. Its performance depends on a contoured bodice pattern, compatible fabric, stabilized edges, correctly positioned darts or seams, and an internal support method suited to the garment’s weight. These elements prevent gaping, slipping, distortion and excessive neck pressure.
The most revealing moment usually arrives after the sample leaves the mannequin. A style may look balanced in a front photograph, then shift as soon as the fit model sits, raises an arm or turns sideways. Experienced development teams therefore treat a halter neckline as a load-bearing construction rather than a decorative line. The following sections explain how the pattern, materials, support, sewing sequence and quality controls work together to turn a strong sketch into a dress that still performs during real wear and repeat production.
What Is Halter Dress Construction?
Halter dress construction is the engineering of a bodice secured partly or mainly around the neck instead of through conventional shoulder seams. The pattern, bust shaping, side seams, back and waist must distribute garment weight while controlling exposure and movement. A successful design stays close to the body without relying on extreme neck tension.
Halter Structure
A halter dress is defined by the way the front bodice travels upward toward the neck while leaving most or all of the shoulders exposed. The neckline may close with ties, buttons, hooks, snaps, a zipper or a shaped collar band. Some versions retain a medium or high back, while others remove nearly all back coverage. The technical distinction matters because the remaining fabric determines where the garment can resist downward pull and how much freedom the pattern maker has to control the upper body.
In a conventional sleeveless dress, front and back bodices connect across the shoulders, allowing garment weight to pass through two stable seams. A halter removes part or all of that route. The neck connection positions the front, but the bust, underarm, side seams, back band and waist must prevent the bodice from drifting. The lining may also act as a secondary support layer. When these elements are planned separately, tightening the neck tie often becomes the only way to improve security, which creates discomfort without solving the underlying balance problem.
Common Halter Types
Commercial halter dresses fall into several construction families. Tie-neck styles provide adjustability and are common in resort or vacation collections, yet they allow the wearer to change neckline tension. Fixed neckbands create a cleaner and more repeatable fit, although the finished neck circumference must be graded carefully. Gathered halters convert dart volume into controlled fullness, while paneled and princess-seam versions shape the bust through curved seams. Plunge and corset-supported designs require more deliberate internal engineering because their visible edges provide less natural coverage.
Halter type | Primary support | Typical use | Main risk |
Tie-neck halter | Neck ties, side seams, waist | Resort, vacation, summer dresses | Neck pressure and uneven tying |
Fixed neckband | Shaped band, back closure, fitted bodice | Occasion and contemporary dresses | Incorrect neck circumference |
Gathered halter | Neck casing, underbust, lining | Chiffon, satin, fluid maxi dresses | Uneven gathers or excess volume |
Princess-seam halter | Curved seams, waist fit, lining | Fitted party and event dresses | Bust-seam imbalance |
Plunge halter | Neck support, cups, inner edge control | Going-out and occasion dresses | Rolling neckline or exposure |
Corset halter | Inner bodice, boning, cups, waist stay | Structured party and formal dresses | Outer layer carrying too much load |
Stretch bodycon halter | Fabric recovery, torso compression, neckband | Club, party and fitted dresses | Armhole growth or edge rolling |
Weight Distribution
The complete garment must be considered when support is planned. A chiffon maxi may look weightless, but the long skirt, lining and multiple layers create continuous downward pull. A short embellished dress can be equally demanding when sequins, beads or dense trims concentrate weight across the bodice. The neckband should position the upper front rather than carry the dress alone. A fitted waist, stable underbust, back panel, power-mesh layer, side boning or internal waist stay can redirect much of the load through the torso.
Testing should take place after the real skirt, lining and decoration have been attached. An unfinished bodice may feel comfortable because it does not yet carry the final weight. Strap width also changes pressure: a narrow tie looks delicate but concentrates force on a small area, while a wider band spreads it more evenly. For styles intended for events or extended wear, a useful fitting session lasts longer than a few photographs. The fit model should walk, sit and remain in the completed sample long enough for pressure and shifting to become noticeable.
Halter and Backless Differences
Halter and backless are related descriptions, but they are not interchangeable. Halter refers to the way the upper front connects to the neck. Backless refers to the amount of back exposure. A halter with a medium back can use shaped back panels and a center-back zipper, giving the pattern more anchoring points. A deeply backless halter removes much of that control, so the side seams, underbust, waist and neck must work harder to keep the front in position.
Simply lowering the back edge on an existing pattern usually creates imbalance. The back may gape, the front can pull upward, and the side seams may rotate. A production-ready low-back version may need a contoured back edge, elastic stabilization, a side zipper, an underbust band or an internal waist stay. The back line should also be tested during sitting and torso rotation because a shape that looks clean while standing can lift or open during movement. The most reliable development starts by defining neckline type and back exposure as separate technical decisions.
How Is a Halter Dress Pattern Drafted?
A halter dress pattern is drafted by reshaping a fitted bodice block around the neckline, shoulder, armhole and back while preserving bust volume and torso balance. Darts, gathers or shaped seams direct fabric around the body, and the neck and waist support points are planned together. The draft must then be tested in the intended fabric.

Neckline and Armhole
The draft should begin with a bodice block that already reflects the target bust, waist, shoulder slope and torso length. Converting an unsuitable generic block into a halter style creates unnecessary fitting work. The conventional shoulder area is removed or redirected toward the neck, forming a new halter armhole that often cuts farther inward than a standard sleeveless armhole. Because this line may pass close to the bust apex, even a small change can affect side coverage, comfort and the overall visual balance.
The finished neckline and armhole must be evaluated at the sewing line rather than only at the raw edge. The pattern maker should walk these lengths against the lining, facing, binding or neckband and confirm the placement of every notch. Curved and diagonal sections may stretch during cutting and handling, so the pattern or construction sheet should identify where staystitching, narrow fusible tape, woven stay tape or clear elastic is required. A smooth digital curve is not enough; the edge must remain smooth after clipping, turning, understitching, pressing and repeated wear.
Bust Shaping
Bust shaping may be created through darts, princess seams, neckline gathers, underbust gathers, pleats, draping or controlled stretch. Removing a visible dart does not remove the body volume it controls. That intake must be transferred into another seam or form of fullness. When it disappears without redistribution, the bodice may flatten the bust, pull upward or stand away from the upper chest. Princess seams are especially useful in fitted halters because they allow gradual adjustment over the bust and underbust, although the paired curves must be stitched without stretching.
Gathered halters create a softer appearance, but the gathering ratio must suit the fabric. A practical starting range may be about 1.3:1 to 2:1, meaning 13 to 20 centimeters of fabric is controlled into 10 centimeters of finished length. Chiffon can usually absorb more fullness than dense satin, which becomes bulky quickly. Bust-point height is equally important. In fitted dresses, an error of roughly 1 to 1.5 centimeters can visibly distort a cup, princess seam or gather placement, particularly when the neckline is narrow or the fabric is reflective.
Low-Back Balance
Lowering the back removes horizontal and vertical support, so the rest of the bodice must be rebalanced. The pattern may require a shorter back edge, contouring darts, a revised side-seam angle, increased underbust control or a more secure waist. A side zipper is often more practical than a center-back zipper when the back line is very low. Elastic or clear tape can help the edge follow the body, but excessive tension creates gathering and pulls the side seams backward.
The back edge should follow the body’s curves rather than behave like a flat horizontal strip. Its performance should be observed when the fit model sits and rotates, not only while standing. If the back looks stable but the front armhole opens during movement, the issue may be overall balance rather than the back edge alone. An internal waist stay is particularly helpful in heavier dresses because it gives the garment an independent anchor. This allows the neckline to maintain position without carrying all of the skirt’s downward force.
Size Grading
Halter patterns should not be graded by enlarging every measurement at the same rate. Neck circumference, bust projection, underarm coverage, waist and back depth change differently across sizes. A neckband that increases too quickly may become loose in larger sizes, while one that barely changes can become uncomfortable. Adding bust width without reviewing the armhole may expose more of the side chest. Larger sizes may also require additional front length and cup depth rather than simple side expansion.
Pattern point | Development check | Typical fault |
Front neckline | Maintains body contact without pulling | Gaping or rolling |
Halter armhole | Covers the bust and allows movement | Side exposure or cutting |
Bust point | Matches the target fit profile | Drag lines and distorted seams |
Neckband | Closes comfortably at finished thickness | Choking or loose neckline |
Side-seam angle | Remains vertical when worn | Front or back rotation |
Back edge | Follows the body during movement | Gaping or excessive tension |
Waist | Anchors the bodice without over-compression | Slipping or horizontal wrinkles |
Front length | Allows adequate bust projection | Front hem lifting |
For fitted, plunging or backless designs, the graded nest should be reviewed at a smaller size, the base size and a larger size before final approval. Physical fit samples are particularly valuable when the style contains fixed cups, boning or a shaped neckband. Cup components may need their own size groups rather than being enlarged mechanically with the outer pattern. A base-size cup can become too shallow or too widely spaced if the grading method follows only overall garment dimensions.
Which Fabrics and Supports Work Best?
The best material depends on whether the halter dress needs fluid drape, stretch, compression or structured shaping. Chiffon, crepe and satin suit softer silhouettes, while compact knits, stretch wovens and heavier satins support fitted designs. Lining, cups, elastic, boning and power mesh should be selected according to opacity, recovery, garment weight and the intended support system.

Fabric Selection
Fabric determines how the pattern behaves, so a halter developed in firm crepe cannot be transferred directly to soft jersey or bias satin without review. Fluid dresses often use chiffon, georgette, charmeuse, lightweight crepe or soft jersey. These fabrics produce drape and movement but may stretch along curved edges, reveal internal seams or develop puckering around the neckline. Structured halters commonly use stretch satin, compact crepe, ponte, double knit, duchess satin or bonded constructions that can hold contouring seams and internal support.
Fabric weight is a useful reference, but it does not describe stretch, recovery, thickness, weave density or finishing. Two materials at 180 gsm can behave completely differently. Before approval, the development team should examine widthwise and lengthwise stretch, recovery, shrinkage, seam slippage, needle marking, pressing response, opacity and hanging growth. Bias-cut or long layered dresses should remain hanging before the hem is finalized because some materials lengthen under their own weight. Reflective satins also require pressing and seam tests because surface marks can become more visible than the stitching itself.
Material | Common weight | Best use | Key test |
Chiffon | 60-100 gsm | Layered and gathered halters | Transparency and edge growth |
Georgette | 80-140 gsm | Soft occasion and maxi dresses | Puckering and shrinkage |
Charmeuse satin | 90-160 gsm | Draped and bias-cut designs | Seam slippage and snagging |
Crepe | 120-220 gsm | Controlled drape and tailored fit | Dimensional stability |
Stretch satin | 160-240 gsm | Fitted party dresses | Recovery and pressing shine |
Jersey | 160-240 gsm | Soft bodycon halters | Neckline growth |
Ponte or double knit | 250-350 gsm | Structured fitted silhouettes | Bulk and compression |
Duchess satin | 180-300 gsm | Formal sculpted bodices | Thick seam allowances |
Power mesh | 120-200 gsm | Internal support | Compression and recovery |
Lining Choices
Many halter dresses benefit from a lined bodice even when the skirt remains unlined. Lining can stabilize the neckline, improve opacity, conceal cups and support materials, and create a cleaner inner finish. It should complement the shell rather than fight it. A stable woven lining inside a highly elastic dress can restrict movement, while an overly soft lining may fail to control the neckline. A heavy lining under lightweight satin can also cause bubbling or an uneven hang.
The lining pattern may need slightly reduced ease in selected areas so it supports the outer layer without appearing loose. Excessive reduction, however, pulls the shell inward and creates visible dimples. Stretch tricot suits many stretch-woven or knit bodices, while power mesh can provide targeted control. Self-fabric lining is useful when color and texture must match closely. In pale or sheer styles, lining color is part of the design decision: bright white, ivory and skin-toned layers create noticeably different results under chiffon, mesh or light satin.
Cups and Boning
Cups, boning and elastic solve different problems and should not be added automatically. Foam cups provide shape and modesty, but they do not hold the entire dress in place. The cup must align with the outer bust seam, apex and underbust position. Boning keeps selected seams upright and reduces collapse, while elastic maintains contact along an edge or provides controlled tension. A structured plunge halter may combine cups, side boning, power mesh and a waist stay, whereas a soft gathered maxi may need only lining and an elasticated back.
Boning length and stiffness affect comfort. Support pieces are commonly kept clear of seam junctions and may stop about 1 to 2 centimeters below an upper edge or above a waist seam, depending on the style. Ends should be rounded, capped or fully enclosed so they cannot wear through the garment. Elastic should be tension-tested because over-reduction causes gathering, cutting and shape distortion. For heavier dresses, an internal grosgrain waist stay is one of the most effective ways to transfer load away from the neck without changing the visible design.
Stretch and Recovery
Stretch describes extension, while recovery describes the ability to return. Halter necklines and armholes experience repeated tension, so both measurements matter. A practical test marks a 10-centimeter section, stretches it to the expected wearing length, releases it and measures the remaining growth. A section extended to 12 centimeters has approximately 20 percent stretch. If it returns only to 10.3 centimeters, the extra 0.3 centimeters indicates residual growth that may appear as neckline looseness after wear.
The test should be performed in both fabric directions, and bias-cut wovens should also be checked diagonally. Negative ease in a fitted halter depends on fabric power, weight, opacity and support. Too much reduction can make pale fabric transparent, flatten the bust, pull the armhole forward, strain seams or increase neck pressure. Bulk fabric should therefore be compared with the approved sample material. Fiber content alone is not enough: two fabrics labeled 95 percent polyester and 5 percent elastane may have very different extension, thickness and recovery.
How Is a Halter Dress Sewn and Finished?
A halter dress is sewn by stabilizing vulnerable edges, constructing the bust and internal support, assembling the shell and lining, attaching the neck system, installing the closure and joining the bodice to the skirt. The order matters because curved and bias edges can stretch, and access becomes limited after the neckline and armholes are enclosed.

Straps and Neckbands
Halter ties may be narrow turned tubes, folded bands, lined straps or shaped extensions of the bodice. The method must reflect garment weight and the intended visual effect. Very narrow satin ties can twist, feel hard against the neck and become difficult to turn consistently in production. Where the design allows, a slightly wider band or a soft inner layer improves comfort. Paired straps should be cut on the same grain, sewn with controlled allowances, trimmed evenly and measured after turning and pressing.
Attachment points need reinforcement because repeated tying places concentrated force where the strap meets the bodice. A production specification should define the finished strap length, width, knot type and visible tail length rather than leaving them to operator judgment. Fixed neckbands require even more precision. Their finished seam line must match the bodice, and the closure overlap must be included in the neck measurement. Small mismatches create twisting, uneven gathers or pressure at the throat, especially after bulky seam allowances and fasteners are turned inside.
Edge Stabilization
Halter necklines and armholes frequently contain diagonal sections that can lengthen before they are sewn. Stabilization should begin soon after cutting. Depending on the fabric, the method may include staystitching, narrow fusible tape, woven stay tape, clear elastic, lightweight interfacing, a self-fabric facing or bias binding. The lightest method that reliably controls the edge is usually preferable. Heavy tape can make chiffon or charmeuse look stiff, while elastic applied with too much tension creates visible gathering.
After the lining or facing is attached, curved seam allowances should be trimmed, graded and clipped where needed. Understitching helps keep the inner layer from rolling outward. Pressing is part of the construction rather than a final cosmetic step; curves should be shaped over a suitable pressing tool instead of flattened aggressively. Heat-sensitive and reflective fabrics require testing because high temperature, steam or adhesive can leave shine, water marks or bubbling that becomes more visible than the seam itself.
Closures and Lining
Closure choice depends on back depth, fabric stretch and the required fit. A medium- or high-back halter often uses a center-back invisible zipper. A very low back may require a side zipper because there is not enough center-back length for a stable installation. Stretch styles may eliminate the zipper, but the garment still needs sufficient opening to pass over the head, bust and hips without damaging the neckline or disturbing makeup and hair.
Invisible zipper areas often need narrow stabilization in lightweight satin or bias-cut fabric because unsupported seams can become wavy. The lining assembly should be planned before sewing begins, since access becomes limited once the neckband and armholes are closed. Depending on the design, shell and lining may be joined at the neckline first and completed through an open side seam. Internal tacks at the neck, waist, zipper or selected side seams prevent twisting, but they must allow enough movement so the lining does not pull the outer layer upward.
Sewing Sequence
A disciplined sequence protects the shape before long seams and heavy components begin pulling on the bodice. The fabric is inspected and relaxed, shell and support pieces are cut, balance marks are transferred, and vulnerable edges are stabilized. Darts, gathers or princess seams are completed before cups, power mesh and boning channels are integrated. The shell and lining are assembled in an order that preserves access, after which the neck system, zipper, side seams, skirt and waist support are completed.
- Inspect, relax and test the production fabric before cutting.
- Cut paired bodice pieces accurately and transfer every balance mark.
- Stabilize neckline, armholes and zipper areas before handling increases.
- Construct bust shaping and verify left-right symmetry.
- Prepare lining, cups, power mesh and boning as separate controlled units.
- Join shell and lining, then attach the neckband or ties.
- Install the closure before access becomes restricted.
- Join bodice and skirt, secure the waist, then complete hem and final pressing.
The first garments off the production line should be checked before output accelerates. Key points include armhole symmetry, equal strap lengths, neckband twist, bust-seam position, gather distribution, lining roll, zipper waviness and waist balance. A sample machinist may shape a difficult edge successfully through individual skill, but bulk production requires a method that several operators can repeat. When an operation depends on excessive manual manipulation, the pattern, support or sewing method should be refined before full cutting.
How Do Manufacturers Control Fit and Quality?
Manufacturers control halter dress fit by testing fabric behavior, fitting the complete garment on an appropriate model, defining critical measurements and documenting the approved construction. Bulk quality control must monitor neckline contact, neck pressure, armhole coverage, bust balance, back stability and symmetry. Measurements alone are insufficient because a dress can pass specifications and still gape, twist or feel uncomfortable.
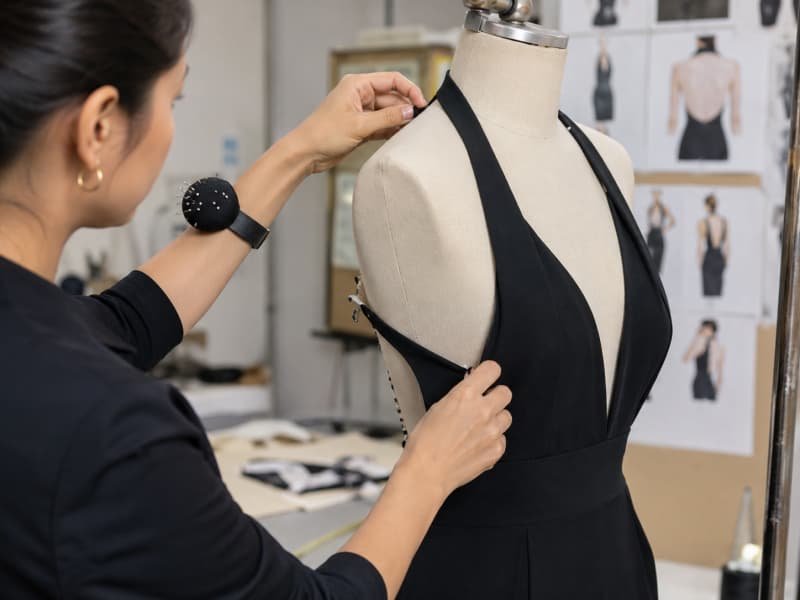
Fit Diagnosis
A gaping neckline is a symptom rather than a single fault. Excess edge length, insufficient bust contour, fabric stretching, an incorrect neckline angle or weak torso support can all produce a similar appearance. The location helps identify the cause. Gaping at the upper chest often indicates excessive neckline length, while an opening beside the bust may point to missing dart or seam shaping. If the sample fitted before sewing but opened afterward, edge growth or feed imbalance may be responsible.
Shortening the neck strap is not always the correct repair because it raises the bodice, increases pressure and may distort the armhole. A better correction may reduce the neckline, rotate dart intake, reshape the bust seam or strengthen the waist support. Armhole gaps require the same caution. Removing width at the side seam can compress the bust when the real problem is insufficient projection. Fit comments should describe the location and approximate amount, such as reducing left upper-chest gaping by 8 millimeters, rather than using a vague note such as neckline too loose.
Comfort and Movement
A halter dress should be assessed while the fit model stands, walks, sits, reaches forward, raises both arms, turns and bends slightly. These movements reveal whether the neckline shifts, the side bust becomes exposed, the back edge lifts or the neckband begins to feel restrictive. The complete skirt and embellishment weight must be present during this session. A bodice that feels balanced before the skirt is attached may become uncomfortable when the finished garment carries substantially more weight.
The expected bra solution should be defined during development. Bra-friendly, strapless-bra compatible, built-in support and intended for fashion tape are different product outcomes. A fit model wearing an unrelated push-up bra can change bust projection and hide cup-placement problems. For built-in support, the sample should be assessed under the conditions the customer will experience. Comfort can often be improved by transferring more load to a fitted waist or underbust, widening the neckband, smoothing internal seam bulk or adding a stable support layer.
Sample Approval
Sample approval is most reliable when the stages have different purposes. A first prototype confirms the overall design, a fit sample corrects body balance, a revised sample verifies changes, and a pre-production sample locks the construction for bulk. Complex styles may need additional rounds, while a proven block may need fewer. Each round should use the intended fit-model profile, size specification, fabric or a technically equivalent substitute, and the correct undergarment condition.
The approval record should include garment measurements, fit-model measurements, front, side and back photographs, neckline contact, armhole coverage, bust-point position, neck tension, back-edge behavior, movement notes, fabric and trim references, and written pattern changes. The approved physical sample, paper or digital pattern and technical documents must all reflect the same version. If a correction exists only in the sample but not in the pattern or specification, production may unknowingly return to the earlier fault.
Bulk Control
The approved sample must be converted into repeatable production information: final patterns, grading rules, measurement specifications, a bill of materials, fabric and trim approvals, seam and stitch requirements, gathering ratios, elastic lengths, cup and boning placement, pressing instructions and quality checkpoints. Before full output begins, initial garments should be compared with the approved sample. This step is especially important when the style uses slippery satin, bias edges, fixed cups, boning, a low back or a shaped neckband.
Quality point | Example tolerance | Primary concern |
Neckband circumference | ±0.5 cm | Comfort and closure overlap |
Neckline edge per side | ±0.5 cm | Gaping and symmetry |
Halter armhole | ±0.6 cm | Coverage and left-right balance |
Bust-point position | ±0.6 cm | Cup and seam alignment |
Strap length | ±0.5 cm | Equal neck tension |
Waist circumference | ±1.0 cm | Bodice anchoring |
Back-neckline depth | ±0.6 cm | Stability and design accuracy |
Center-front length | ±0.7 cm | Front balance |
Side-seam length | ±0.7 cm | Bodice and hem level |
These figures are practical examples rather than universal standards. Tolerance should be adjusted for size, fabric stretch, construction complexity and the brand’s quality requirements. In-line inspection should focus on operations that become difficult to correct later, including stabilization tape, bust-seam matching, cup alignment, strap attachment, neckband symmetry, armhole length and zipper insertion. Final inspection should combine measurement with worn appearance, pull resistance, lining control, transparency, shade consistency, seam puckering and hem balance.
Consistent halter dress production depends on resolving risk before the order reaches full scale. When material behavior, pattern balance, support and sewing method are confirmed during development, the approved sample is far more likely to remain accurate across the production run. Duolan Apparel supports custom halter, backless, fitted, party and occasion dress development from tech pack, reference sample or collection brief. Brands can request a technical review and quotation by sharing the target fabric, size range, quantity, launch date and requirements for cups, lining, boning, closures or low-back construction.
Duolan Apparel is backed by long-term experience in fashion dress development and a manufacturing network designed for sampling, fit correction, coordinated production and repeat programs. A clear brief allows the development team to identify structural risks early, recommend a workable sample path and prepare a quotation based on the real materials, construction and quality level required.
For a faster technical review, prepare a concise development package before requesting a quotation. Include enough information for the pattern, material and production teams to judge the real construction rather than quote from appearance alone. Clear inputs reduce avoidable assumptions, make the first sample more purposeful and help the factory identify support, fit or material risks before they become expensive revisions.
- Front, back and side sketches or a complete tech pack.
- Reference sample or clear construction photographs when available.
- Target fabric composition, weight, stretch and color direction.
- Required lining, cups, boning, elastic and closure details.
- Base size, size range and finished measurement specification.
- Expected quantity by style, color and delivery window.
- Target market, care requirements and applicable test standards.
- Comments on bra compatibility, coverage and intended wearing occasion.
Share:
Our Services
Categories
Table of Contents
Here, developing fashion collections is more than manufacturing garments — it’s a collaborative process focused on transforming ideas into well-executed, market-ready products. From fabric sourcing and sample development to scalable production and delivery coordination, every stage is built to support quality, consistency, and efficient collection launches across global markets.

