
How to Add Bust Support to Halter Dresses?
Your trusted Women’s Apparel Development & Manufacturing Partner from China
- Jerry
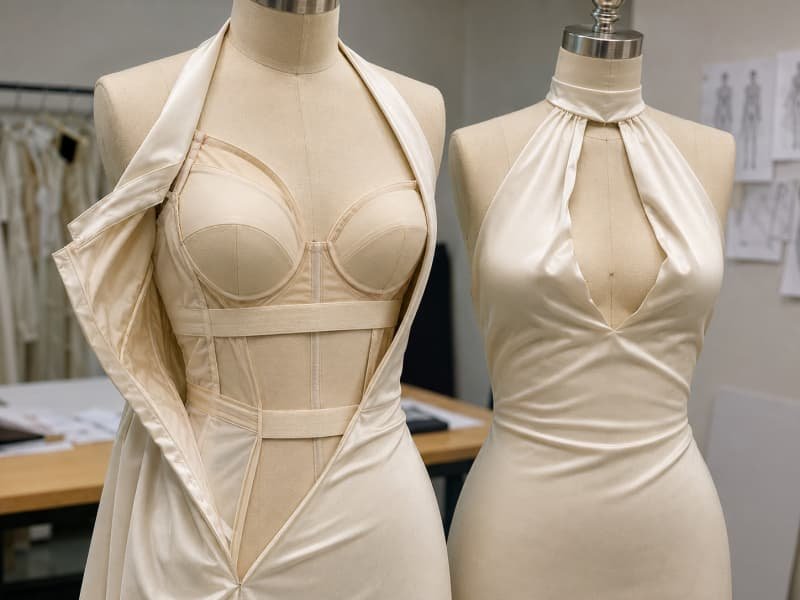
A halter dress can look beautifully simple from the outside while hiding one of the most demanding fit problems in dress development. The shoulders are exposed, the back may be low, and the neckline often leaves little room for a conventional bra. When support is added as an afterthought, the usual response is to sew two foam cups into the lining. That may improve coverage, but it rarely solves lifting, movement, neckline gaping or neck pressure by itself. The most successful halter dresses treat support as part of the pattern, not as a trim added after the silhouette has already been approved. Cup shape, underbust tension, side coverage, lining recovery and the remaining back or waist structure must work together. A dress can be light and open without feeling fragile, but only when the hidden load path has been planned as carefully as the visible neckline.
To add bust support to a halter dress, position correctly sized cups against the body, anchor them with an underbust band or stable inner bodice, reinforce the sides with supportive lining, and add boning only where the bodice needs resistance. Test the neckline, back, strap and movement together. Fuller busts usually need deeper cups, stronger side containment and a lower anchor than foam cups alone can provide.
The real question is not simply, “Which cup should we use?” It is, “Where will the weight go?” One halter sample can look secure on a mannequin after its neck strap is shortened, yet become uncomfortable within ten minutes because the entire front load has been transferred to the wearer’s neck. Another sample can use the same outer fabric and neckline while feeling dramatically more stable because the cup, underbust and side panels have been rebuilt from the inside. The following sections explain how to make that second result repeatable rather than accidental.
What Makes Bust Support Difficult in Halter Dresses?
Halter dresses are difficult to support because they remove the shoulder straps and often reduce the back coverage that normally stabilizes a bra. The cups, underbust area, side seams, lining, waist and remaining back must share the load. Tightening the neck strap alone may lift the neckline, but it usually increases neck pressure without creating reliable bust support.
The Support Load
A conventional bra distributes force through cups, an underbust band, shoulder straps and a stable back. A halter dress often weakens two of those elements at the same time. The shoulder straps become one neck connection, while a low or open back removes part of the horizontal band around the ribs. If the pattern does not replace that missing resistance, the neck strap is asked to lift the bust, control the neckline and hold the bodice upright. That may appear workable during a short fitting, but the wearer usually feels pressure long before the sample looks visibly unstable.
A better construction creates a continuous load path. The cups contain the bust, the underbust area resists downward movement, the side panels control outward movement, and the lower bodice prevents the structure from climbing toward the neck. The halter strap should then maintain neckline position instead of carrying the full weight. During fitting, reduce the neck tension slightly and observe the garment. When the bust immediately drops, the lower structure is too weak. When the bust remains secure and only the neckline relaxes, the support is being carried where it should be.
Fit Symptom | Likely Structural Cause | Practical Correction |
Neck strap becomes painful | Too much load is transferred to the neck | Strengthen the underbust band and side anchoring before shortening the strap |
Front waist rises | Bust weight pulls the front bodice upward | Add lower anchoring or correct the front length over the bust |
Neckline gapes | Cup position, edge length or upper tension is incorrect | Refit the cups before reducing the neckline |
Back edge rises | Band tension is weak or unbalanced | Rebalance front and back tension and review the anchor position |
Cups shift during movement | Cups are attached to soft lining without a stable frame | Connect the cups to a band, cradle or reinforced support layer |
Side bust escapes | Cup width or side coverage is insufficient | Increase cup coverage or add a shaped side-support panel |
Low-Back Limits
A low back is harder to support because the dress loses the continuous band that would normally circle the torso. The lower the back becomes, the less horizontal resistance is available to counter the forward and downward pull at the front. This becomes more demanding when the same style also includes side cutouts, a narrow centre front or a deep plunge. A stronger cup alone cannot solve the problem because the cup still needs something stable to hold it against the body.
The support must be redirected into whatever coverage remains. Depending on the design, that may be a narrow underbust elastic, a powernet frame, a waist stay, a fitted longline lining or a stable lower bodice. The outer back can still appear open while the internal structure uses the side waist or lower back to control movement. When the back depth, side-seam height and distance from underbust to waist are all very limited, the pattern may need a slightly higher side seam, a wider halter base or a concealed waist anchor. If there is nowhere for the garment to resist downward movement, the design has a structural problem rather than a component problem.
Cups Have Separate Jobs
A foam cup can improve modesty and create a smoother bust shape, but it does not automatically provide lift. Lift is created only when the cup is held securely beneath and around the bust. A loose cup attached at the neckline may move with the dress instead of supporting the wearer. It can also show through satin, drop away from the body when the wearer bends, or rotate inside the lining after repeated dressing.
Cups perform three different jobs: covering the bust, shaping its visible profile and supporting it when connected to a stable frame. Many commercial dresses achieve the first two but not the third. Cup profile matters as much as cup label. A shallow cup may compress a projected bust, while a narrow cup may push tissue toward the underarm. The cup must also remain concealed below the neckline and transparent panels. This is why cup selection should happen alongside pattern development, not after the neckline, armhole and side cutouts have already been locked.
Bust Size and Shape
Bust support should not be based only on garment size. Two wearers can share the same full-bust circumference while having different underbust measurements, breast-root widths and levels of projection. Their support needs may therefore be very different. Smaller busts often need stable cup placement and light shaping. Medium busts may need a controlled underbust band and stronger side support. Fuller busts usually require deeper cups, greater lower anchoring and more careful control of the neckline and side edge.
A useful development scale is light, moderate and high support. Light support may use cups, stable lining and controlled neckline tension. Moderate support adds an underbust elastic and side reinforcement. High support may require shaped or underwired cups, powernet, boning, a cradle or a longline inner bodice. These categories are starting points rather than fixed rules. A fuller bust in a high-neck halter may be easier to support than a smaller bust in a very narrow, low and backless design because the high-neck style offers more area for structure.
Which Bust Support Method Is Best?
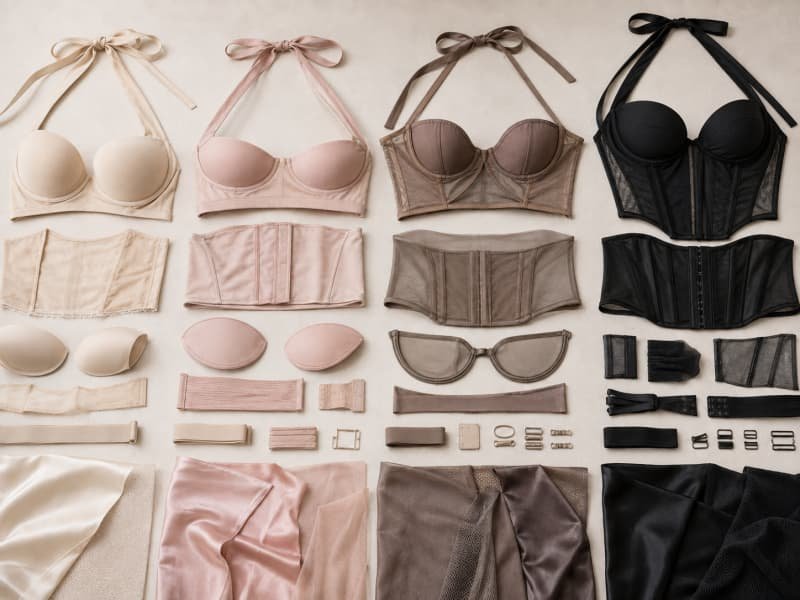
The best support method depends on the required lift, back height, neckline depth, fabric stretch, cup size and intended size range. Foam cups suit light shaping, shelf bras add moderate underbust control, and underwired or corset-style foundations provide stronger lift. The best choice is the least complicated structure that stays secure, comfortable and visually clean during movement.
Cups and Shelf Bras
Sewn-in foam cups are suitable when the main objectives are coverage, light shaping and consistent bust placement. They work best in a close-fitting bodice with adequate side coverage and enough lining tension to hold the cups against the body. They are less successful when the back is extremely low, the bodice is loose below the bust or the fabric stretches easily without strong recovery. In those conditions, the cups tend to travel with the shell instead of staying in a stable relationship with the body.
A shelf bra improves control by adding a fitted inner layer and elastic beneath the bust. This method is common in stretch jersey, bodycon and some mesh-lined dresses. The shelf layer should have reliable recovery, and the elastic should be firm enough to anchor without rolling. For many styles, elastic in the approximate 20-40 mm width range is a practical development starting point, but the final width depends on the available bodice depth and support requirement. A very narrow elastic can feel less bulky yet concentrate pressure, while a wider elastic may distribute pressure more comfortably if it remains fully concealed.
Underwires and Cradles
An underwire supports the lower edge of a shaped cup and helps preserve separation and lift. It works only when enclosed in a stable cradle or cup frame. Adding a wire to soft lining without sufficient anchoring can create pressure without improving support. The wire shape should follow the intended breast root. A wire that is too narrow can sit on breast tissue, while one that is too wide may extend into the underarm without supporting the lower cup properly.
The cradle is the stable area surrounding the cups. It connects the cups to the underbust band, centre front and side panels, often performing the structural work that the visible outer bodice cannot provide. It may use stable woven fabric, low-stretch tricot, powernet or a mixed construction. Underwired support is most useful when the dress requires defined lift, controlled cleavage or a bustier-like silhouette. It may be unnecessary for relaxed resort dresses or soft high-neck halters. The fitting must include sitting and arm movement because a wire that feels correct while standing can become uncomfortable when the torso shortens.
Boned Inner Bodices
A boned inner bodice is useful when the dress needs stronger overall control, especially in low-back satin styles, fitted occasion dresses and corset-inspired halters. It can combine cups, an underbust anchor, side panels, boning and a waist-level stay in one internal foundation. Boning keeps the bodice extended and resists folding, but it does not replace a well-fitted cup or band. A heavily boned dress can still provide poor support when the cups are shallow or the lower anchor is loose.
A longline foundation extends below the underbust toward the waist, increasing the area available for tension distribution. Instead of concentrating pressure at the neck and cup edge, the structure transfers part of the load to the waist and lower torso. This is useful when the visible back is low but the waist remains covered. The support layer should be slightly independent from the outer shell so that satin, crepe or embellished fabric can keep its intended drape. Excessive rigidity is not a sign of better construction; the wearer must still be able to breathe, sit and turn without the neckline lifting away from the body.
Match the Dress
Support decisions should begin with the actual silhouette rather than a preferred component. A stretch bodycon halter and a low-back satin plunge may both contain cups, yet they need very different internal structures. The choice should satisfy three conditions: it must support the intended wearer, remain compatible with the visible design and be repeatable in production. A solution that works only after extensive hand adjustment may be acceptable for a one-off garment but is risky for a commercial collection.
Dress Type | Suitable Starting Structure | Typical Level | Main Fit Risk |
Stretch bodycon halter | Molded cups, shelf lining, underbust elastic | Light to moderate | Band rolling or rising |
High-neck halter | Cups, stable lining, balanced neck tension | Light to moderate | Bust compression |
Deep-plunge halter | Separated cups, plunge frame, side reinforcement | Moderate to high | Centre-front instability |
Low-back satin halter | Cups, powernet sides, boning, waist stay | Moderate to high | Front load pulling on neck |
Mesh-panel halter | Concealed cups, power mesh, narrow elastic | Moderate | Support components showing |
Corset halter dress | Underwired cups, cradle, boning, longline support | High | Wire or bone pressure |
Soft vacation halter | Thin cups or removable pads, double lining | Light | Cup movement in a loose bodice |
How Do You Add Built-In Bust Support?
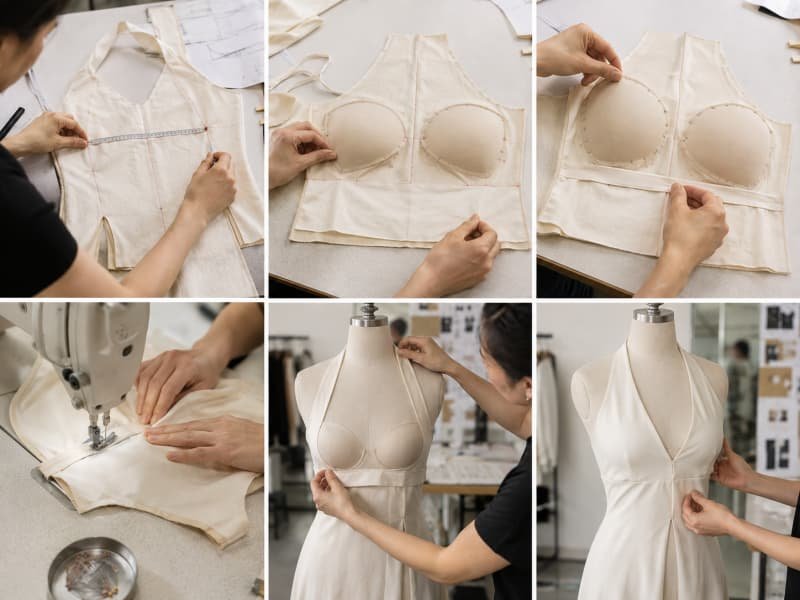
Built-in support is added by measuring the wearer and garment, selecting the correct cups, positioning them on a fitted support lining, and connecting them to an underbust band or inner bodice. Keep the structure adjustable until fitting is approved. Cup placement, band tension, neckline stability, side coverage and movement should be corrected together before the lining is permanently closed.
Measure Before Cutting
The full-bust measurement alone is not enough for a supportive halter dress. The pattern maker also needs to know where the bust sits, how far it projects and where the support can be anchored. Useful measurements include high bust, full bust, underbust, bust-point spacing, shoulder-neck point to bust apex, front length through the bust, underarm-to-waist length, finished back depth and intended neckline depth. These measurements describe both volume and position, reducing the risk of placing cups symmetrically inside the pattern but incorrectly on the body.
The dress must also be measured because cups and support layers occupy internal space. A thick cup edge or deep profile can make a close-fitting bodice tighter than planned. Stretch fabrics require separate evaluation. Stretch percentage can be calculated as: (stretched length – original length) / original length x 100. A 10 cm sample stretched to 13 cm has 30% stretch, but recovery must be checked after release. If it returns to 10.5 cm rather than 10 cm, it has retained extension and should not be treated as a dependable support layer without reinforcement.
Position the Cups
Cup placement should be established on a fit model or a dress form that represents the target body. Mark centre front, underbust and bust apex on the support lining, then attach the cups temporarily. The cup apex should align with the wearer’s bust apex, but the cup should not simply be centred within the visible bodice panel. A curved or angled halter neckline can make visually centred placement physically incorrect. The body remains the primary reference.
Check placement from the front, side and three-quarter views. The lower cup should sit directly beneath the bust rather than on breast tissue, and the outer edge should contain the side without cutting inward. Both cups should remain hidden below the neckline and away from transparent areas. Ask the wearer to raise her arms, sit and rotate before permanent sewing. A cup that appears correct while standing may move downward when posture changes. Any correction to the neckline should come after cup position has been confirmed, otherwise the edge may be shortened to hide a deeper structural problem.
Build the Anchor
The underbust anchor prevents the cups and bodice from moving downward. It may be made with elastic, a stable fabric band, a cup cradle, a powernet frame or a longline lining. Underbust elastic is usually shorter than its attachment line so that it remains firm against the body. For some firm elastics, an initial development test around 8-12% negative ease may be reasonable, but this is not a universal rule. Elastic strength, width, fabric stretch, body size and comfort all affect the final length.
For an 80 cm attachment line, that test range would be approximately 70.4-73.6 cm before seam allowances, but the fitted result must decide the specification. Divide both the elastic and attachment line into equal sections so tension is distributed evenly. Uneven application can pull the centre front upward or create pressure at the side seams. A stable fabric band may be preferable in satin or structured dresses where elastic would gather the surface. In a longline foundation, the underbust anchor connects to the waist, spreading load across a larger area and reducing dependence on the neck strap.
Assemble in Stages
The internal support should remain accessible until the fitting is approved. Begin by marking the lining, basting the cups, attaching the band temporarily and preparing any boning channels. Assemble enough of the shell to reproduce the final neckline, side seams, closure and halter strap. A support fitting conducted on an unfinished, open bodice can be misleading if the final closure or neckline changes the tension.
Correct cup position, band tension, bust containment and side coverage before refining the outer appearance. Adjust the neck strap last, after the lower support is working. Once approved, secure the components using stitches that do not crush the cups or create ridges through the outer fabric. Join the support lining to the shell in a controlled sequence, stabilizing the neckline where needed. Fit the dress again after turning and pressing because heat, edge stitching and lining tension can subtly change the neckline length or cup position. Approval before the lining is closed is necessary, but final approval must happen after the finished layers behave as one garment.
How Are Boning, Lining, and Fabric Used?
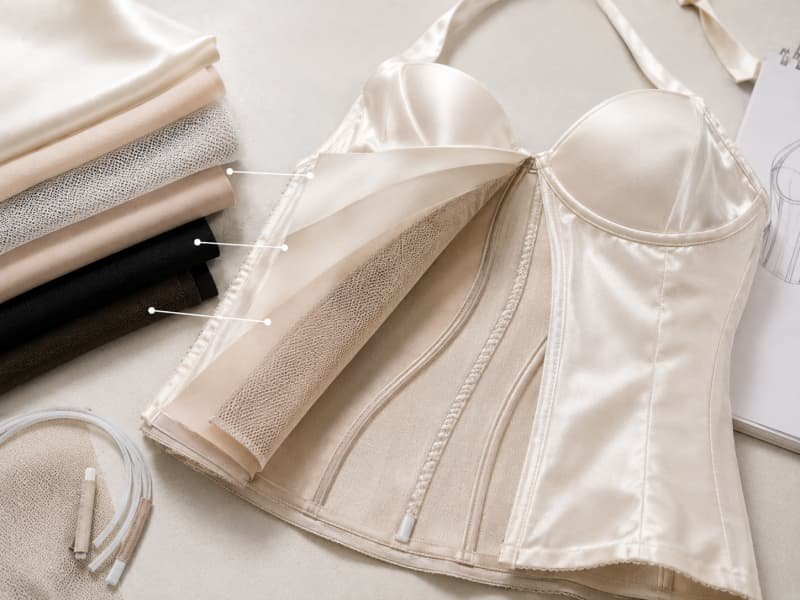
Boning stabilizes the bodice, lining distributes tension, and the outer fabric creates the visible silhouette. Each layer should have a clear job. Boning cannot correct an unsuitable cup, and soft lining cannot hold a strong frame in place. Choose the materials together according to stretch, recovery, transparency, weight, seam behaviour and the support level required.
Boning and Channels
Boning resists folding, maintains vertical length and stabilizes the area around the cups. It is commonly placed near side seams, princess seams, cup edges or the centre front. Lightweight plastic or sew-through boning can provide moderate stabilization in softer dresses. Spiral steel follows curved seams more naturally because it bends in several directions, while flat steel offers stronger vertical resistance but is less suitable for highly curved positions or areas that require side movement.
The channel should fit the selected bone without squeezing it. A tight channel can force the bone against the seam, while a loose channel allows twisting. The bone is normally cut slightly shorter than the finished channel so that the ends do not press directly into the seam. Ends should be rounded, capped or covered securely, and they should not finish at the bust apex or immediately beneath the arm. Always check boning while the wearer sits because the torso shortens. A bone that looks correctly placed while standing may rise into the bust or dig into the waist. Adding more bones does not automatically improve support; the goal is controlled resistance with enough flexibility for normal movement.
Support Linings
A lining is not supportive simply because it covers the inside of the dress. Lightweight polyester lining can improve opacity and comfort while stretching or shifting under load. Supportive halter dresses often require a separate inner layer beneath the ordinary lining. Power mesh and powernet provide controlled stretch and recovery at the side body, back and underbust. Their strength varies widely, so the actual material should be tested rather than selected only by its trade name.
Low-stretch tricot can stabilize cups without the bulk of a fully woven foundation. Stable woven fabric is suitable for corset-style bodices and boning channels, but it requires accurate shaping because it offers little flexibility. Mixed construction is often the most effective: stable fabric around the cup cradle, powernet at the sides and back, soft lining against the skin, elastic at the underbust and local reinforcement where boning is inserted. This arrangement lets each material perform one job and prevents the outer fabric from carrying structural loads that can cause puckering, shine marks or visible tension lines.
Fabric Behaviour
The face fabric determines how much structure can be hidden and how the dress responds to internal tension. A fabric that appears substantial may still be structurally weak, while a lightweight shell can perform well over a properly engineered inner foundation. Changing the face fabric can therefore require a pattern and support revision rather than a simple purchasing substitution. Firm stretch jersey, soft stretch jersey, satin, mesh, crepe and chiffon all react differently around cups, elastic and boning.
Material | Typical Behaviour | Main Support Risk | Useful Response |
Stretch jersey | Flexible and body-following | Loss of recovery; cup edges may show | Add recovery lining and perform a wear test |
Satin | Smooth, reflective and slippery | Puckering, pressure marks, seam slippage | Use stable underlining and concealed attachment |
Mesh | Transparent and lightweight | Cups and elastic remain visible | Integrate support lines into the design |
Power mesh | Controlled stretch and recovery | Strength varies by grade and direction | Test both stretch directions and repeated recovery |
Crepe | Balanced drape and texture | May not hold a defined cup frame | Add a stable inner cradle or bodice layer |
Stretch velvet | Dense surface with directional nap | Uneven stretch and cutting distortion | Test panels in the approved nap direction |
Sequin fabric | Heavy with strong surface interest | Shell weight pulls on support seams | Carry weight through the lining or foundation |
Chiffon | Light and fluid | Almost no structural support | Use a separate fitted inner bodice |
Material Testing
Material approval should include the complete combination of shell, lining, elastic, cups and boning. Test stretch in both directions, recovery after repeated extension, cup-edge visibility under bright light, seam appearance after pressing and elastic comfort after at least 15 minutes of wear. A cup colour that appears neutral in the sample room may become visible under photography lighting, especially beneath white, pale or reflective fabrics. Satin and lightweight wovens should also be checked for seam slippage where the support lining pulls against the shell.
Care testing matters because washing, steaming or dry cleaning can affect cup shape, elastic recovery, adhesive layers and boning channels. Elastic should be tested after sewing because dense stitching can reduce extension while weak stitching may break when the dress is pulled over the body. For recovery testing, mark a 10 cm section, extend it to the intended working length and release it. Measure immediately and again after several minutes. A material that remains noticeably longer may relax during wear, leaving the neckline and underbust less secure than they appeared during the first fitting.
How Do You Test Fit and Support?
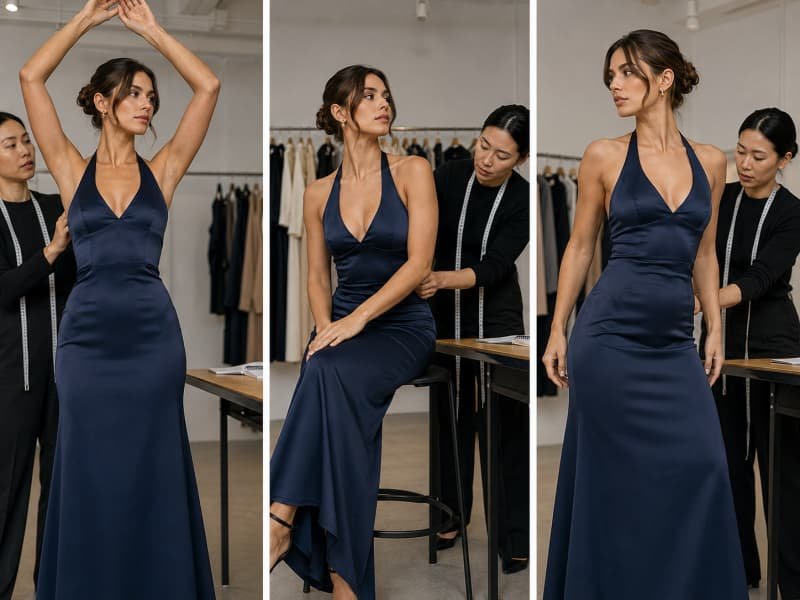
Fit testing should confirm bust containment, lower anchoring, neckline contact, comfort and recovery after movement. The wearer should sit, raise her arms, bend, walk and remain in the dress for at least 15-30 minutes. Support is successful when the cups, underbust band and neckline return to their intended positions without excessive neck pressure or repeated adjustment.
Containment and Balance
Bust containment means the breast remains within the intended support area without spilling at the side, sliding below the cup or being compressed above the neckline. The cup apex should align with the bust apex, the lower edge should stay beneath the breast, and the outer edge should contain the side without cutting inward. The centre area should support the intended silhouette, whether the design calls for separation, soft shaping or controlled cleavage.
The bodice must also remain vertically balanced. When the front waistline rises but the back stays level, the bust may be pulling the garment upward. When the back rises, the lower band may be too loose or poorly positioned. Wrinkles radiating from the cup toward the side seam or neckline can indicate poor cup placement, insufficient volume or a support lining that is pulling the shell. Ask the wearer where pressure is felt and whether the bust feels lifted, compressed or unstable. A smooth-looking dress can still be uncomfortable, especially at the neck, underarm and boning ends.
Movement Testing
Static fitting is not enough because halter necklines react strongly to upper-body movement. Use a repeatable sequence so that different samples can be compared fairly. Ask the wearer to raise both arms, reach across the body, rotate the torso, sit and stand, bend slightly forward, walk quickly and simulate dancing or repeated arm movement. The sample should then be worn continuously for at least 15-30 minutes, because neck pressure and elastic relaxation often appear only after time.
- Raise both arms above the head and lower them slowly.
- Reach forward and across the body in both directions.
- Rotate the torso, then sit and stand several times.
- Bend slightly forward, walk quickly and turn.
- Simulate event movement such as dancing or putting on a jacket.
- Remain in the sample for 15-30 minutes before final comfort comments.
After each stage, check the cup position, underbust level, neckline contact, side coverage and strap pressure. A small amount of temporary movement is normal, but the garment should recover. If the cups remain lower after the arms are raised, the anchor is too weak. If the neckline stays loose after sitting, the fabric or support lining may lack recovery. Inspect the skin after the test as well. Deep neck marks, concentrated pressure around the underbust or irritation from boning indicate that forces are not being distributed correctly.
Correct the Source
A visible fit problem can have several causes. Neckline gaping may result from excess edge length, a low cup, insufficient cup volume or a weak underbust anchor. Shortening the neckline without diagnosing the cause can compress the upper bust or distort the halter angle. Corrections should be tested one variable at a time whenever possible. Changing cup position, strap length and band tension simultaneously makes it difficult to identify which adjustment actually improved the result.
Fit Problem | First Checks | Typical Correction |
Neckline gapes | Cup height, cup volume and neckline shape | Reposition the cup or reshape the neckline before tightening the strap |
Bust slides below cup | Underbust line, cup depth and band tension | Refit the cup and strengthen the lower anchor |
Neck pressure | Band level and side-panel tension | Improve underbust, side or waist anchoring |
Cup edge shows | Cup thickness, edge profile and shell opacity | Use a thinner edge or add underlining |
Side spillage | Cup width and armhole coverage | Increase cup width or add a shaped side panel |
Back rises | Front-to-back tension balance | Rebalance the lower band and bodice |
Boning pushes outward | Bone rigidity, length and channel location | Reposition the channel or change the bone type |
Centre front collapses | Plunge depth and frame strength | Reinforce the frame or revise the plunge construction |
Larger sizes lose shape | Cup, elastic and lining grade rules | Create size-group support specifications |
Test More Than One Size
A supportive base-size sample does not prove that the design will work across the full size range. Cup volume, body proportions and support load do not increase in exactly the same way as the outer pattern measurements. At minimum, test the base size and one larger or fuller-bust size. For a broader range, use lower, middle and upper test sizes with fit models who represent the intended customer rather than relying only on dress forms.
Review cup profile, bust-point spacing, underbust length, elastic width, side-panel height, powernet strength, boning position, halter strap width and neckline coverage in each tested size. A larger size may require a different cup reference instead of a proportionally enlarged base cup. The elastic may also need a different percentage of negative ease for comfort. Side coverage often requires special attention because simply grading the armhole outward can reduce containment. The goal is not identical compression across every size; it is consistent security, comfort and visual balance for each intended wearer.
How Is Bust Support Prepared for Production?
Production-ready bust support requires an approved sample, complete component specifications, measurable placement points, size-specific rules and clear quality checkpoints. The tech pack must define cups, lining, elastic, boning, attachment methods and tolerances. A first production piece should be checked before bulk sewing because small changes in cup profile, elastic tension or placement can significantly alter fit.
Technical Specifications
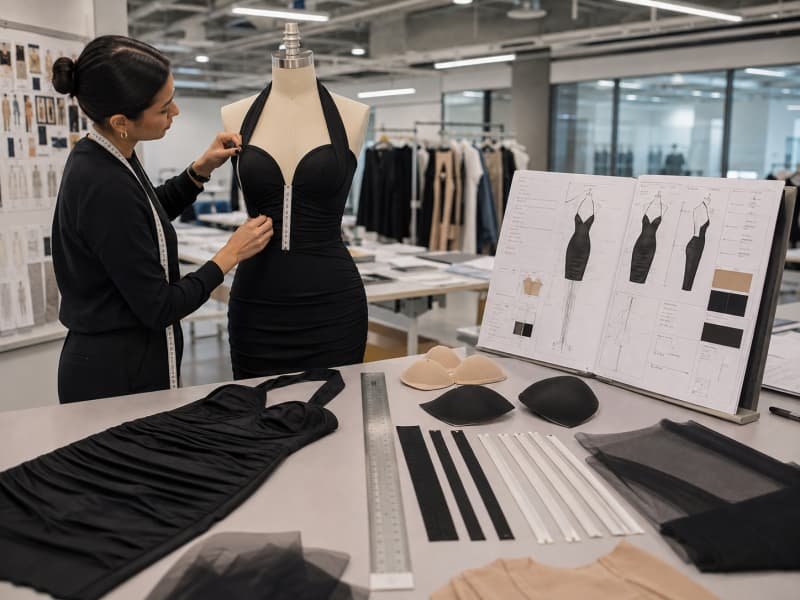
Instructions such as “add padding” or “use supportive lining” are not precise enough for commercial production. Different operators may interpret them differently, creating inconsistent cup positions, elastic tension and neckline shape. The technical package should specify the cup supplier and reference, material, colour, thickness, allocation by garment size, apex position, underbust elastic, support lining, powernet direction, boning type, stitch method, strap length, neckline stabilization and measurable tolerances.
- Cup reference, size allocation, profile, colour and edge thickness.
- Cup-apex position measured from stable finished construction points.
- Underbust elastic type, width, cut length and finished attachment length.
- Support-lining composition, stretch direction and approved recovery.
- Boning or wire type, channel position, length and end protection.
- Halter strap finished length, adjustment range and attachment method.
- Neckline stabilization, stitch type, seam allowance and pressing method.
- Measurement tolerances and approved inside-construction photographs.
Placement should be measured from stable finished references rather than raw fabric edges that may stretch during handling. Centre front, a finished underbust seam and established balance marks provide more reliable control points. Internal photographs are especially useful for mesh, cutout and low-back styles where the support must remain hidden within narrow areas. Component substitution should require approval. Two cups marked as the same size can have different widths, depths, foam density and edge profiles, changing the bust silhouette even when they appear similar on a worktable.
Sample and Approval Stages
A support-sensitive dress should move through defined sample stages because each stage answers a different question. The first prototype confirms whether the proposed support method can coexist with the outer design. The fit sample refines cup placement, underbust tension, neckline shape and movement. A revised sample verifies that the corrections have actually worked. Selected size-set samples check grading, while the pre-production sample confirms the final shell, lining, cups, elastic, boning and workmanship.
- Prototype to confirm space, silhouette and internal support concept.
- Fit sample using components close to production quality.
- Revised fit sample to verify comments and movement performance.
- Selected size-set samples to confirm cup and support grading.
- Pre-production sample in approved bulk materials.
- First production piece and inline inspection before full release.
A sales or photography sample should not automatically become the production standard. It may contain hand adjustments, temporary cups or specially selected fabric used to meet a campaign date. Before bulk release, identify any construction that cannot be repeated consistently and replace it with an approved production method. For halter, backless, corset and fitted occasion dresses, the transition from a beautiful sample to repeatable bulk depends on locking the cup, band, lining and construction sequence before cutting begins.
Placement and Tolerances
Support components need measurable tolerances because small shifts can change appearance and performance. The appropriate range depends on the garment, fabric and size. In many fitted styles, a cup-apex shift of several millimetres is visible, so a project may use a placement tolerance around plus or minus 5 mm from the approved reference. That figure is an example rather than a universal standard; transparent mesh, strong symmetry lines or a narrow plunge may require tighter control.
Underbust elastic should be measured before and after attachment. The cut length confirms material preparation, while the finished attachment length identifies uneven stretching during sewing. Boning length should be controlled relative to the channel so the bone is neither long enough to damage the seam nor too short to stabilize the section. Neckline length must be measured without stretching, because a minor difference in the flat garment can create visible gaping on the body. The quality team should compare the garment with both the measurement chart and the approved sample, since support is three-dimensional and similar flat measurements can still produce different fit when cup orientation or elastic distribution changes.
Bulk Quality Control
Quality control begins before assembly. Cups should be checked for matching shape, colour, thickness and deformation. Elastic, powernet and support lining should be verified against approved references, and boning should be cut and finished safely. During sewing, first-piece approval should confirm cup position, underbust length, boning placement, neckline stability and symmetry. These operations are difficult to correct once the lining has been closed, so inspection must happen at the point of construction rather than only at final packing.
- Cup apexes align with the approved marks and sit at the same height.
- Cup edges remain smooth and do not print through the outer shell.
- Underbust elastic is distributed evenly and stays level.
- Boning ends are fully enclosed and channels are securely closed.
- Powernet is cut in the specified stretch direction.
- Neckline edges remain flat and halter straps match the approved length.
- The lining is not twisted, over-tightened or pulling the outer fabric.
- The centre front remains stable through the required movement test.
Inline inspection should focus on the highest-risk operations rather than waiting until the dress is complete. Flat inspection can identify workmanship defects, but it may not reveal cup collapse, neckline gaping or unbalanced tension, so controlled fit sampling or form checks should be used where the project requires them. The objective is not to add the greatest amount of structure. It is to reproduce the approved balance of support, comfort and appearance across every intended size and production batch.
Develop a Production-Ready Halter Dress
A well-supported halter dress is not created by hiding two cups beneath the lining. It comes from coordinating cup volume, underbust anchoring, neckline shape, side coverage, lining recovery, boning and strap tension. When those decisions are made together, the garment can look lighter, feel more secure and perform more consistently during real wear. Before approving a style, the development team should know who the intended wearer is, how much support she needs, where the lower anchor sits and whether the structure can be reproduced across the planned size range.
Duolan Apparel develops fashion dresses for established brands and product teams, with documented experience in halter, backless, bodycon, corset, bustier, satin, mesh, party and occasion constructions. Its supplied company profile describes dress-focused pattern, sample, material and production resources supported by a multi-factory manufacturing system. To review a custom halter-dress project, send the tech pack, reference images or original sample, target size range, fabric direction, estimated quantity and launch date. The development team can assess the support concept, identify structural risks and recommend a practical sample route before bulk production begins.
Share:
Our Services
Categories
Table of Contents
Here, developing fashion collections is more than manufacturing garments — it’s a collaborative process focused on transforming ideas into well-executed, market-ready products. From fabric sourcing and sample development to scalable production and delivery coordination, every stage is built to support quality, consistency, and efficient collection launches across global markets.
