Skip to content

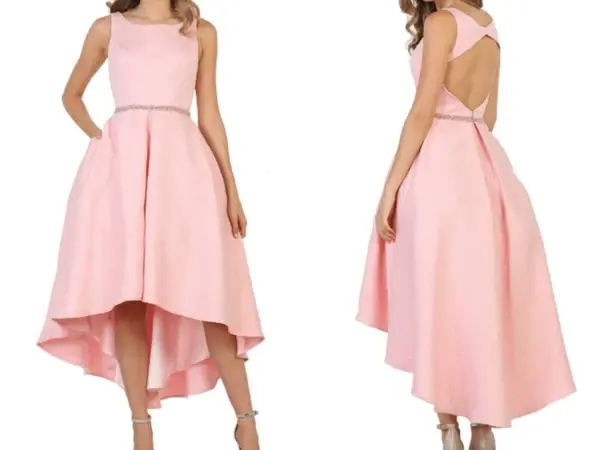
A high-low dress hem looks effortless when the proportion is right: the front feels light, the back carries movement, and the curve seems to fall naturally around the body. Getting to that point is less effortless than it appears. The hem is influenced by pattern geometry, sweep, grain direction, fabric weight, lining, seam construction, pressing, and the amount of time the garment is allowed to settle. A shape that looks balanced on paper can change after a few hours on a hanger, and a sample that photographs beautifully can become inconsistent when the same method is repeated across hundreds of garments.
A reliable high-low hem is developed by controlling the front-to-back drop, the transition through the side seams, fabric drape and bias growth, the hem-finishing method, and the measurement standards used during sampling and bulk production. The goal is not simply to make the back longer than the front. The goal is to create a repeatable silhouette that hangs smoothly, moves naturally, and keeps the same visual balance across sizes and production lots.
That distinction is what separates a strong development process from last-minute trimming. Imagine an approved satin sample with a clean 30 cm front-to-back drop. The next fabric lot is slightly softer, the back quarter relaxes more on the bias, and the production line hems the garments before they have settled. The paper pattern has not changed, yet the dresses no longer look like the approved sample. High-low development becomes much easier once the team stops treating the hem as a single line and starts treating it as a connected system of pattern, material, fit, finishing, and production control.
What Is a High-Low Dress Hem?
A high-low dress hem is a deliberately shaped hemline that finishes shorter at the front and longer at the back, with the change in length flowing through the side areas rather than appearing as a sudden step. Its final appearance depends on more than front and back measurements: skirt sweep, fabric drape, grain direction, lining, body proportions, and finishing all influence whether the silhouette looks balanced and intentional.
What Defines a High-Low Hem?
The most obvious feature is the difference between the center-front and center-back lengths, but experienced pattern teams rarely judge the shape from those two points alone. The side length and the curve connecting the front to the back are equally important. A dress can hit the correct front and back measurements and still look awkward because the transition becomes too steep near the side seam, one quarter of the skirt hangs lower than the other, or the back fullness pulls the curve away from the intended position.
It is more useful to think of the hem as a three-dimensional silhouette rather than a curved line on a flat paper pattern. For a moderately flared dress, control points at center front, front quarter, side seam, back quarter, and center back provide a much clearer picture of the shape. These points help the pattern maker see where the length begins to increase, how quickly the curve descends, and whether the back extension is centered or visually drifting toward one side.
Skirt volume changes how strongly the drop is perceived. A relatively narrow skirt can make a 25 cm difference look sharp and directional, while a wide circular skirt spreads the same difference across a larger sweep and makes the transition look softer. This is one reason a brand should not approve the front-to-back drop in isolation. The drop, side length, total sweep, and material behavior need to be considered together if the final silhouette is expected to stay recognizable after fitting and production.
How Is It Different From an Asymmetric Hem?
A high-low hem belongs to the broader family of asymmetric hems, but the two terms are not interchangeable in technical development. An asymmetric hem can be longer on one side, cut diagonally, shaped into handkerchief points, created with overlapping panels, or produced by draping and ruching. A high-low hem is more specific: its main length relationship normally progresses from a shorter front to a longer back, even when the curve is softened by flare or layered construction.
The distinction matters when a reference image becomes a tech pack. A comment such as “make the hem more asymmetric” is not specific enough for reliable pattern work. The team needs to know whether the center front should move upward, the center back should move downward, the side seam should remain fixed, or the entire transition should become steeper. Each option changes the pattern differently and can affect sweep, grain direction, lining visibility, and the amount of fabric touching or approaching the floor.
Fashion merchandising also uses terms such as dipped hem, waterfall hem, uneven hem, and asymmetric hem quite loosely. That is normal on product pages, but development teams need a measurable description. Photographs are useful for communicating the visual target, yet measurements and marked control points are what allow the same shape to be reproduced. A technical team should also confirm whether the apparent asymmetry actually comes from the hem pattern, because wrap construction, side draping, or a twisted waist can create a similar appearance through a completely different structure.
Which Dress Styles Use High-Low Hems?
High-low hems are especially effective when movement is part of the product’s visual appeal. Occasion dresses, party dresses, cocktail dresses, resort dresses, prom-inspired styles, ruffled dresses, chiffon dresses, and flowing maxi silhouettes can all use the shape successfully. The shorter front can expose more leg and footwear, while the longer back maintains volume and movement. This combination is useful for products expected to look strong in photography, events, social content, and motion rather than only on a hanger.
The same geometry behaves differently across categories. A soft viscose resort dress may suit a relaxed, fluid transition, while a satin occasion dress usually needs a cleaner and more controlled curve because its reflective surface makes small irregularities easy to see. Organza can preserve a sculpted high-low shape almost literally, whereas chiffon tends to soften the paper pattern and move more freely around the body. Layered mesh can add another variable because each layer may have a different weight and settling behavior.
The intended occasion should influence proportion as well. A subtle drop can add movement to a day-to-evening style without looking theatrical, while a dramatic back extension makes more sense for an event dress where the silhouette is meant to create a stronger entrance. The practical question is not whether a particular category can use a high-low hem. It is whether the drop, sweep, material, lining, and finishing method all support the same design intention without creating avoidable fit or production problems.
How Is a High-Low Hem Pattern Drafted?
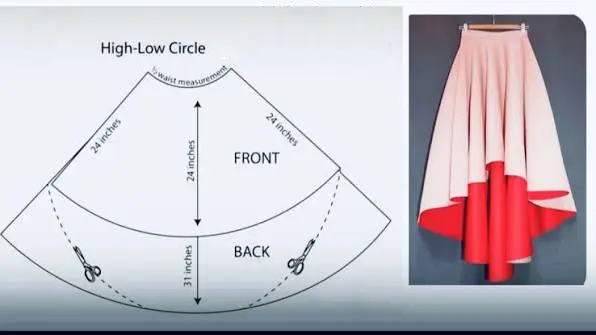
A high-low hem pattern is drafted by defining the desired front, side, and back lengths, then connecting those points with a controlled curve that works with the skirt’s flare and grain direction. The pattern should be trued at side seams, checked for left-right balance, and tested in the intended fabric because a mathematically smooth paper curve can still hang unevenly once the skirt carries its own weight.
How Do You Set the Front-to-Back Drop?
The front-to-back drop should begin with the intended wearing position rather than an arbitrary number. First decide where the front should finish on the body, then establish the back length according to footwear visibility, movement, floor clearance, and the overall mood of the style. A 15 cm difference can feel modern and restrained, while a 45 cm difference can change the same base silhouette into a much more dramatic occasion piece. The numbers only become meaningful when they are considered against garment length and wearer proportions.
The ranges below are useful as early development references rather than fixed industry standards. They help product teams describe the visual intensity they want before the pattern is refined on the body and in the actual material.
| Visual Effect | Indicative Front-to-Back Drop | Typical Application | Main Development Concern |
| Subtle | 10-20 cm | Day, resort, easy occasion styles | Drop may disappear visually on very full skirts |
| Moderate | 20-35 cm | Cocktail, party, occasion dresses | Side transition becomes more noticeable |
| Dramatic | 35-55 cm | Event and statement dresses | Back weight, movement, floor clearance |
| Very dramatic | 55 cm+ | Editorial or train-like looks | Bias growth, practicality, production control |
A 30 cm drop does not create the same appearance on every skirt. On a finished sweep of roughly 150-170 cm, the change can look direct and relatively sharp. On a sweep closer to 280-320 cm, the same length difference is distributed over much more fabric, so the shape can appear softer and more gradual. The design team should therefore approve the front-to-back relationship together with sweep, side length, and the placement of intermediate control points.
A useful sample comment should also state which point is intended to stay fixed. If the back feels too dramatic, shortening the center back by 5 cm is different from lengthening the center front by 5 cm, even though both reduce the numerical drop by the same amount. The first changes back clearance and movement; the second changes how much leg is exposed. Clear development comments protect the intended proportions instead of simply chasing a target number.
How Is the Side-Seam Transition Balanced?
The side seam is one of the most revealing checkpoints in a high-low dress because it connects the shorter front area with the longer back section. If the front and back pieces meet at different angles, the finished hem can form a point, dip, or visible break at the seam. Pattern pieces should therefore be joined or virtually walked together before cutting so the hem can be trued across the seam and the curve can continue smoothly rather than changing direction abruptly.
For simple styles, center front, side seam, and center back may provide enough control. More dramatic or fuller shapes benefit from additional quarter points. A team might compare the vertical length at center front, a front-quarter position, the side seam, a back-quarter position, and center back. These measurements are not necessarily customer-facing specifications, but they provide an internal map that makes it easier to identify whether a problem comes from the actual pattern curve or from fabric relaxation after assembly.
The side seam must also be evaluated on the body. A high hip, uneven waist position, tight lining, zipper distortion, or twisted bodice can make one side appear lower even when the skirt pattern itself is symmetrical. If the hem is trimmed before these causes are checked, the correction can hide the real fit problem and create a new issue when the upper garment is corrected later. The hem should be the last part of a balance problem to be cut, not the first part blamed.
How Do Flare and Sweep Change the Curve?
Flare determines how fabric distributes itself around the body, and that distribution changes the high-low effect. As sweep increases, a larger portion of the skirt moves away from the straight grain and closer to diagonal or bias directions. This usually creates more movement and a softer fall, but it also increases the chance that some sections will relax more than others. A very full skirt therefore needs more attention to settling, leveling, and production handling than a narrow skirt made in the same material.
Consider two dresses with the same 30 cm center-front-to-center-back drop. If one skirt has a finished sweep around 160 cm and the other around 300 cm, the second contains far more curved edge and more fabric hanging away from the straight grain. The paper measurements can be identical, yet the second style is more likely to show local growth at the front or back quarters. This is not a pattern-making failure by itself; it is a predictable consequence of fabric weight interacting with grain direction and skirt volume.
Ruffles, godets, circular panels, and layered constructions increase the effect. A heavily gathered back panel can visually drag the hem even when the pattern lengths are correct, while an inserted godet can change both weight distribution and the apparent curve. Sometimes reducing back sweep by 10-15% improves control without noticeably changing the design. In other cases, the fullness is the main selling feature and should be preserved, which means the development and production method must be designed around that extra movement instead of trying to eliminate it.
Which Fabrics Work Best for High-Low Hems?
High-low hems work best in fabrics whose drape, weight, and structure match the intended silhouette. Fluid fabrics create softer movement, while firmer fabrics hold a clearer architectural shape. Because different sections of a curved skirt can fall on different grain directions, fabric weight, bias growth, stretch, recovery, surface friction, and lining compatibility should be tested before the final hem pattern and finishing method are approved.

How Do Drape and Weight Change the Shape?
A pattern can look completely different when it is cut in another material. Chiffon collapses into small folds and moves easily, satin often forms broader folds and reflects every small ripple, crepe usually gives more controlled movement, and organza can hold a sharper shape with greater visual volume. This is why switching fabric after the silhouette has been approved should not be treated as a simple sourcing substitution. The same hem curve can appear shorter, longer, fuller, or more uneven depending on the material’s weight and bending behavior.
Approximate weight ranges can help during early development, although supplier specifications and physical testing should always take priority because fiber content, weave, finishing, and yarn construction can change behavior even at a similar gsm.
| Fabric | Approx. Weight Range | Typical High-Low Behavior | Main Development Check |
| Chiffon | 50-100 gsm | Very fluid with high movement | Bias growth and narrow-hem control |
| Georgette | 60-120 gsm | Fluid with slightly more body | Grain distortion and edge stability |
| Lightweight crepe | 90-160 gsm | Soft but comparatively controlled | Hem leveling and repeatability |
| Satin | 80-180 gsm | Fluid with strong light reflection | Puckering, fluting, pressing marks |
| Organza | 30-80 gsm | Crisp and volume-holding | Edge stiffness and curve shape |
| Heavier crepe | 160-220 gsm | Stable, fuller fall | Weight at back hem and waist balance |
The most useful test is still the garment itself. A 15 cm swatch may feel soft in the hand but behave differently when that same fabric is spread across a 250-300 cm curved hem. When the final fabric is unavailable, a partial skirt test made in a material with similar weight, drape, and surface character gives the pattern team more useful information than a small swatch alone. This is particularly important for occasionwear, where movement and surface quality are part of the product’s commercial value.
How Does Bias Stretch Affect the Hem?
Bias growth is one of the main reasons a curved hem changes after sewing. In a flared skirt, some areas hang close to the straight grain while others approach the bias, and those areas respond differently to gravity. The effect is usually more visible in soft, loosely constructed, or highly fluid fabrics. A longer back section can add further weight, so one quarter of the skirt may relax more than the side seam even when every paper measurement was correct at the cutting stage.
For fluid or strongly flared skirts, allowing the assembled garment to hang before final leveling is often more reliable than hemming immediately. A moderately fluid style may be checked after roughly 12-24 hours, while a very fluid circular skirt may need closer to 24-48 hours before the team decides whether the lengths have stabilized. These are practical working ranges, not universal rules. The actual fabric should determine the process, especially when a brand requires a tight visual tolerance.
A simple measurement record makes the decision much clearer. Suppose the front quarter changes from 91.8 cm to 92.7 cm after 24 hours, while the side seam moves from 97.0 cm to only 97.2 cm. That 0.9 cm local difference shows that the material is relaxing unevenly rather than the whole garment simply becoming longer. Once this pattern is understood, the team can decide whether to pre-compensate in the paper pattern, change the hanging procedure, or reconsider the fabric if the growth is too unpredictable for repeat production.
How Should Lining Be Developed?
A lining should support the outer skirt without controlling it unintentionally. Problems often appear when the lining is treated as nothing more than a shorter copy of the shell. If the lining has too little sweep, it can pull the outer skirt inward and reduce movement. If it is too long, it can flash below the short front area. If its weight or stretch behavior is very different from the shell, the two layers can settle at different rates and create tension that shifts the hem or side seams.
For many lined high-low dresses, the lining may initially be developed several centimeters shorter than the shell at visible points, often around 3-8 cm depending on style, fabric transparency, and intended movement. That is only a starting relationship. A sheer mesh dress may intentionally expose part of the lining, while a layered chiffon style may need a much larger difference so the layers remain visually separated when the wearer walks. The front area deserves particular attention because lining exposure becomes more obvious where the outer shell is already shortest.
Material compatibility matters as much as length. A stiff acetate lining under soft chiffon can suppress the movement that made the shell attractive in the first place, while a very stretchy knit lining under a stable woven shell can encourage twisting or uneven tension around the waist and side seams. During fit review, the shell and lining should be assessed together while standing, walking, sitting, and turning. If a brand sends a tech pack or reference sample for development, this relationship is worth locking early because a late lining change can force the hem and fit to be reviewed again.
How Do You Control the Hem During Sampling?
A high-low hem should be controlled during sampling by allowing the fabric to relax where necessary, checking the garment on a dress form or fit model, measuring several hem reference points, and translating visible problems back into pattern corrections. Final trimming should come after the cause of an uneven hem is understood. The approved sample must establish a repeatable production method, not simply look correct once.

How Long Should the Skirt Settle Before Leveling?
There is no single settling time that works for every high-low skirt. A compact woven dress with limited flare may change very little after assembly, while a full chiffon or crepe skirt can continue to grow at the bias sections as gravity acts on the garment. Instead of relying on habit, sample teams can measure the hem immediately after assembly, hang the garment naturally for a defined period, and then compare the same points under the same measurement conditions.
A useful record might include center front, front quarter, side seam, back quarter, and center back on both sides. If a sample changes by only 0.2-0.3 cm at most points after 24 hours, the fabric may already be stable enough for leveling. If one quarter grows 1.2-1.5 cm while the rest of the skirt barely changes, the team has evidence of local bias behavior. That information is more useful than simply saying the hem “looks lower” because it identifies where the problem is developing.
If growth stabilizes after approximately 24 hours, that can become the working sample procedure. If it continues toward 48 hours, the team may need a longer relaxation step, a pattern adjustment, a different cutting orientation, or a different material. The production method should later mirror the approved sampling method. If the sample was allowed to settle overnight but bulk garments are hemmed immediately, the team is no longer reproducing the process that created the approved result.
How Is the Hem Balance Checked?
Hem balance should be reviewed from the front, side, back, and three-quarter views because each angle exposes different problems. A front view can reveal left-right imbalance, while a side view shows whether the curve transitions smoothly from short to long. A back view makes it easier to see whether the longer section is centered or being pulled by the zipper, lining, back seam, or uneven fullness. A mannequin can be useful, but a fit model is often necessary when walking movement matters.
For a symmetrical high-low style, differences around 0.5-1.0 cm between matching left and right points can already become visible on plain satin or other smooth solid fabrics. Prints, ruffles, or highly textured surfaces may disguise a small difference, but the internal standard should still be defined because inconsistency becomes more obvious when multiple units are viewed together. The acceptable tolerance should be agreed according to fabric behavior, product positioning, and the brand’s measurement specification rather than copied from another style.
The upper garment must be checked before the hem is corrected. A tilted waist seam, a zipper pulling to one side, uneven bust support, or a twisted bodice can make the skirt appear longer on one side even when the skirt pattern is correct. Trimming the low side may create a temporary visual fix, but once the bodice is corrected the hem can become too short. Experienced sample teams diagnose the entire balance chain before taking scissors to the bottom edge.
How Do Fit Comments Become Pattern Corrections?
Useful fit comments describe what is happening, where it is happening, and what the approved reference should be. “Trim 2 cm from the side” sounds precise but assumes that the hem itself is the cause. A more useful comment would state that the left side hangs approximately 1.5 cm below the right while center front and center back remain within the approved measurements. That gives the pattern maker enough information to investigate local bias growth, side-seam mismatch, lining tension, or waist imbalance instead of cutting blindly.
Revisions should be recorded by sample version. If Sample 2 changes center front by -1 cm, front quarter by -1.5 cm, side seam by -0.5 cm, and center back by 0 cm, those adjustments should appear in the revised pattern and measurement record. Sample 3 should then be checked against that new reference. Without version control, a later sample can easily reintroduce a problem that was already corrected because one team is working from the latest pattern while another is still reading comments from an earlier version.
A structured development workflow also separates fit changes, fabric or detail changes, visual preferences, and production-related concerns. That matters because they are not always solved in the same way. A softer hem curve might be a visual preference, while a quarter-point drop caused by bias growth is a technical issue. When teams treat every comment as the same type of instruction, unnecessary revisions accumulate. When the comment is tied to a measured observation and a clear goal, each sample round becomes easier to judge and more useful as a basis for production.
How Is a High-Low Hem Finished Cleanly?
A clean high-low hem uses a finishing method that can follow the curved edge without stretching, puckering, or creating excess bulk. Lightweight fabrics usually respond better to narrow, flexible finishes, while firmer fabrics may support a facing or bound edge. The correct method depends on curve depth, fabric thickness, transparency, price level, and whether the finished edge is meant to look soft, crisp, nearly invisible, or deliberately structured.

Which Hem Finish Works Best on Curves?
Curved hems are harder to turn than straight hems because the outer raw edge is longer than the line onto which it must fold. The deeper the curve, the greater this difference becomes. A wide turn-up can therefore create excess fabric inside the hem, which shows as puckering, small folds, or a wavy edge. Narrow hems are often easier to control on chiffon, georgette, fine crepe, and lightweight satin because they ask the fabric to absorb less difference between the outer and inner edge lengths.
A rolled hem might finish around 2-3 mm wide on a lightweight fabric, while a baby hem often falls around 2-4 mm. A narrow double-turn hem around 5-8 mm can work when the curve is moderate and the fabric has enough stability to be handled without stretching. These figures are practical starting points rather than universal specifications. A 3 mm hem that looks excellent in polyester chiffon may be difficult to execute consistently in a heavier acetate satin, especially if the edge is very curved.
A faced hem solves the problem differently. Instead of forcing a wide seam allowance around the curve, a separate shaped facing follows the hem geometry and can add body or weight where the design needs it. This can work well for structured occasion dresses or firmer satin styles. The finishing method should be approved during sampling because changing it later can affect finished length, drape, pressing behavior, sewing time, and cost. A hem finish is part of the silhouette, not merely the last operation on the sewing line.
How Do You Prevent Puckering and Fluting?
Puckering and fluting are common on high-low hems because the edge often moves through several grain directions. Puckering may come from thread tension, feeding imbalance, fabric compression, or a turned allowance that cannot sit comfortably inside the curve. Fluting often appears when the edge is stretched during sewing and then stays longer than the fabric immediately above it. Satin makes both problems particularly noticeable because reflected light exaggerates even small surface distortions that a printed or textured fabric might hide.
Handling is the first control point. Operators should avoid pulling the edge through the machine, and the weight of the garment should be supported so the long back section does not drag on the part being stitched. Needle size, thread, presser-foot pressure, stitch length, and differential feed where relevant should be tested on curved pieces cut from the actual production fabric. A straight-grain scrap is a poor test for a bias-heavy hem because it does not reproduce the same stretch response.
Pressing can improve or worsen the result. Excessive steam may relax some fabrics and increase distortion, while too much iron pressure can leave shine or impressions on satin. The longer the hem, the more small handling differences accumulate. On a sweep around 250-300 cm, even slight stretching repeated around the edge can become obvious by the time the operator reaches the starting point. The most reliable method is one that an average trained operator can repeat consistently, not one that only the best sample machinist can make look correct.
How Are Sheer and Layered Hems Finished?
Layered dresses should not automatically use the same finish on every layer. The outer chiffon, inner mesh, organza ruffle, and opaque lining may have different visual roles and different edge behavior. An outer chiffon layer might suit a 2-3 mm rolled hem, while an internal layer may use another narrow finish and the lining may use a wider double turn. The exact combination should come from fabric testing, but forcing one construction method onto every layer simply for convenience can flatten the design or make the layers behave unevenly.
Length relationships should also be defined separately. If the outer center-back length is 145 cm, the next layer may intentionally finish a few centimeters shorter and the lining shorter again. The front differences may not match the back differences because the shortest area is where lining exposure is most likely to become visible during walking. These numbers should be approved on the body rather than taken from a fixed formula, especially when the outer layers are transparent or move independently.
For complex layered styles, it is often easier to level and approve individual layers before the full assembly is completely closed. That gives the sample room better access to each hem and makes it easier to identify which layer is creating tension. Once the layers are joined at the waist, side seam, or lining attachment points, one layer can pull another and create a problem that looks like bad hemming even though the real cause is above the hem. Layered high-low dresses reward careful sequencing because correction becomes harder after the structure is fully enclosed.
How Do You Keep High-Low Hems Consistent in Bulk?
High-low hems stay consistent in bulk when the approved sample is translated into measurable production controls. The pattern version, shell and lining materials, key hem lengths, relaxation procedure, workmanship method, and visual standards should be locked before cutting. First-piece verification and inline inspection should then confirm that the production process reproduces the approved silhouette rather than relying on final trimming to correct variation after hundreds of garments are assembled.
What Must Be Locked Before Cutting?
An approved sample is only useful if the team knows exactly which details were approved. Before bulk cutting, the final pattern version should be identified clearly, especially when several sample rounds have changed the front length, back length, side transition, or sweep. The approved shell fabric and lining should also be confirmed because a new lot can behave differently even when the composition and nominal gsm look the same on the purchase order.
For shape-sensitive styles, useful pre-cutting checks can include fabric width, weight, color, hand feel, shrinkage, drape, and any relaxation behavior observed during sampling. Key measurements should include more than center front and center back when the style demands it. Side-seam length, quarter points, lining relationship, sweep, and the approved front-to-back drop may all be important. If the sample required 24 hours of settling before leveling, that process is just as relevant to bulk consistency as the paper pattern itself.
The workmanship method must be specific enough for production. “Narrow hem” may not tell the line whether the target width is 3 mm or 7 mm, whether a rolled-hem attachment is required, how the garment should be supported during sewing, or what pressing method was approved. The best time to clarify these details is before cutting, when changes are still manageable. Once hundreds or thousands of panels have been cut, correcting a pattern, lining relationship, or material issue becomes significantly more expensive and can threaten the delivery calendar.
How Do You Control Measurement and Symmetry?
Tolerances should be set according to the fabric, garment construction, size range, brand requirements, and visual sensitivity of the style. There is no single universal tolerance that suits every high-low dress. A plain satin occasion dress can expose small length differences that would be almost invisible in a printed chiffon style, so the same numerical tolerance does not always create the same visual quality. Development teams should establish working ranges during the pilot stage and confirm them against the approved sample.
The table below illustrates the type of internal control that may be used for a shape-sensitive dress. These figures are practical examples, not substitutes for a brand’s own approved measurement specification.
| Control Point | Example Working Range | What It Protects |
| Center-front length | +/-0.5-1.0 cm | Front proportion and leg exposure |
| Center-back length | +/-0.5-1.0 cm | Drop, movement, and floor clearance |
| Left-right balance | 0.5-1.0 cm max. difference | Visual symmetry |
| Side-seam length | +/-0.5-1.0 cm | Smooth front-to-back transition |
| Narrow hem width | About +/-1-2 mm | Visible workmanship consistency |
| Lining exposure | As approved sample | Clean front and side appearance |
| Front-to-back drop | Derived from approved length tolerances | Silhouette identity |
Measurements also need consistent conditions. One dress measured immediately after steaming and another measured after hanging overnight may produce different readings even when construction quality is similar. The measuring surface, hanging time, closure position, and method of placing the tape should be standardized for important points. When a tolerance failure appears, the team should determine whether it comes from cutting, sewing, pressing, fabric relaxation, or measurement technique before adjusting the pattern or rejecting large quantities unnecessarily.
How Is Bulk Inspection Performed?
First-piece inspection is particularly valuable for high-low dresses because it verifies whether the production line can reproduce the approved sample before full output begins. The review should include center-front and center-back measurements, side transition, left-right balance, hem workmanship, lining visibility, seam position, pressing, and overall hanging appearance. For highly fluid styles, the garment may also need to be checked after the same relaxation period used during development so the comparison is meaningful.
Inline inspection then looks for process drift. If the first 20 garments are balanced but later pieces begin showing a lower right side, the team should investigate bundle handling, cutting accuracy, machine settings, operator handling, pressing, or hanging procedure instead of treating every dress as a separate defect. A pattern problem normally repeats in a consistent way; a process problem may appear gradually or only on specific bundles or operators. That distinction saves time when the line needs to be corrected quickly.
Final inspection should combine measurement with visual evaluation. A dress can technically meet its center-front and center-back lengths and still look wrong because the curve dips at a quarter point, one side seam rotates, the lining shows at the front, or the hem waves after pressing. Repeat orders should be treated with the same care. A second production run months later may use another fabric lot or line, so critical fabric behavior and workmanship should be reconfirmed rather than assuming the old pattern alone guarantees the same result.
Conclusion
A successful high-low hem is not defined by a dramatic back length or a perfect curve on a CAD screen. It is defined by whether the intended proportion survives real fabric, real movement, sampling, grading, sewing, pressing, packing, and repeat production. The most dependable development process connects the visual idea to measurable checkpoints: front and back length, side transition, sweep, fabric behavior, lining relationship, settling time, hem finish, and bulk tolerances. When one of these changes, the rest of the system should be reviewed rather than assuming the approved shape will automatically remain the same.
For fashion brands, the technical work is largely invisible to the customer, but its effect is not. Customers notice when the back hem drags differently from one dress to another, when a lining appears beneath the short front, or when a satin edge ripples under light. A capable development partner should be able to explain these risks before production, test the variables during sampling, and carry the approved decisions into bulk manufacturing. That is what turns a high-low hem from a visually attractive sample detail into a commercially reliable product.
Frequently Asked Questions
What is the best fabric for a high-low dress hem?
There is no single best fabric because the right choice depends on the intended silhouette. Chiffon, georgette, and lightweight crepe work well when soft movement is the priority, while satin creates a more polished and reflective occasionwear look. Organza suits styles that need crisp volume. The important comparison is not only gsm but also drape, bias growth, surface friction, and how the fabric behaves across a wide curved hem. A sample or partial-skirt test is more reliable than choosing from swatches alone.
How much longer should the back of a high-low dress be than the front?
The appropriate drop depends on dress length, wearer proportions, skirt sweep, and the intended visual effect. A difference around 10-20 cm often produces a subtle result, 20-35 cm creates a clearly visible high-low silhouette, and 35-55 cm can create a stronger event or statement look. These are practical development ranges rather than fixed standards. The same 30 cm drop can look very different on a narrow skirt and a full circular skirt, so the side transition and sweep should be approved at the same time.
Why does a high-low hem become uneven after hanging?
The most common reason is uneven relaxation across different grain directions. Flared skirts place some areas close to straight grain and others close to bias, so soft fabrics can lengthen more in certain quarters under their own weight. A garment may look balanced immediately after sewing and change over the next 12-48 hours. Measuring several reference points before and after hanging helps identify whether the problem is local bias growth, an overall length change, or a fit issue coming from the waist, lining, or upper garment.
Should a high-low skirt hang before it is hemmed?
Many fluid or strongly flared high-low skirts benefit from hanging before final leveling, especially when chiffon, georgette, crepe, or another bias-sensitive fabric is used. A practical starting point is roughly 12-24 hours for moderately fluid styles and 24-48 hours for very fluid or circular constructions, but the fabric should determine the final process. The important production principle is consistency: if the approved sample was leveled after hanging, bulk garments should follow a comparable method rather than being hemmed immediately after assembly.
What hem finish is best for a curved high-low skirt?
Lightweight curved hems usually respond well to narrow finishes because a deep turn-up can create excess fabric around the curve. Rolled hems around 2-3 mm and baby hems around 2-4 mm are common development starting points for fine chiffon, georgette, or similar materials. A 5-8 mm narrow double turn can suit more stable fabrics, while a shaped facing may be better for structured styles. The final choice should be tested on the actual fabric because curve depth, weight, transparency, and pressing response all affect the result.
How can high-low hems stay consistent in bulk production?
Consistency comes from converting the approved sample into a controlled production standard. The final pattern version, shell and lining fabrics, front and back lengths, side and quarter reference points where necessary, relaxation method, hem construction, pressing process, and measurement tolerances should be locked before cutting. First-piece approval checks whether the production line can reproduce the sample, while inline inspection catches process drift before it spreads. Final inspection should include both measurements and the natural hanging appearance because a dress can pass two length measurements and still look visually unbalanced.