Skip to content

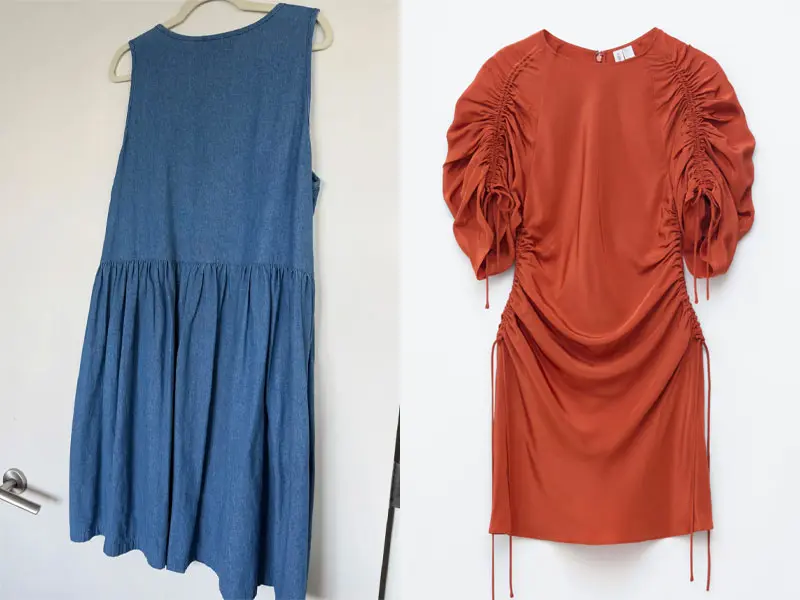
Gathering and ruching are often discussed as if they were interchangeable because both compress extra fabric into a shorter space. On an actual dress, however, the difference becomes important very quickly. A gathered skirt uses excess fabric to create volume that releases away from the seam, while a ruched bodycon dress keeps the folds concentrated against the body as part of the visible design. That distinction affects pattern length, fabric selection, sewing method, grading, fit review, lining construction, and the way a style can be repeated in production.
Gathering primarily controls and distributes fullness, while ruching deliberately keeps compressed folds visible to create texture, shaping, or adjustable length. Gathering commonly joins a longer edge to a shorter seam at waists, cuffs, tiers, and sleeve heads. Ruching is more often concentrated at the bust, waist, hip, or side seam, where its density and placement can change fit, silhouette, and garment length.
The difference sounds straightforward until a sample arrives with beautiful folds in the wrong place, a side seam that has rotated forward, or a hem that sits two centimeters higher on one side. These are not unusual mistakes when a design note simply says “add gathers” or “make it ruched.” The most reliable development work begins by translating the visual idea into measurable lengths, locations, tension, and fabric behavior. Once those variables are clear, both techniques become much easier to design, sample, grade, and reproduce consistently.
What Is the Difference Between Gathering and Ruching?
Gathering reduces a longer fabric section into a shorter finished length so fullness can be controlled or redistributed. Ruching keeps that compressed fabric visibly concentrated as a design feature. Gathering often supports volume at waists, cuffs, tiers, or sleeve heads, while ruching is commonly used around the bust, waist, hip, or side seam to create texture, shaping, or adjustable length.
| Comparison Point | Gathering | Ruching |
| Main purpose | Distribute or create fullness | Create visible texture and local shaping |
| Typical location | Waist seams, sleeve heads, cuffs, tiers | Side seams, bust, waist, hip, skirt panels |
| Common starting ratio | About 1.5:1 to 3:1 for sampling, depending on fabric | Usually controlled by original and finished length rather than one fixed ratio |
| Finished appearance | Fullness usually releases away from the seam | Folds remain concentrated in a defined area |
| Common construction | Basting, gathering foot, elastic, differential feed | Elastic, fixed gathering, drawstring, channels, anchored folds |
| Main production risk | Uneven fullness distribution | Uneven density, twisting, length variation |
Gathering Controls Fullness
The easiest way to understand gathering is to compare the original fabric length with the length it must fit after sewing. If a skirt edge measures 60 cm before gathering and must fit a 30 cm waistband section, the gather ratio is 2:1. The extra 30 cm is not removed; it is converted into repeated folds that create fullness below the seam. A 45 cm section reduced to 30 cm produces a lighter 1.5:1 ratio, while 90 cm reduced to 30 cm gives a much fuller 3:1 result. These ratios are useful starting points for sampling, but the fabric still determines whether the finished effect looks soft, crisp, bulky, or flat.
Gathering therefore describes a method of controlling volume rather than one specific decorative appearance. It can be almost invisible at a sleeve head, softly distributed through a neckline, or highly obvious at the waist of a full skirt. The technical objective is to fit one length into another without losing control of where the extra fabric is released. For designers and product teams, this is why a measurement-based instruction is more reliable than simply asking for “more fullness.” The amount and distribution of that fullness should be linked to the intended silhouette.
Ruching Keeps the Folds Visible
Ruching uses the same basic idea of compressed fabric, but the folds remain part of the visible surface rather than simply serving a seam. On a fitted mini dress, for example, a 45 cm side section may be compressed into a finished 30 cm zone. The extra 15 cm forms ripples around the waist and hip instead of expanding into a fuller skirt. If the design uses a drawstring, the final length can change again when the wearer adjusts the cord, so the garment has both a visual effect and a functional length range.
Because the folds remain visible, ruching is especially sensitive to placement, density, direction, and tension. Five centimeters of additional compression near the natural waist can change the look of a dress more than a much larger amount spread across a full skirt. This is why a production note such as “ruched side seam” is incomplete on its own. A useful specification normally identifies where the ruching begins and ends, the original fabric length, the approved finished length, whether the effect is fixed or adjustable, and the visual distribution expected from the approved sample.
Ruching Is Not Simply More Gathering
It is tempting to call ruching a denser version of gathering, but that explanation fails when you compare real garments. A gathered skirt can contain far more extra fabric than a ruched side seam and still not be considered ruching. The key difference is what the compressed fabric is meant to do after sewing. If 90 cm of skirt fabric is reduced to 30 cm at the waist, the 3:1 fullness is expected to release into the skirt. If 42 cm of a side panel is compressed into 28 cm and the folds remain concentrated against the hip, the compression itself becomes the visible design.
This distinction matters during sampling because the machinist will make different choices depending on the wording. “Gather evenly into seam” encourages the fullness to be spread along the seam. “Create fixed side ruching from waist notch to hip notch” tells the sample room that the visible texture should remain concentrated within a defined area. When terminology and construction intent do not match, the sample may technically contain gathers but still look nothing like the reference. Clear language reduces those avoidable rounds of correction.
Gathering, Ruching, and Shirring Are Different
Gathering, ruching, and shirring belong to the same family of fabric manipulation, but they do not behave the same way on the body. Gathering broadly reduces fabric length and creates fullness. Ruching keeps compressed folds visible for shaping or surface texture. Shirring usually uses several parallel rows of gathered fabric, often with elastic thread or another elastic system, so the finished panel can stretch and recover around the body. A shirred back panel therefore behaves very differently from a fixed gathered waist even if both look softly wrinkled when laid flat.
The difference becomes practical on fitted womenswear. A fixed ruched side seam may hold one approved length, an elastic-ruched panel may expand during movement, and a drawstring version may be adjusted by the wearer. A shirred bodice can stretch substantially across several body measurements. If a design team uses these words loosely, the sample may look acceptable in a photograph but fail in comfort, recovery, or fit. The most useful terminology describes both appearance and function, so everyone understands whether the fabric is fixed, elasticized, adjustable, or simply being distributed into a seam.
How Do Gathering and Ruching Change a Dress?
Gathering mainly changes how volume is distributed through a garment, while ruching changes both surface texture and local shaping. The result depends on where the fabric is compressed, how much extra length is used, and whether the folds are fixed or adjustable. Waist gathering can create a fuller skirt, while side ruching can shorten a dress locally, reshape the waist, and alter the hem.
Gathering Changes Silhouette Through Volume
Gathering changes silhouette because every centimeter of extra fabric has to be released somewhere after the seam is reduced. Consider a skirt panel that must fit a 35 cm waistband section. A 52.5 cm panel creates a 1.5:1 ratio, a 70 cm panel creates 2:1, and a 105 cm panel creates 3:1. All three can fit the same waistband, but they will produce noticeably different skirt volume. The final result also depends on whether the fullness is spread evenly, concentrated near the side seams, or focused around the center front and back.
The same principle applies to sleeves, peplums, ruffles, and tiered dresses. A puff sleeve gathered mainly at the crown creates more lift above the shoulder than one whose fullness is spread farther around the armhole. A tiered skirt with the same ratio at every seam can become progressively fuller toward the hem, while a lower ratio creates a cleaner, less voluminous profile. For product development, it is useful to think of gathering as volume engineering. The pattern determines how much material exists, and the sewing specification determines where that material is released into the finished silhouette.
Ruching Changes Perceived Body Shape
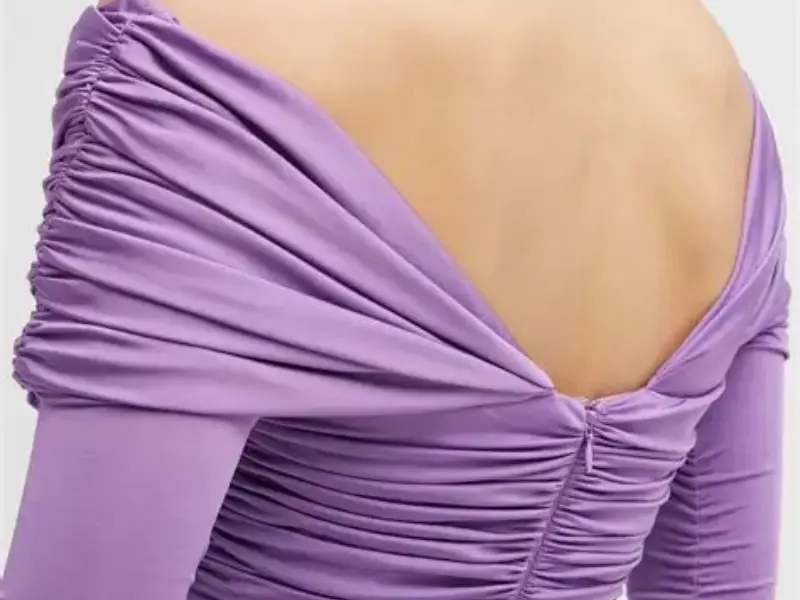
Ruching works differently because the extra material remains close to the body. A smooth bodycon dress creates long, uninterrupted lines across the bust, waist, and hip. Adding concentrated folds breaks those lines and changes how the eye reads the body underneath. Side-waist ruching can make the middle look more sculpted, hip ruching can add controlled texture to an otherwise simple jersey dress, and bust ruching can redirect fullness toward the center front or neckline without adding the large external volume associated with gathering.
Direction matters as much as density. Horizontal folds can create width if they are too regular or too bulky, while diagonal folds often produce more movement and can redirect attention across the torso. Vertical drawstring ruching can alter both texture and length, especially on mini and midi skirts. This is why attractive ruching looks intentional rather than accidental. The folds need a clear beginning, end, and direction, and their density must suit the body area. When those variables are vague, the result can look more like uncontrolled wrinkling than deliberate dress design.
Placement Can Alter Fit and Hem Level
Ruching is often treated as surface decoration, but it can change real garment measurements. Suppose a dress has a 46 cm side section that is compressed to 32 cm. That construction removes 14 cm of visible length from the side. If the opposite side remains 46 cm, the style becomes intentionally asymmetric. If both sides are meant to finish at 32 cm but one production piece finishes at 34 cm, the difference can shift the hem and change the apparent waist and hip position, especially on a short dress where two centimeters is visually significant.
Side ruching can also rotate the garment. If the front panel stretches more easily than the back, or if the elastic tension is applied unevenly, the side seam may move forward or backward even when the pattern itself is correct. This is why fit review should look beyond the folds. The team should check the side-seam line, waist level, hip balance, slit height, and hem after the ruching is applied. A detail can look attractive from the front while still creating a construction problem from the side or back.
Bust and Waist Ruching Need Separate Control
Ruching at the bust and ruching at the waist solve different problems, so they should not be specified the same way. Around the bust, the design must handle three-dimensional volume, neckline stability, coverage, and sometimes cups, boning, or lining. Too little fullness can flatten the intended shape, while too much can create bulky folds that sit away from the body or expose the inner layer. The placement of the folds also affects how the neckline opens and where the visual center of the bodice appears.
At the waist, the challenge is usually to create texture without adding unnecessary thickness or disturbing the fit around the midsection. A fabric that looks soft and balanced when pinned on a mannequin may become much denser once stretched over several body sizes. For fitted dresses, it is sensible to review the ruching from the front, side, and three-quarter view rather than approving it from a flat photograph. This reveals whether the folds are flattering in three dimensions and whether the surrounding seams stay aligned when the garment is actually worn.
Which Fabrics Work Best for Gathering or Ruching?
Light to medium fabrics with good drape generally gather easily, while successful ruching depends on the intended look and construction. Chiffon, mesh, crepe, satin, and jersey can all work, but they behave differently under compression. Fabric weight, stretch, recovery, thickness, friction, and lining compatibility should be tested carefully together before the production pattern, gather ratio, or ruched length is finalized.

| Fabric | Gathering Behavior | Ruching Behavior | Useful Sampling Focus |
| Chiffon | Handles relatively high fullness well | Soft, fluid folds | Slippage, transparency, seam stability |
| Stretch mesh | Light and easy to compress | Excellent for layered fitted ruching | Stretch direction, lining compatibility |
| Jersey | Soft gathering with stretch | Strong choice for bodycon ruching | Recovery, seam twisting, edge growth |
| Satin | Polished but more sensitive | Strong highlights and visible folds | Puckering, bulk, press marks |
| Crepe | Balanced, controlled fullness | Soft to moderate ruching | Weight and drape |
| Cotton poplin | Crisp and structured | More architectural texture | Bulk at higher ratios |
| Velvet | Can become bulky when gathered | Rich but technically sensitive | Pile direction, crushing, seam thickness |
Fabric Weight Changes the Practical Ratio
A gather ratio should never be selected without considering fabric weight and thickness. A lightweight chiffon may tolerate a 2.5:1 or 3:1 sampling ratio because the layers compress easily and the folds collapse softly. The same ratio in a heavier satin can create a thick seam that is difficult to sew, press, line, or wear comfortably. A crisp poplin can start to form upright, structured folds before a fluid reference image has been matched, which means adding more fabric may only increase bulk rather than improve the visual result.
One efficient development method is to test short strips before changing a full pattern. If the finished seam needs to be 30 cm, prepare pieces at 45 cm, 60 cm, and 90 cm to compare 1.5:1, 2:1, and 3:1 results in the actual fabric. That small test reveals how much seam bulk develops, how evenly the folds distribute, whether the drape remains attractive, and how much visual volume the material can carry. A quick physical test often gives better information than trying to calculate fullness from a photograph or sketch alone.
Stretch and Recovery Matter More in Ruching
Stretch is useful in fitted ruching, but stretch alone does not guarantee a stable result. Recovery matters just as much. Two jerseys can both extend comfortably across the hip, yet one may return close to its original dimension after movement while the other remains slightly elongated. That difference can change the look of a side-ruched dress after fitting, sitting, or repeated wear. A sample that starts with dense, controlled folds can gradually become flatter if the fabric or elastic system does not recover consistently.
During sample review, useful observations include the ruched-zone length before fitting, the length immediately after fitting, the length after a recovery period, and whether the side seam or hem has moved. The team should also note whether the visual density returns to the approved appearance after the fabric relaxes. These are practical checks even before formal laboratory testing begins. They help determine whether the material is suitable for a design that depends on repeated compression and extension rather than simply confirming that the fabric contains elastane or feels stretchy by hand.
Satin and Mesh Need Different Thinking
Satin and mesh are both common in party and occasion dresses, but they create very different development problems. Satin reflects light strongly, so every ridge, fold, and tension line becomes visible. Well-controlled ruching can look rich and dimensional, while uneven distribution can look messy immediately. Seam puckering, needle marks, pressing pressure, and excessive bulk are also easier to see. A moderate amount of ruching may therefore look more refined than forcing the fabric into a very dense effect that it cannot carry cleanly.
Stretch mesh is lighter and often more forgiving visually, but it is less stable during cutting and sewing. It can grow along the seam, distort under tension, or behave differently from the lining underneath. If the mesh stretches 40 percent across the width but the lining stretches far less, the outer layer may form attractive folds while the inner layer restricts the body and pulls the ruching out of position. For layered dresses, the outer fabric and lining should be sampled together as one system rather than approved separately.
Lining Can Improve or Ruin the Result
Lining is often the hidden reason a ruched sample does not sit correctly. If an outer layer contains 40 cm of fabric compressed to 28 cm but the lining remains at a smooth 40 cm, the unused lining length may bunch underneath. If the lining is too short, it can pull the outer ruching flat and make the dress feel tight. If it lacks enough stretch, a fitted style may look correct on a mannequin but become restrictive on a moving body, especially around the hip and bust.
The lining strategy should therefore be chosen together with the outer construction. Some styles need the lining to remain relatively smooth while the outer layer carries all of the texture. Others require the lining to follow part of the compressed length or to stretch with the wearer. Useful development checks include lining length, stretch compatibility, anchor points, seam allowance bulk, transparency, and movement during fitting. These details rarely appear in fashion photographs, yet they often determine whether a finished dress feels clean and intentional or complicated and uncomfortable.
How Are Gathering and Ruching Constructed?
Gathering is commonly created by pulling long temporary stitches until a fabric edge reaches the required finished length, then securing it into a seam. Ruching may use fixed gathering, elastic, drawstrings, stitched channels, or anchored folds. The best method depends on whether the finished area needs to remain fixed, stretch with the body, or allow the wearer to adjust length and density.

Machine Gathering Needs Reference Points
Traditional gathering is simple in principle but becomes inconsistent when long sections are controlled only by eye. Suppose a 120 cm skirt edge must fit a 60 cm waistband. Instead of gathering the entire section at once, divide both pieces into four equal reference zones. Each 30 cm section of skirt then needs to fit a 15 cm waistband section. The overall ratio remains 2:1, but the operator can control the fullness in smaller areas, which makes it much less likely that one end becomes crowded while another remains almost flat.
The same logic can be translated into production notches, chalk marks, or pattern references. For delicate fabrics, two parallel rows of long temporary stitches can help keep the fabric flatter and make the gathering easier to distribute near the seam line. In higher-volume work, a suitable gathering attachment, ruffler, or differential-feed machine may improve speed, but the approved finished dimension still needs to be defined. Equipment can make the operation faster; it cannot replace a clear target for how much fullness belongs in each section of the garment.
Fixed Ruching Gives Predictable Length
Fixed ruching is useful when the designer wants one stable appearance and does not need the wearer to change the length. A fabric section is gathered or compressed between defined points and then permanently secured into a seam, binding, panel, or backing. Once the finished length is locked, the production team can compare the same measurement across garments. A sample might use a 42 cm original section compressed into 29 cm, creating 13 cm of controlled excess that appears as visible folds along the side.
Those numbers still do not describe the entire appearance because 42 cm can be compressed into 29 cm with even distribution or with several heavy clumps beside a flat area. The approved sample therefore remains important as a visual reference. Fixed ruching is generally easier to standardize than an adjustable version because the target length is stable, but the trade-off is that the wearer cannot correct or modify the effect later. If the sample length or density is slightly wrong, the garment has no adjustment mechanism to compensate, so the pre-production standard needs to be especially clear.
Elastic Ruching Adds Tension and Recovery
Elastic ruching is popular because it creates visible texture while allowing the area to stretch with the body. The result, however, depends on more than elastic width. Elastic cut length, fabric length, sewing tension, stitch type, attachment method, and recovery all interact. If a 40 cm fabric section is attached to 28 cm of elastic, the elastic contracts the fabric after sewing. If another operator applies different tension during attachment, the same materials can produce a finished section closer to 30 cm or 26 cm, which is enough to affect hem level and fit on a short dress.
A useful production specification should therefore record both the elastic and the garment result. Writing only “6 mm elastic” leaves too much open to interpretation. A stronger instruction includes elastic width, cut length, attachment start and stop points, finished relaxed measurement, stitch method, and approved visual density. Elastic quality should also be checked after repeated extension because a ruched section that looks correct before wear may lose shape if the elastic does not recover. The construction is successful only when the tension remains stable through fitting and normal movement.
Drawstring Ruching Requires Measurement Conditions
Drawstring ruching creates another level of complexity because the garment no longer has one fixed length. A side seam may measure 42 cm when fully relaxed, shorten to 28 cm when pulled tightly, and be presented for photography or packing at a standard 34 cm position. Those three states are different, and inspection becomes confusing if the team measures garments without defining which state is required. A production standard should therefore identify the relaxed length, the normal presentation length, and the maximum approved adjustment range.
The casing and cord also influence performance. A narrow channel with a thick cord can create too much friction, while a loose channel can allow the folds to migrate and become uneven. Cord length, exposed ends, stopper position, tie method, and channel start and end points all affect how the wearer experiences the detail. Adjustable ruching succeeds when the dress can change length smoothly without losing balance, exposing the lining, twisting the side seam, or creating an awkward cluster of folds around the opening.
Which Technique Is Better for Different Dress Designs?
Neither technique is universally better. Gathering is usually the stronger choice when a designer needs volume to expand away from a seam, while ruching is better when visible folds should remain concentrated against the body. The decision should be based on silhouette, fabric, fit function, grading, and whether the effect must remain fixed, stretch with movement, or allow wearer adjustment.

Full Skirts and Puff Sleeves Favor Gathering
A gathered skirt shows clearly why gathering exists. If a waistband section measures 35 cm and the skirt panel measures 70 cm, the 2:1 ratio creates extra fullness that falls away from the waist. The design is not trying to preserve the small folds at the seam as a surface treatment; it is using them to release fabric into a fuller silhouette. A lower ratio creates a cleaner skirt with less volume, while a higher ratio creates more fullness and may require lighter fabric to prevent the waist seam from becoming too bulky.
Puff sleeves use the same principle in a more localized area. Extra sleeve-cap length is controlled into the armhole and released around the shoulder. The location of that fullness determines whether the sleeve looks softly rounded, strongly lifted, or spread toward the front and back. Ruching would usually be the wrong construction language for these situations because the fabric is supposed to expand away from the seam. A useful design question is whether the extra material should create a larger silhouette or remain visibly compressed. If the goal is expansion, gathering is usually the clearer solution.
Bodycon Dresses Favor Controlled Ruching
Bodycon and fitted occasion dresses often benefit from ruching because the designer can add texture without creating a large external silhouette. Side ruching is especially effective because it can shape the waist and hip while also changing skirt length. A single-side ruched mini dress can move from a relatively straight hem to a strong asymmetric look simply by shortening one controlled section. Bust ruching can direct extra material toward the center front or neckline, while mesh overlays can create visual depth over a smoother lining.
These designs need more development work than the phrase “add gathers” suggests. The pattern maker must decide how much additional length belongs in the ruched zone. The sample team must check whether the fabric recovers after movement. The fit review must confirm that the side seam remains vertical, the hem sits at the intended level, and the lining does not pull the outer layer flat. The strongest results usually come from developing fabric, pattern, lining, and ruching as one construction system rather than adding the effect to a finished base pattern at the end.
Choose Function Before Appearance
A reference image can show beautiful folds without revealing how those folds were made. Before copying the look, it helps to identify the job the fabric is performing. If the extra material needs to expand away from the body and create volume, gathering is usually appropriate. If the material should remain visibly compressed against the body, ruching is more likely. If the wearer needs to change the length or density, a drawstring or another adjustable ruched construction may be required rather than a fixed seam.
This functional approach matters because two methods can look similar in a still photograph while behaving differently during wear. A fixed ruched seam may hold its shape precisely but offer no adjustment. Elastic ruching can expand with movement but depends on recovery. Drawstring ruching gives the wearer control but adds casing, cord, and presentation requirements. Choosing only by appearance often leads to avoidable sample revisions. Choosing by fit, movement, and intended use gives the design team a clearer route from image reference to workable construction.
Grading Needs Visual Review, Not Just Math
Gathering and ruching both affect grading, but ruching becomes particularly sensitive when it sits on a fitted body area. Suppose the sample size uses a 40 cm original side section compressed to 28 cm. The next size may need more body length and hip ease, but that does not automatically mean the ruched allowance should increase by exactly the same percentage. Body growth, finished garment growth, and the amount of extra fabric used to create the visual texture are three different variables that may need separate grading decisions.
If everything is scaled mechanically, larger sizes may become more heavily ruched than the approved sample. If the extra fabric stays identical across all sizes, the detail may become too flat as the garment area grows. A practical review compares representative sizes on a form or model and checks visual density, start and end positions, seam balance, and hem effect. For gathered skirts, maintaining a similar ratio may work reasonably well. For bust, waist, and hip ruching, preserving the intended design effect is often more important than preserving one mathematical ratio without adjustment.
How Do You Control Gathering and Ruching in Bulk Production?
Bulk consistency comes from converting the approved sample into measurable standards. Control the original fabric length, finished compressed length, start and end points, fold distribution, elastic or drawstring specifications, lining behavior, grading, and side-seam balance. First-piece and inline checks should compare both measurements and appearance before full production because small variations in ruching can change hem level, fit, and silhouette.
| Bulk Control Point | Practical Specification | Risk if Uncontrolled |
| Original ruched length | Pattern or cut-panel dimension | Density changes between pieces |
| Finished length | Measured relaxed length | Garment length and hem vary |
| Start and end points | Notches or fixed measurements | Ruching moves up or down |
| Distribution | Approved sample and photo reference | Clumps and flat areas appear |
| Elastic | Type, width, cut length | Tension differs between operators |
| Drawstring | Cord length and adjustment range | Presentation becomes inconsistent |
| Side seam | Alignment at waist and hip | Dress twists on the body |
| Lining | Length, stretch, anchor points | Outer layer distorts or flattens |
| Size grading | Size-specific finished standards | Effect changes across sizes |
| First-piece approval | Measurement plus visual check | Defects repeat through bulk |
Turn the Approved Sample Into Numbers
A sample can look excellent and still be difficult to reproduce because a skilled sample machinist may manually move every fold until one garment looks balanced. Bulk production cannot depend on that individual judgment alone. The approved appearance needs to be translated into information that different operators, lines, and inspection teams can use consistently. For a side-ruched dress, useful values can include a 44 cm original panel length, a 30 cm finished ruched length, a defined start point below the waist, and a defined end point above the hem.
The exact numbers will vary by design, but the structure of the specification should remain consistent. Long ruched zones can also be divided into smaller reference sections so the operator knows where the excess fabric should be absorbed. Instead of asking someone to distribute 14 cm of compression “evenly,” the pattern can provide two or three checkpoints that limit how far the folds can migrate. Measurements reduce variation, while the approved sample confirms whether those measurements still produce the intended look. Both are necessary because neither numbers nor photographs are strong enough on their own.
Control Distribution, Not Only Finished Length
Two dresses can have exactly the same finished side length and still look completely different. One may have folds evenly distributed from waist to hip, while another has most of the fabric crowded near the waist and a nearly flat lower section. Both can measure 30 cm, so a single finished measurement cannot describe the entire quality standard. The visual distribution of the folds needs its own control method, especially when the design intentionally places stronger density in one area.
Reference points are useful because they divide the ruching into manageable zones. The approved section can be marked as upper, middle, and lower, with the sample showing where the folds should be denser or softer. Consistent front, side, and back photographs also help inspection teams understand how the texture affects the silhouette. The strongest quality standard combines objective dimensions with a visual target. Measurements answer whether the garment is the correct length; the visual reference answers whether the fabric has been distributed in the intended way. Treating both as equally important prevents many arguments at final inspection.
Side-Seam Balance Must Be Checked Early
Side ruching can create problems far beyond the ruched area because tension can pull the whole garment out of balance. If the fabric is pulled more strongly toward the front panel, the side seam may rotate forward. If the back panel has different stretch or grain behavior, it may move backward. If left and right sides finish at different lengths, the hem can tilt. These issues are much easier to correct at the first-piece stage than after a large quantity has already passed through the same operation.
A useful first-piece review checks left and right finished side lengths, side-seam position at the waist and hip, hem level, slit position, front and back panel balance, fold density, and lining tension. On a fitted mini dress, even a 1 to 2 cm unexpected difference can become visually obvious because the total visible skirt length is relatively short. Whenever possible, the garment should be reviewed on a form or model as well as flat. Flat measurement confirms dimensions, but only a three-dimensional check reveals rotation, tension, and the way the folds sit around the body.
First-Piece and Inline Checks Prevent Repeated Defects
Final inspection is too late to discover that an entire production run has been ruched incorrectly. The highest-value control point is the first finished piece made with the actual bulk method, because it shows whether the production line can reproduce what the sample room achieved. For more sensitive styles, a short pilot quantity can be useful before full release. The purpose is not to add unnecessary approval stages but to confirm that the industrial process produces the same length, density, seam balance, and visual result repeatedly.
Inline checks should then focus on the variables most likely to drift, including finished ruched length, elastic tension, fold distribution, side-seam position, and hem balance. If a 30 cm target repeatedly becomes 32 cm, the problem should be corrected at the operation where the variation begins instead of being accepted until final inspection. A detail is truly production-ready only when the pattern, fabric, construction, grading, visual reference, and inspection method all describe the same result. That discipline is what turns an attractive sample into a commercially repeatable dress.
Conclusion
Gathering and ruching may begin with the same basic act of compressing fabric, but they serve different design and construction purposes. Gathering is primarily a way to control fullness and create volume, while ruching keeps the compressed folds visible so they can shape the surface, alter local fit, or create adjustable length. The practical difference becomes clearest when pattern length, fabric behavior, lining, stretch recovery, grading, and production tolerances are considered together rather than treating the detail as decoration alone.
For a fashion brand developing fitted, party, occasion, or trend-led dresses, the most useful question is not simply whether a factory can make gathers or ruching. The stronger question is whether the intended effect can be translated from a reference image into measurable construction information and then repeated from sample through bulk production. When the development team can explain the fabric ratio, controlled length, placement, tension, lining relationship, and inspection method clearly, the style becomes easier to approve, easier to grade, and far less likely to change unexpectedly once production volume increases.
If your team is developing a gathered or ruched dress and wants to clarify the construction before moving too far into sampling, you can contact Duolan to discuss the product development and cooperation requirements. Sharing the reference image, intended fabric, target fit, size range, and whether the detail should be fixed or adjustable usually makes the first technical discussion much more useful and helps both sides identify the points that need to be confirmed early.
Frequently Asked Questions
Is ruching the same as gathering?
No. Gathering is the broader technique of compressing a longer fabric section into a shorter finished length so the extra material creates controlled fullness. Ruching often uses gathering as part of its construction, but the compressed folds remain visibly concentrated as a design feature. A gathered skirt may release fullness away from the waist, while a ruched side seam keeps the folds close to the body and may also change garment length or shaping.
Is ruching the same as shirring?
Ruching and shirring can look related, but they are not identical. Ruching describes visible compressed folds that may be fixed, elasticized, or adjustable. Shirring usually uses several parallel rows of gathering, frequently with elastic thread or another elastic system, to create a stretchable panel. A shirred back bodice is designed to expand around the body, while a fixed ruched side seam can remain at one controlled length without providing the same degree of stretch.
What is a good gather ratio for dresses?
There is no single ratio that works for every dress because fabric weight, thickness, drape, and silhouette all change the result. In sampling, 1.5:1, 2:1, and 3:1 are useful comparison points for many lightweight and medium fabrics. A light chiffon may carry a higher ratio cleanly, while a heavy satin can become bulky much earlier. Testing short fabric sections at several ratios is usually more reliable than choosing the ratio from a photograph alone.
Which fabric is best for a ruched dress?
Stretch jersey and stretch mesh are common choices for fitted ruched dresses because they can compress into visible folds while still moving with the body. Satin, chiffon, and crepe can also produce attractive ruching, but each creates different technical risks. Jersey needs good recovery, mesh needs compatible lining and seam stability, and satin makes uneven tension highly visible. The best fabric is the one that produces the intended texture without losing fit, recovery, or production consistency.
Does ruching affect dress fit?
Yes. Ruching can change actual garment length, seam position, waist and hip balance, and the way fabric moves across the body. Side ruching is particularly influential because compressing a side section can raise the hem or rotate the seam if tension is uneven. Bust ruching can change volume and neckline behavior, while hip ruching can alter how a fitted skirt sits. Fit should therefore be reviewed after the ruching is fully constructed, not only on the smooth base pattern.
How do you keep ruching even in bulk production?
Consistent ruching requires more than telling operators to distribute the folds evenly. The approved sample should be translated into measurable original and finished lengths, defined start and end points, elastic or drawstring specifications, and visual distribution references. Long areas can be divided into smaller control zones. First-piece and inline inspections should compare both measurements and appearance so problems such as dense clumps, flat areas, side-seam rotation, or length variation are corrected before they spread through the order.
Can gathering and ruching be used in the same dress?
Yes, and many fashion dresses use both techniques for different purposes. A dress may have gathered puff sleeves or a gathered skirt tier to create volume while also using side or waist ruching to create closer body texture. The important point is to define each area separately because the two details may need different ratios, seam methods, fabrics, grading rules, and inspection standards. Treating every compressed-fabric detail as the same construction can make sampling and bulk production much less predictable.