Skip to content


An empire waist dress often looks effortless because the eye reads one clear idea: a fitted upper body, a seam sitting close to the under-bust area, and a skirt falling from that elevated point. In development, however, moving the waistline upward changes nearly every relationship around the bust. The bodice has less vertical room to absorb shaping, the front needs enough length to travel over the bust, skirt weight begins higher on the body, and fabric behavior becomes more visible immediately below the seam. A design can therefore look correct on a sketch and still feel wrong once it is cut in real fabric. The most successful versions are not created by simply shortening a normal-waist bodice. They are built by coordinating seam position, bust volume, front-to-back balance, skirt release, material behavior, lining, grading, and production controls so that the garment keeps the same visual idea when it moves from one sample to a full size range.
An empire waist dress is constructed by shaping a fitted upper bodice around the bust, placing a raised seam close to the under-bust area, and joining that bodice to a skirt that releases through flare, gathers, pleats, panels, or bias shaping. Good construction depends on controlling bust projection, seam stability, fabric drape, skirt weight, grading, lining, and repeatable sewing methods together rather than as separate decisions.
A common development problem shows how connected these decisions are. A sample may arrive with the correct bust circumference, the correct finished length, and the correct skirt width, yet the seam still cuts into the lower bust and the front hem appears shorter than the back. The first reaction is often to add width or lower the seam. In many cases, the real issue is insufficient front length over the bust. One pattern correction can then improve seam position, side-seam balance, and hem level at the same time. That kind of cause-and-effect thinking is what turns an empire waist dress from a simple-looking style into a controlled, production-ready garment.
What Defines an Empire Waist Dress?
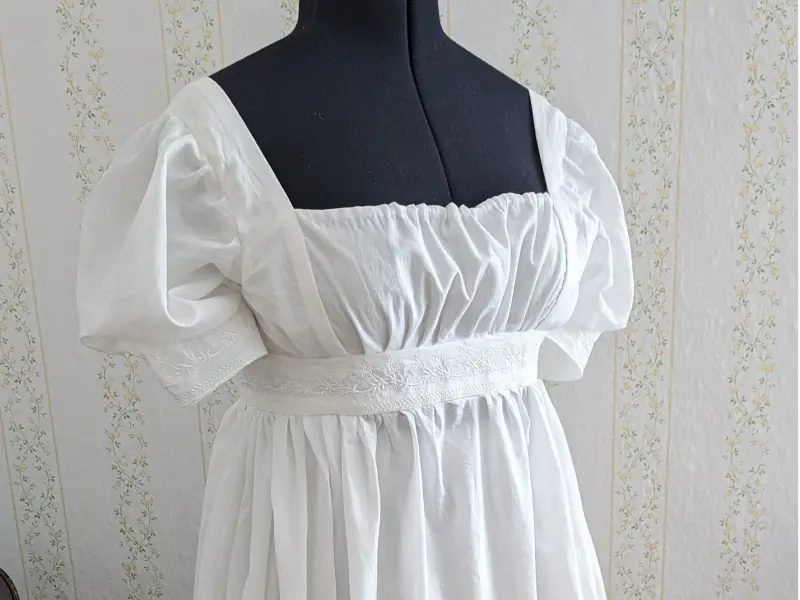
An empire waist dress is defined by a raised seam around the under-bust region, with the lower garment beginning well above the natural waist. The silhouette works when the upper bodice contains the bust correctly, the seam remains stable on the body, and the skirt releases with controlled volume. Moving a waist seam upward without rebuilding bust shaping, vertical balance, and skirt distribution does not create a balanced empire construction.
Seam Position
The defining line of the garment is not simply a horizontal seam placed a fixed number of centimeters below the bust point. Its position should be established from the wearer’s actual bust projection, under-bust contour, neckline, ease, and overall design proportion. On a flat pattern, the line may appear perfectly level; once the garment is worn, the front can rise because the fabric needs extra vertical distance to travel over the bust. That is why the empire line should be checked on the body from the front, both side views, and the back before it becomes a locked production reference. At center front, it should remain clearly below the fullest part of the bust rather than cutting into it. At the side seam, it should connect smoothly without climbing sharply or dropping toward the back. If the line repeatedly rises at center front, the first question should be whether the front bodice has enough length and projection, not whether the whole seam should simply be lowered.
Small left-to-right differences are also more visible here than on many decorative seams because the eye naturally reads an empire line as a strong horizontal reference. During fit development, teams often pay close attention to differences around 0.5 cm at visually critical seam points, although the final acceptable tolerance should always come from the brand’s approved measurement specification and the fabric’s behavior. The important principle is consistency: a seam that is symmetrical, sits below the bust, and remains level during normal movement usually looks intentional, while a seam that changes height across the front can make an otherwise well-made dress feel poorly balanced.
Bust and Bodice Balance
The upper bodice carries most of the technical work because there is much less vertical space between the bust and the joining seam than there is in a natural-waist dress. Bust volume still has to be accommodated, but the pattern maker has fewer centimeters in which to distribute the shaping. A successful empire bodice therefore needs enough front length to travel over the bust, enough under-bust contour to prevent loose fabric collecting below it, and enough stability at the upper edge to stop the garment from collapsing or gaping. These requirements are related, but they should not be adjusted as if they were the same measurement.
A common fitting mistake is to treat every bust problem as a circumference problem. If the real issue is insufficient front length, adding width can create a larger bodice that still rides upward. If the front length is correct but the under-bust area is too loose, adding or redistributing dart intake may solve the problem more effectively than reducing the full-bust measurement. In practical fittings, it helps to evaluate bust projection, center-front bodice length, side-front length, under-bust circumference, dart or gather intake, and side-seam balance as separate but connected variables. When several visible problems improve after one well-targeted change, the correction is usually closer to the true cause than a series of local adjustments made one at a time.
Silhouette Structure
Three structural zones create most of the empire effect: the fitted upper bodice, the raised joining seam, and the lower skirt release. The dress does not need heavy gathering to qualify as an empire silhouette. The skirt can be slightly flared, paneled, pleated, bias-cut, or softly gathered as long as the lower body clearly begins from the elevated seam and the volume supports the intended proportion. A fitted satin occasion dress may use a clean, controlled skirt top, while a chiffon resort maxi may carry much more fullness without looking bulky because the fabric collapses closer to the body.
The relationship between these zones should be judged as a whole. A very close bodice paired with a stiff, heavily gathered skirt can create abrupt volume directly below the bust. A relaxed bodice paired with a very narrow skirt can make the raised seam lose its visual purpose. Designers often focus on the seam as the style feature, but in development the seam is only the transition point. The actual silhouette comes from how bust containment above that point and skirt release below it work together. This is also why material substitutions can change the garment’s identity even when every pattern dimension stays the same.
| Construction Point | Practical Development Target | Why It Matters |
| Left/right empire seam difference | Aim around 0.5 cm or less at critical points | Helps the raised line read as level and intentional |
| Bodice side-seam mismatch before sewing | Aim around 0.5 cm or less | Reduces twisting and forced stretching during assembly |
| Center-front seam changes between samples | Track in 0.5 cm increments | Small vertical changes can strongly affect bust placement |
| Overall dress-length review | Often checked around +/- 1.0 cm where the spec allows | Longer skirts make balance differences more visible |
| Hang time before final hem on fluid fabrics | Commonly 12-24 hours in sample development | Allows relaxation or growth to become visible before hemming |
The figures above are useful development references rather than universal factory standards. Stretch, bias direction, garment length, construction method, and brand-specific measurement tolerances can justify tighter or wider limits. The real value of recording these numbers is that they give the development team a common language. Instead of saying that the seam “looks a little high” or the skirt “seems uneven,” the team can compare the current sample with the previous version and decide whether a measurable change actually improved the silhouette.
How Is the Bodice Pattern Built?
An empire bodice is built by establishing the raised seam on a properly fitted torso pattern, then redistributing bust and waist shaping into darts, seams, gathers, or panels. The pattern must provide enough front length for bust projection while keeping the under-bust edge controlled. The bodice should be fitted, trued, and balanced first; only then should the corresponding skirt top edge and fullness distribution be treated as final.
Under-Bust Line
The under-bust line should be drafted after the main bust shape has been established. Starting with an arbitrary horizontal seam and then forcing the bust into the remaining upper section often creates a short front bodice, excessive gathering, or a seam that cuts into the lower bust. A more reliable sequence is to establish the bust point and projection, mark the intended raised seam using body landmarks and design proportion, close or redistribute dart intake, and then true the resulting seamline so that it can be sewn smoothly. The true stitch line matters more than the raw cut edge because seam allowance added around a curve can make corresponding pieces look visually different even when their sewing lines match correctly.
Notches are important at this stage because an empire seam often combines several types of shaping in a short distance. At minimum, the pattern should identify center front, side seams, major dart or princess positions, and any points where gathering begins or ends. Those references prevent sewing operators from moving fullness according to personal preference. If a style uses a more complex princess construction, the empire line may be divided across two or more front panels, which gives the pattern maker more control over a projected bust and can be easier to grade than trying to force a large amount of shape into a single dart.
Bust Shaping
Bust volume does not disappear when the natural waist section is removed. The amount originally controlled through a side bust dart, waist dart, princess seam, or combination of shaping still has to be resolved somewhere in the shorter upper bodice. That intake can remain as one under-bust dart, be split into two or three smaller darts, rotate into a princess seam, or become soft gathers at the empire line. Each method changes the visual result and the manufacturing behavior of the garment, so the decision should reflect fabric thickness, seam bulk, size range, and the level of repeatability expected in production rather than appearance alone.
For example, a large amount of shaping converted into dense gathers may look soft and natural in chiffon but can become bulky in a 180-220 gsm satin. The same bodice may look cleaner if part of the intake is controlled through a seam and the remaining amount is released as a smaller gather section. One large dart can create a strong point if it is not shaped and pressed carefully, while several smaller darts can distribute projection more smoothly but increase sewing operations. The most useful construction method is therefore the one that reproduces the desired bust shape reliably through sampling, grading, and bulk production, not simply the method that creates the fewest pattern pieces.
Front and Back Balance
The front and back bodices should not be balanced by making their vertical measurements mechanically similar because the front body has to travel over the bust while the back does not. If the front is too short, several defects often appear together: the empire seam rises at center front, the side seam rotates forward, the front skirt appears shorter, and the bodice may feel tighter even when the full-bust circumference is technically within specification. These linked symptoms are valuable because they point toward a balance problem rather than four unrelated defects.
During fitting, compare shoulder-to-bust length, shoulder-to-empire length, bust apex position, center-front seam level, side-seam verticality, and back bodice length as a connected system. If adding appropriate front length improves seam position, side-seam balance, and front hem level at the same time, that change is usually more logical than adding width, lowering the seam, and lengthening the skirt separately. This method also reduces revision noise. Instead of accumulating many small corrections that can conflict with one another, the pattern maker addresses the structural relationship that caused several visible problems in the first place.
Necklines and Closures
Neckline and closure choices can change the behavior of the empire bodice enough that they should be decided before final fit approval. A high neckline provides substantial upper-body stability, while a deep plunge removes material from the center front and increases the risk of gaping or spreading. Strapless construction removes shoulder support completely and may require cups, boning, elastic, grip tape, or internal panels to keep the bodice in position. A halter redirects tension toward the neck and can alter how the under-bust seam reacts during movement, especially when the fabric has stretch or the skirt is relatively heavy.
Closure selection creates similar structural consequences. A center-back invisible zipper introduces a stable vertical opening and a highly visible empire-seam matching point. A side zipper shifts that technical area to a seam that already affects balance. A stretch pull-on style may remove the zipper entirely, but it then depends on controlled negative ease, adequate recovery, and a neckline or opening large enough for dressing. These are not finishing details added after the pattern is solved. They determine how the wearer enters the garment, where tension is carried, and which edges have to remain stable, so changing them late can force a new round of fit and construction corrections.
Which Fabrics Work Best?
The best fabric for an empire waist dress is one whose drape, weight, stretch, recovery, opacity, and surface character support the intended silhouette. Fluid fabrics create a soft fall below the bust, structured fabrics create stronger projection, and stretch fabrics require different ease and seam control. Material selection should happen with pattern development because changing fabric can alter fit, fullness, seam stability, and the way the dress hangs.

Drape and Weight
Drape has an unusually strong effect on an empire dress because the skirt begins high on the body. A fluid crepe or chiffon can collapse close to the torso even when the pattern contains substantial width, while a crisp poplin, taffeta, or structured satin can project outward with far less actual fabric. For that reason, skirt volume should never be evaluated from pattern dimensions alone. The same 1.6:1 fullness ratio can read as soft movement in one fabric and as a pronounced shelf of volume in another, especially when the gathers begin directly below the bust.
During development, a small swatch is useful for color and handfeel but does not show enough fabric to judge skirt behavior. It is more informative to test a larger section in at least three conditions: hanging straight, lightly gathered, and gathered close to the proposed ratio. Observe the fabric after steaming or pressing as well, because some materials soften significantly with heat while others shrink, glaze, or lose surface character. The fabric should also be viewed in motion. Empire dresses are often selected for party, occasion, resort, and event dressing, where movement and photography matter almost as much as the static fit seen during a technical fitting.
Structure and Support
A fluid skirt does not mean the entire dress should be soft. Many successful empire styles combine a stable upper body with a more relaxed lower section. Depending on the design, the neckline, zipper area, under-bust seam, strap attachments, or specific front panels may need lightweight interfacing or another form of reinforcement. Fitted occasion styles may also use cups, elastic, or light boning to support the upper bodice. The goal is to stabilize the silhouette without turning a soft empire dress into an unnecessarily rigid corset structure.
Surface finish changes how much construction error the eye can see. Satin reflects light and can exaggerate seam puckering, uneven pressing, and small fitting ripples, while matte crepe is usually more forgiving. Chiffon hides some seam contour but introduces transparency and handling risks. A material change of only 20-30 gsm can sometimes be enough to make skirt pull, gather thickness, or seam stability noticeably different, particularly on long dresses. When a brand substitutes material after sample approval, the safest approach is to review the fit and construction again rather than assuming that similar color and handfeel mean identical garment behavior.
| Fabric Type | Broad Commercial Weight Range* | Typical Empire-Waist Use | Main Construction Risk |
| Chiffon | 60-110 gsm | Soft occasion and layered dresses | Transparency and seam stretching |
| Lightweight crepe | 100-180 gsm | Fluid midi and maxi styles | Growth and uneven drape |
| Satin | 90-220 gsm | Party and occasion dresses | Puckering and pressing marks |
| Jersey | 160-260 gsm | Stretch empire styles | Recovery loss and seam growth |
| Cotton poplin | 100-160 gsm | Casual structured dresses | Excess projection at gathers |
| Lightweight taffeta | 90-180 gsm | Structured occasion styles | Bulk and outward volume |
*These are broad commercial reference ranges, not fixed specifications. Fiber composition, yarn size, weave or knit construction, finishing, and supplier methods can move a fabric outside the range while still producing a similar handfeel. The more useful comparison is how the proposed fabric behaves against the approved sample fabric in drape, weight, stretch, opacity, recovery, and pressing response. Those properties have a more direct influence on the final empire silhouette than fabric name alone.
Stretch Fabrics
Stretch empire dresses need a different pattern strategy from woven styles because the material itself becomes part of the fit system. Stretch percentage alone is not enough to determine negative ease or closure requirements. Recovery matters just as much. A fabric may extend 30% across the width and remain permanently longer after repeated wear, while another may stretch only 15-20% and return very close to its original dimensions. The second fabric can create a more reliable fitted bodice even though its headline stretch percentage is lower.
Development testing should therefore record crosswise stretch, lengthwise stretch, recovery after repeated extension, shrinkage after the intended care process, and seam growth under the weight of the skirt. The empire seam also needs special attention because a highly elastic bodice joined with a rigid tape or nonstretch lining can create uncomfortable horizontal tension. The opposite problem occurs when the seam stretches too freely and the lower skirt gradually pulls it longer. A new jersey, stretch satin, or power-mesh combination should not simply be inserted into an existing woven pattern. Ease, neckline recovery, closure, lining, seam stabilization, and skirt weight should all be reviewed together.
Lining Compatibility
Lining should solve a defined problem such as opacity, internal support, reduced friction, cleaner finishing, or protection of the outer fabric. The wrong lining can introduce a new fit defect even when the shell looks correct on its own. A rigid lining under a stretch shell becomes the garment’s real size limit, while a lining that is significantly stiffer than a fluid outer fabric can restrict skirt movement and make the dress hang differently from the approved sample. The relative length of the two layers also matters because a lining that grows less or shrinks differently can cause bubbling or show below the hem.
Shrinkage differences become meaningful quickly on longer dresses. If a shell changes by 2% while the lining remains stable, a 100 cm length represents a potential 2 cm differential, which is enough to distort the relationship between layers. Opacity should also be checked on the body under strong lighting rather than only on a cutting table, especially with white, pastel, nude, chiffon, mesh, or lightweight satin. For fitted empire bodices, final fit approval is more reliable when the intended lining, cups, boning, or interfacing are already installed because these layers can change bust volume, seam bulk, and comfort.
How Are the Bodice and Skirt Joined?
The bodice and skirt are joined along the raised empire seam after both stitch-line lengths and the intended fullness distribution have been confirmed. The skirt may be flared, gathered, pleated, paneled, or relatively straight, but its upper edge must match the bodice according to a controlled plan. Accurate notching, seam stabilization, pressing, lining, and closure alignment keep the seam level and prevent production operators from interpreting the silhouette differently.

Skirt Volume
There is no single gathering ratio that works for every empire dress because volume depends on fabric behavior and the visual result the designer wants. A soft chiffon can accept substantially more fullness than a crisp cotton or structured satin without creating heavy projection. The more useful starting point is to decide where the skirt should leave the body. Some styles need immediate softness directly below the bust, while others look cleaner when center-front volume is controlled and more flare is moved toward the side or lower panels.
When gathers are part of the design, record the actual relationship between seam lengths rather than relying on phrases such as “gather evenly.” If a finished front bodice seam measures 40 cm and the corresponding skirt section measures 64 cm before gathering, the ratio is 1.6:1. If the same bodice is joined to an 80 cm skirt section, the ratio becomes 2.0:1 and the visual effect can be much fuller even before fabric behavior is considered. Recording the ratio makes future samples, colorways, and repeat orders easier to compare, while still allowing the pattern team to adjust the number if a different fabric produces too much or too little apparent volume.
Gather Control
Gathering is simple to create but difficult to reproduce consistently when the distribution is not defined. Twenty centimeters of excess width pushed toward center front creates a different silhouette from the same twenty centimeters distributed toward the side seams. The total skirt measurement can therefore be correct while the garment still looks wrong. The practical solution is to divide the joining seam into controlled zones with notches, so the sewing operator adjusts each section independently instead of moving fullness across the entire front until it appears visually even.
Two rows of gathering stitches are generally easier to control than one because the fabric remains flatter and the gathers are less likely to cross during assembly. After sewing, review the seam at close range for trapped folds, crossed gathers, or inconsistent stitch depth, then step back to normal viewing distance to judge symmetry and volume balance. This second view matters because a seam can be technically clean but visually heavier on one side. On thick fabrics, reducing the ratio or moving some shape into flare or panel seams may create a better product than forcing a highly gathered construction simply because the original sketch suggests softness below the bust.
Seam Stability
The raised seam defines fit and carries the weight of the lower garment, so it needs more control than a decorative style line. Curved or bias-sensitive sections can stretch during cutting, handling, or sewing, and a long skirt can continue pulling on the seam after assembly. Staystitching, narrow reinforcement, lightweight interfacing, or another stabilization method may be appropriate depending on fabric behavior, but the goal is not to make the line rigid. The seam still needs enough flexibility for comfort and for the wearer to move naturally.
After joining the skirt, compare left and right seam height, check that the seam does not wave or rope, and then allow the garment to hang before making the final hem decision. Long fluid or bias-sensitive styles are commonly rested for 12-24 hours during sample development so that relaxation or growth becomes visible, although some materials need more time. Pressing also requires restraint. A shaped under-bust seam contains three-dimensional contour, and aggressively flattening it on a table can remove some of the form the pattern maker created. Pressing should support the curve rather than forcing it into a completely flat line.
Lining and Zippers
Invisible zippers are common in woven empire dresses, and the horizontal seam creates an obvious alignment checkpoint across the closure. Before the zipper is stitched permanently, compare both back sections from the neckline through the empire seam and farther down the skirt. If the top edges align but the raised seams differ by 3-5 mm, the mismatch can still be obvious in a fitted solid-color garment because the viewer’s eye follows that line directly across the back. Basting or temporary matching at the empire level before final stitching can prevent an avoidable visual defect.
Lining construction should follow the approved sewing sequence rather than being improvised on the production floor. Depending on the style, the lining may be caught directly into the empire seam, attached as part of a supported bodice, or finished separately. Each method changes seam thickness and pressing behavior. Shell, lining, interfacing, zipper tape, cups, boning, and several seam allowances can accumulate in a very small area, particularly at side seams and closures. Reducing unnecessary bulk improves comfort and appearance, but it also improves repeatability because operators can sew and press the area more consistently across larger quantities.
How Do You Control Fit Across Sizes?
Empire waist fit is controlled by preserving the relationship between bust projection, under-bust position, bodice length, seam shape, and skirt release as sizes change. Grading circumference alone is not enough. Each size needs appropriate front length, bust-shaping volume, and seam placement so that the raised line stays below the bust and the lower skirt begins from a visually consistent position across the size range.
Critical Measurements
Traditional bust, waist, and hip measurements do not fully describe an empire bodice because the natural waist is no longer the main joining point. Additional vertical and under-bust references become much more useful. Full bust and under-bust circumference should be considered alongside bust-point position, shoulder-to-bust length, shoulder-to-empire length, side-seam position at the raised line, and center-front skirt drop from that seam. Not every brand needs to publish all of these as finished-garment measurements, but the development team should understand which references are controlling the fit.
Movement testing should also be part of the measurement review. A seam that looks correct while the wearer stands still can climb 1-2 cm when the arms are raised if the upper bodice is too short or the armhole and neckline restrict movement. Sitting can reveal under-bust pressure that is not obvious in a standing fit. The most important measurements are therefore not always the ones with the smallest numeric tolerance; they are the ones most closely tied to the silhouette. On an empire dress, a small vertical error at the seam can be more visible than a larger difference in lower-skirt circumference.
Bust Shape
Two wearers can share the same full-bust circumference and still need different empire bodices because circumference does not describe how volume is distributed. One person with a 92 cm full bust may have a relatively small ribcage and strong forward projection, while another may carry the same circumference more broadly across the torso. The seam sits close enough to the bust base that these shape differences become immediately important. Greater projection may require additional front length and dart volume without an equivalent increase at the back, while a shallower bust can look hollow or pointed if too much shaping is forced into the pattern.
Fit comments become more useful when the team classifies the problem before editing the pattern. A practical four-part system is circumference, vertical length, projection, and seam position. “Empire seam too high at center front” gives the pattern maker a clearer starting point than “waist wrong,” and “excess fabric between bust apex and seam” is more actionable than “bodice loose.” This discipline helps prevent a repeated cycle in which width is added to solve a length problem, then removed again when the under-bust area becomes too large. It also makes graded fit reviews easier to compare across several sizes.

Grading
Grading should preserve the visual design rather than simply enlarge every pattern piece by a standard increment. Bust-point movement, dart intake, under-bust contour, neckline width, strap position, armhole depth, and skirt release may all need different grade behavior. A technically correct nested pattern is not enough if the largest size no longer reads as the same empire silhouette as the base size. The seam still has to remain below the bust, the upper bodice needs enough vertical length, and the lower skirt should begin from a comparable visual position.
For a commercial size range, validating more than one size gives much more useful information than relying on the base mannequin alone. If a line runs from XS to XL, reviewing a smaller size, the base size, and a larger size can reveal whether bust projection and seam height are drifting as the grade develops. Wider ranges may need additional fit points where body-shape assumptions change more significantly. The pattern team should compare at least bust-point movement, empire-seam height, dart or gather increase, side-front bodice length, and skirt fullness at the joining seam. A good grade makes every size look like the same design, not like progressively enlarged copies.
Common Fit Problems
Most empire-waist defects can be traced to a relatively small set of structural relationships, and several symptoms often share the same cause. A seam that rises at center front may indicate insufficient front length or bust projection. If the side seam also moves forward and the front hem looks shorter, those three observations reinforce the same diagnosis. Loose fabric below the bust may come from insufficient under-bust contour even when the full-bust measurement is correct, while neckline gaping can result from excess edge length, poor stabilization, or bust shaping that is not controlling the upper body correctly.
Photography is useful because balance changes are easier to see when samples are compared consistently. Front, left side, right side, and back images taken at the same camera height allow the team to compare seam level and side-seam direction between revisions. The aim is not to replace fitting with photographs but to create a repeatable visual record. When combined with measurement notes, photos make it much easier to determine whether a correction actually improved the garment or simply moved the problem to another area.
| Fit Problem | Likely Cause | First Area to Check |
| Empire seam rises at center front | Insufficient front length or bust projection | Front bodice length and bust shaping |
| Seam cuts across lower bust | Seam placed too high or shaping is inadequate | Bust apex and under-bust line |
| Loose fabric below bust | Too much under-bust width | Dart or contour intake |
| Side seam moves forward | Front needs more length or volume | Front-to-back balance |
| Neckline gapes | Excess edge length or unstable edge | Neckline pattern and stabilization |
| Front hem appears short | Bust consumes extra vertical length | Center-front balance |
| Skirt twists | Grain, seam balance, or uneven joining | Grainline and side seams |
A useful troubleshooting habit is to solve the largest structural relationship first, then reassess the local defects. If the center-front balance is corrected and the side seam, empire line, and hem all improve together, the team has probably addressed a root cause. If a local adjustment improves one point but creates a new problem somewhere else, it may be compensating for the symptom rather than solving the underlying pattern balance.
How Is the Design Prepared for Production?
An empire waist dress becomes production-ready when the approved fit, pattern, fabric, lining, trims, seam construction, grading, measurements, and finishing method are converted into repeatable references. The first sample should prove the main silhouette; later samples should remove uncertainty. Before bulk starts, the factory needs a locked version of the details that can materially change fit, appearance, or consistency rather than relying on verbal interpretation of one approved sample.
First Sample
The first sample should answer the biggest technical questions before the team spends time polishing small details. If the raised seam is 2 cm too high or the selected fabric creates the wrong skirt shape, discussing a 2 mm topstitch width is premature. A more efficient review starts with empire seam position, bust projection and coverage, front-to-back bodice balance, skirt volume, fabric drape, and overall proportion. Once those relationships are reasonably close, neckline finish, zipper appearance, lining details, straps, and internal seam treatments can be refined with much less risk of being discarded by a later structural change.
Comments are easier to manage when they are grouped into pattern and fit changes, fabric or trim changes, visual preferences, and production-related concerns. Each revised sample should have a clear purpose so that the team knows what the new version is supposed to prove. If every round introduces unrelated design changes at the same time, it becomes difficult to identify which correction improved the fit. A disciplined sample process makes the garment more decision-ready because each version reduces uncertainty instead of creating another collection of questions.
Sample to Bulk
A sample that looks good is not automatically a production-ready garment because sample machinists can make individual adjustments that are difficult to repeat across hundreds or thousands of pieces. Before release, the approved result needs to be translated into one controlled manufacturing basis. That normally means locking the approved pattern version, measurement specification, grading, shell fabric, lining, zipper and major trims, gathering distribution, seam construction, pressing standard, and required labeling or packaging. Operators should not need to infer important visual details by looking at the sample alone.
Material substitutions deserve particular caution because a change that looks minor on a swatch can affect several parts of the garment. Moving from a 120 gsm crepe to a 170 gsm satin, for example, may change seam bulk, gather appearance, pressing behavior, skirt pull, and the way light exposes puckering. If the replacement fabric is materially different in weight, stretch, recovery, or drape, a construction or fit check is safer than assuming the approved pattern will behave the same way. The goal is to transfer the relationships proven during development, not merely to send an attractive sample to the sewing line and ask production to copy it.
Production Risks
Production risk should be concentrated on the areas where a small problem becomes expensive after multiplication. One slightly stretched empire seam on a prototype is a repair; the same defect across 3,000 garments can require extensive rework. For this silhouette, the highest-value checks usually include seam growth, bust-shaping repeatability, zipper alignment, lining behavior, skirt balance, and material consistency. These points deserve attention early because they directly affect fit and are difficult to hide with pressing or final inspection after the garment is already complete.
For fit-sensitive styles, reviewing the first 3-5 completed production garments before the line reaches full speed can expose repeated problems that a single sample did not show. The next useful review is often an early inline check when roughly the first 10-20% of the order has been produced, although the exact timing should follow the factory and brand quality plan. The principle is more important than the percentage: verify critical construction while correction is still practical. Waiting until cartons are packed turns a manageable sewing adjustment into a shipment-level problem.
A practical production control sequence should follow the garment while corrections are still inexpensive and easy to communicate. The exact inspection frequency will vary by order size, construction difficulty, quality agreement, and brand requirements, but the checkpoints below create a useful working framework for an empire-waist style. They focus attention on the raised seam, bust shaping, materials, and repeatability before small deviations have had time to spread through a larger production run:
- Confirm one clearly identified approved sample, pattern version, and measurement specification before line release.
- Measure critical bodice and empire-seam points on the first several completed garments rather than relying only on overall appearance.
- Check gather distribution, seam level, zipper alignment, and lining behavior early enough that operators can correct a repeated method.
- Compare fabric, trims, pressing, and finished handfeel with the approved basis when a new lot enters production.
- Complete final inspection according to the brand’s agreed sampling and quality requirements rather than treating end-of-line inspection as the only control stage.
Bulk Consistency
Consistency begins by deciding which characteristics define the approved garment. On an empire dress, those points commonly include seam height, bust shaping, left-to-right symmetry, zipper alignment, skirt fullness, overall length, lining position, and major finished measurements. The first production pieces should be checked against both the specification and the physical approved sample because measurement compliance alone does not guarantee the same visual result. Gather distribution, pressing, grain behavior, and fabric handling can make two garments look different even when the major dimensions fall within tolerance.
Critical bodice measurements may justify tighter control than less visible dimensions, and many development teams pay particular attention to differences around 0.5 cm on sensitive upper-body points and around 1.0 cm on longer garment lengths where the approved specification allows it. Those numbers are practical references rather than universal rules. Version control is just as important as tolerance. Pattern, measurement chart, sample comments, and workmanship instructions should all point to the same approved revision. A production system becomes reliable when decisions made during development travel into cutting, sewing, pressing, inspection, and repeat orders without gradually changing from one team or production run to the next.
An empire waist dress is a good example of how a simple visual idea can depend on many small technical relationships. The raised seam cannot be separated from bust projection, bust shaping cannot be separated from front length, skirt volume cannot be separated from fabric drape, and fabric behavior cannot be separated from seam stability and lining. Grading adds another layer because the same relationships must remain visually consistent as body dimensions change. Production then has to reproduce those decisions without relying on the individual judgment of the sample machinist who created the first successful garment.
For brands developing empire-waist occasion dresses, party dresses, resort styles, or fashion-led collections, the most useful development conversation often starts before a sample is cut. A tech pack, reference image, original sample, fabric direction, or initial collection concept can be reviewed against the key fit, material, construction, and production risks described above. If your team is preparing an empire-waist style for sampling or bulk production, Duolan can discuss the development requirements and help identify the points that need to be locked before the project moves forward.
Frequently Asked Questions
How far below the bust should an empire waist seam sit?
There is no universal fixed distance because bust projection, cup volume, under-bust shape, neckline, and design proportion all affect the correct position. The seam should sit below the fullest part of the bust and follow the actual under-bust contour without cutting into breast tissue or dropping so low that the style begins to read like a conventional high waist. The most reliable method is to establish the line on a fitted bodice, then confirm it on the body from front and side views before locking the pattern.
What fabric is best for an empire waist dress?
There is no single best fabric because the right choice depends on the intended silhouette. Chiffon and lightweight crepe work well for soft, flowing skirts, while satin can create a more polished occasion look but shows puckering and pressing problems more easily. Jersey can work for stretch versions if recovery is strong, and crisp poplin or taffeta can create deliberate structure. The fabric should be judged by drape, weight, stretch, recovery, opacity, and seam behavior rather than fiber name alone.
How do you stop an empire waist seam from riding up?
A seam that rides up is often a balance problem rather than simply a seam-position problem. Check whether the front bodice has enough vertical length to travel over the bust, whether bust projection and dart intake are adequate, and whether the armhole or neckline restricts movement. Lowering the entire seam may hide the symptom in a standing fit but can create excess fabric below the bust. The best correction addresses the front length and shaping relationship that is pulling the seam upward during wear.
How much gathering should an empire waist skirt have?
The correct gathering ratio depends on fabric weight, drape, skirt length, and where fullness is intended to appear. A ratio around 1.4:1 to 1.8:1 can create controlled softness in many lightweight fabrics, while 2.0:1 or more produces much fuller volume and can become bulky in structured satin or poplin. These numbers are starting references, not rules. The ratio should be tested in the actual fabric, and the fullness should be distributed through marked zones rather than left to visual judgment during sewing.
Is an empire waist dress the same as a babydoll dress?
They can look similar because both may place a seam below the bust, but the construction intent is often different. An empire waist dress usually uses a more clearly shaped upper bodice and a deliberate raised waistline that controls bust fit before the skirt releases. A babydoll style is commonly looser, shorter, or more relaxed through the upper torso and may depend less on precise under-bust contour. In technical development, the distinction affects measurements, dart shaping, ease, skirt volume, and how closely the seam follows the body.
How should an empire waist dress be graded across sizes?
Grading should preserve the relationship between bust point, bust projection, under-bust seam, bodice length, and skirt release rather than simply increasing circumference. As sizes change, dart or gather intake, front length, neckline, armhole, and seam position may need different grade behavior. Reviewing at least a smaller size, the base size, and a larger size during development is useful for identifying drift. The goal is for each size to read as the same design and keep the raised seam in a comparable position on the body.