Skip to content


A backless dress can look almost perfect in an approved sample and become surprisingly unstable only two sizes away. The reason is simple: removing fabric from the back also removes some of the structure that normally keeps a fitted dress balanced on the body. Once that support is reduced, small changes in bust volume, torso length, strap position, side-seam balance, or back-edge length have a much larger effect. A grade that looks mathematically clean in CAD can therefore produce a larger size with more exposure, weaker bust containment, falling straps, or a back edge that no longer sits against the body.
To grade backless dresses successfully, start with an approved base-size pattern and separate normal body growth from design-sensitive areas. Bust, waist, hip, and torso measurements may follow the brand’s size progression, while back-opening width, opening depth, strap anchors, side coverage, and support components need controlled grade rules. Smaller and larger sizes should then be checked through measurements, nested-pattern review, fit testing, and movement testing before production release.
The commercial impact becomes obvious when you picture an approved M sample prepared for a campaign. Its back opening is clean, the straps feel secure, and the side seams hang correctly. A few weeks later, the XL sample arrives with each strap anchor only 5 mm farther out, the back opening slightly wider, and the front body slightly short over the bust. None of those changes looks dramatic on its own. Together, however, they create a noticeably different dress. Good grading is the work of preventing that quiet accumulation of small errors.
What Makes Backless Dress Grading Different?
Backless dress grading is different because body growth and design exposure cannot be treated as the same thing. Bust, waist, hip, and torso dimensions must change with size, while the back opening, strap anchors, side coverage, neckline, and support zones often need much tighter control. The objective is not proportional enlargement; it is maintaining comparable fit, coverage, balance, and visual identity across the size range.
Common Failure Points
Many grading problems that appear in the largest or smallest size actually begin in the approved base pattern. A back edge that is already 3–4 mm too long, a strap anchor that sits slightly too far outward, or a side seam that leans a little forward may be difficult to notice in one fitting. If the same relationship continues through three or four grade steps, the accumulated difference can become 12–16 mm, which is large enough to change both appearance and stability on a fitted backless dress.
This matters because a conventional bodice may distribute tension across the shoulders, upper back, neckline, center back, side seams, and waist. A very low-back dress may depend on only a few remaining anchors. The bust and underbust area manage front volume; the side body connects front and back; the waist or lower back may become the main anchor; and the straps or neckline suspend the upper bodice. If one of these zones grows faster than the others, the garment may rotate instead of simply becoming larger.
A common reaction to back gaping is to shorten the back edge immediately. Sometimes that is correct, but the visible gap may also come from excessive width placed toward the back, insufficient front length over a fuller bust, poor fabric recovery, or strap anchors that moved too far apart. Fixing only the edge can hide the symptom while leaving the grade logic unchanged. Before grading begins, the base size should therefore have stable bust balance, vertical side seams, correct strap tension, clean back-edge contact, and a clearly approved opening shape.
Fit Works as a System
A backless dress should not be evaluated from the back alone. The front bodice often determines whether the back opening stays where the designer intended. If the front body is too short over the bust, the garment can ride upward at the front and drop lower at the back. The technical measurement of the back opening may still be correct, yet the wearer experiences more exposure because the entire dress has shifted around the body.
The side seam is one of the most useful visual indicators. When a side seam moves forward in a larger size, it may suggest that the front does not contain enough volume or that too much circumference has been allocated to the back. When it moves backward, the opposite may be happening. On a backless style, that movement is especially important because the side panel frequently contributes to side-bust coverage, waist control, and the physical connection between the front bodice and the reduced back structure.
For fittings, it is useful to review at least four connected zones together: bust and underbust shape, side-seam position, waist or lower-back anchoring, and strap or neckline suspension. If the back looks wrong, examine all four before changing the opening itself. This approach is slower than making an immediate local correction, but it produces more reliable grading and fewer repeated problems when the same style is developed in another fabric or colorway.
Proportional Grading Has Limits
Uniform proportional grading is rarely enough for a fashion-sensitive backless dress. Suppose a brand’s size specification increases full bust circumference by 40 mm between two sizes. On a half-body pattern, that represents 20 mm of additional circumference. Distributing the amount evenly may appear logical, but the back opening does not automatically need to absorb the same percentage of growth as the body.
A more useful approach separates pattern points by function. Body-driven points, including primary side-seam bust and waist positions, usually follow the approved grade rule. Controlled points, such as strap anchors, deep-back corners, cut-out edges, and neckline junctions, often move less. Certain visual landmarks may move mostly vertically, while others remain close to their original position and allow neighboring seams to accommodate the required body growth.
The difference becomes clearer across several sizes. If a strap anchor moves outward by 4 mm at every grade step, four steps create 16 mm of movement on each side. Total strap separation has then changed by 32 mm. That may be appropriate for a particular block, but it should be the result of fitting evidence rather than a default CAD progression. A smooth-looking nest can still create a garment that becomes progressively more exposed or less stable.
Preserve the Design Experience
Successful grading does not mean every shape is geometrically identical at a different scale. It means that people wearing different sizes experience the design in a comparable way. A smaller and larger wearer should see a similar depth of back exposure, comparable side coverage, a secure strap position, and the same overall balance between front and back.
Achieving that result sometimes requires intentionally uneven growth. A larger size may need substantially more front-bust volume while the back opening changes very little. A smaller size may need reduced strap separation so the straps do not drift toward the shoulder edge. A curved back opening may require almost unchanged finished edge tension even while waist circumference grows according to the normal size chart.
This is the central idea behind grading backless dresses well: body growth, garment growth, and design growth are related, but they are not identical. Once those three are separated in the technical process, many problems that once seemed unpredictable become much easier to diagnose.
Which Measurements and Grade Rules Matter Most?
The most important measurements are those controlling both fit and exposure: full bust, underbust, waist, hip, front and back body length, strap position, back-opening width, and opening depth. Grade rules should come from the brand’s approved body chart and finished garment specification, while design-sensitive measurements are monitored separately so they do not automatically grow at the same rate as circumference.
Body and Garment Measurements
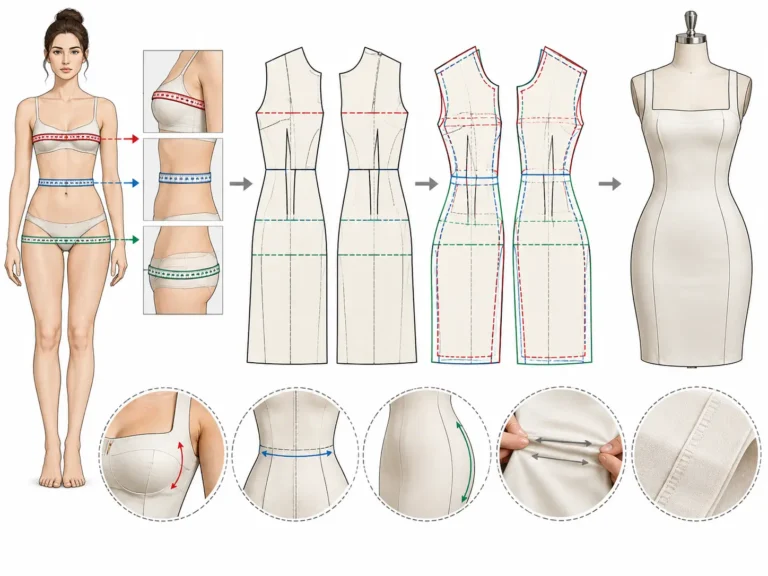
A body chart and a finished garment specification perform different jobs. The body chart describes the person the size is intended to fit. The garment specification describes the actual dress. The relationship between them depends on ease, negative ease, fabric stretch, recovery, lining, construction, and the intended silhouette. Treating these two sets of numbers as interchangeable is one of the easiest ways to create inconsistent grading.
Consider two backless dresses sold in the same nominal size range. A stretch bodycon style may have a finished bust measurement below the corresponding body bust because negative ease is part of the fit. A stable woven satin dress may need a positive or near-body ease relationship because the material cannot stretch enough to accommodate the same movement. Both products can fit the same target customer, yet their finished garment increments do not need to be identical.
A practical technical file therefore separates three layers. First comes the body-size progression. Second comes the finished garment progression after ease and fabric behavior are considered. Third comes a set of design-controlled measurements such as back-opening depth, strap separation, cup placement, side exposure, or cut-out width. Reviewing these layers separately makes later fit corrections much more precise.
The figures below are illustrative examples rather than universal grading standards. Each brand should follow its own approved block, fit model, size architecture, and product category.
| Measurement | Main Function | Illustrative Size-to-Size Review | Grading Approach |
| Full bust | Upper-body accommodation | +40 mm | Follow approved size chart |
| Underbust | Support and contour | +30–40 mm | Fit-sensitive |
| Waist | Anchor and silhouette | +40 mm | Follow approved size chart |
| Hip | Lower-body accommodation | +40–50 mm | Follow silhouette |
| Front body length | Bust projection and waist level | +3–8 mm | Validate through fitting |
| Back waist length | Vertical balance | +3–8 mm | Controlled |
| Back opening width | Exposure and stability | Not tied directly to bust grade | Design-controlled |
| Strap separation | Suspension and coverage | Small controlled movement | Fit-tested |
| Back opening depth | Visual exposure | Often limited | Design-controlled |
Where the Grade Is Added
Getting the total circumference increase correct is only the first part of the job. The second part is deciding where that growth belongs. If a half-body bust needs 20 mm more width, the additional amount can be distributed through the front bodice, side seam, back panel, princess seams, darts, or other shaping areas. Different distributions can produce exactly the same total measurement while creating very different garments on the body.
For a fitted backless dress with a fuller bust, more of the increase may need to be handled through the front body rather than being divided equally between front and back. The correct proportion depends on the brand’s block, bust shaping, cup strategy, stretch level, and silhouette. A structured corset-backless hybrid may require a very different distribution from a soft jersey halter dress.
Side-seam position gives the pattern maker useful feedback. If the seam moves forward as the size increases, the front may need more volume or the back may contain too much. If it moves backward, the distribution may have shifted in the opposite direction. The seam is therefore more than a construction line; it is a visual checkpoint showing whether the circumference grade has been allocated in a balanced way.
Horizontal and Vertical Rules
Horizontal and vertical grading should be reviewed separately because bodies do not grow uniformly in every direction. Circumference may change substantially from one size to the next, while torso length changes by only a few millimeters. A 40 mm bust increase does not imply that a low-back apex should move down by anything close to 40 mm.
This distinction becomes particularly important around the bust. Larger sizes may need additional front-body length to travel over greater bust projection. If that vertical requirement is ignored, the front waist can rise and the back can drop. The resulting garment may appear to have an excessively deep back even though the technical back-opening measurement has barely changed.
Critical CAD points should therefore have separate X and Y movements. A side-bust point may primarily receive horizontal growth. A bust apex may require both horizontal and vertical adjustment. A deep V-back apex may receive little horizontal movement and only carefully controlled vertical movement. Recording these rules explicitly makes the pattern easier to audit and easier to reproduce when repeat orders or related styles are developed.
When Grade Increments Change
Not every size range needs one continuous linear rule. Many brands use consistent increments through a core range, but extended sizes, curve ranges, petite blocks, or tall blocks may require different proportions. Even within a conventional XS–XL range, some design-sensitive measurements may benefit from reduced movement near the endpoints.
Strap position is a good example. Moving the attachment point outward through the middle sizes may work well until the largest size places it too close to the shoulder edge. Back-opening width may also increase slightly through the core range and then need tighter control so the largest size does not become disproportionately exposed.
This is why reviewing only adjacent sizes can be misleading. A rule that looks harmless from M to L may produce a visible problem by XXL because several increments have accumulated. Pattern teams should examine the complete nest and physically validate sizes that are farthest from the approved base, particularly when the design includes deep backs, narrow straps, cups, high stretch, or other fit-sensitive features.
How Do You Grade the Back Opening?
Grade the back opening as its own design feature rather than allowing it to expand automatically with body circumference. Control its maximum width, vertical depth, finished edge length, and relationship with the straps and waist. The larger size needs more room for the body without automatically becoming wider or lower at the back, while smaller sizes should avoid excessive narrowing or tension.

Width and Depth Control
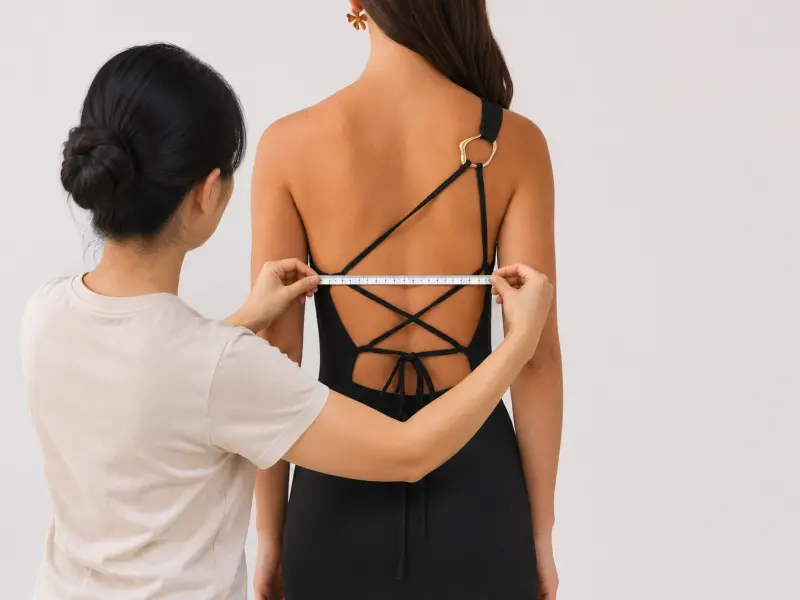
Back-opening width deserves its own measurement because a relatively small pattern movement can create a large visual change. Consider a base size with a 220 mm opening measured between two defined reference points. If each side moves outward by 8 mm during the next grade, the opening becomes 236 mm wide. That represents 16 mm of additional exposure, or roughly 7.3%, after only one size step.
The calculation does not prove that the grade is wrong. A 236 mm opening may be perfectly appropriate for the next size. What matters is that the change was deliberately approved rather than created accidentally by general circumference grading. If the same 16 mm increase continued through three additional sizes, the visual difference would become much more obvious.
Vertical depth should be handled with the same care. If the lowest point of a V-back moves downward by 6 mm per size step, four steps create another 24 mm of exposure. On a low-back party dress, 24 mm can noticeably change waist stability, bra compatibility, and the overall balance of the design.
The measurements below illustrate useful opening-related checkpoints. They are examples of what to control rather than universal product specifications.
| Back-Opening Check | Illustrative Base Measurement | Main Grading Risk |
| Maximum opening width | 220 mm | Excessive exposure as sizes increase |
| Vertical opening depth | 300 mm | Back becomes progressively lower |
| Left finished edge | 410 mm | Gaping or excess tension |
| Right finished edge | 410 mm | Asymmetry after grading |
| Strap-to-edge distance | 35 mm | Weak attachment or reduced coverage |
| Lower-back anchor width | 90 mm | Loss of waist stability |
V-Back and U-Back Shapes
Different back shapes fail in different ways. A deep V-back is highly sensitive to three positions: the two upper edge points and the lowest apex. If the upper points move outward while the apex moves downward, the exposed area increases in both dimensions at the same time. A movement of only a few millimeters at each point can create a surprisingly large change in the triangular opening.
A U-shaped opening often has a different problem. Its maximum width and depth can remain relatively consistent while its curved finished edge becomes progressively longer. That extra edge length may have nowhere to go when the dress is worn against the curved lower back, especially in satin, lightweight woven fabrics, or stretch fabrics with limited recovery.
For this reason, opening width and depth should not be the only recorded measurements. Total edge length should also be compared between sizes. Two U-shaped patterns can both measure 240 mm wide and 300 mm deep while having noticeably different curved edge lengths. The longer curve may be much more likely to stand away from the body.
Nested CAD patterns are useful because the complete progression becomes visible at once. If a back curve suddenly becomes flatter, fuller, or wider in one size, the irregularity is easier to detect in the nest than when each size is viewed separately.
Back Gaping Diagnosis
Back gaping often looks like a simple edge-length problem, but several different causes can produce the same symptom. The edge may genuinely be too long, or the garment may have excessive back width, insufficient front-body length, poor waist anchoring, weak recovery, excessive lining length, or a strap geometry that pulls the opening away from the body.
A better diagnosis starts with the complete fit. Confirm bust and waist circumference, then check whether the side seams are vertical. Review front-body length over the bust and compare the back-edge pattern length with the previous size. Only after those checks should the team move to elastic tension, stay tape, lining, facing, or local edge correction.
Imagine an XL fitting that shows an 8 mm gap on each lower-back edge. Taking 8 mm from both sides immediately removes 16 mm from the local area. The sample may look cleaner, but the overall fit can become tighter if the actual problem was 16 mm of circumference wrongly allocated toward the rear during grading. In that case, the correction belongs in the front-to-back grade distribution rather than being hidden inside the opening edge.
This distinction is important for repeat orders. A local patch may solve one sample, while a corrected grade rule prevents the same fault from returning in every new color, fabric, or production batch.
Where Extra Width Belongs
Additional body circumference has to be placed somewhere, but the exposed back should not automatically receive an equal share. The front bust, princess seams, darts, side seams, waist shaping, and side-back panels can all contribute to the grade. The best distribution depends on body shape, fabric behavior, internal support, and the intended silhouette.
A structured backless dress with molded cups may need much more front-bust development than a soft stretch halter style. A straighter silhouette may distribute width more evenly. A very deep back may deliberately hold the back-opening geometry close to the base design while allowing most of the circumference increase to occur farther forward.
After grading, compare three things together: front-bust comfort, side-seam position, and the amount of exposed back. When all three remain balanced, the width distribution is usually working. When one begins to fail, changing only the visible opening is rarely the best first solution.
How Do You Grade Straps, Bust, and Support?
Straps, bust shaping, and support components need their own grade logic because they control where a backless dress sits on the body. Strap length and attachment positions should be fit-tested, bust growth should reflect projection and coverage rather than circumference alone, and cups, boning, elastic, waist stays, or support panels may need size-specific mapping to maintain comparable stability across sizes.

Strap Length and Position
A strap is not simply a piece of fabric connecting two points. On a backless dress, it can control neckline tension, bust position, shoulder security, and the location of the entire upper bodice. Moving one attachment by only a few millimeters can change all of those relationships.
If each back strap anchor moves outward by 5 mm, total separation increases by 10 mm. That may be appropriate when shoulder width increases, but it can also flatten the strap angle and push the contact point toward the edge of the shoulder. On a narrow or deeply cut back, the wearer may then feel the strap slipping even though the strap itself has the correct measured length.
Fixed straps are especially sensitive because the wearer cannot compensate after purchase. Adjustable straps offer a useful fitting range, but the base pattern still has to be correct. Ideally, a small-size wearer should not need the adjuster at its absolute shortest position and a larger wearer should not immediately reach its longest position. Leaving practical adjustment in both directions improves the chance that the garment can accommodate individual body variation within the same nominal size.
Cross-back styles need one additional review: the intersection point. If front and back anchors move at different rates, the crossing point can rise or fall noticeably. That can change both appearance and functional tension even when individual strap lengths appear correct on the specification sheet.
Bust Growth and Coverage
Bust growth is more complicated than adding width. As sizes increase, the body may also need additional front length, greater projection, altered apex placement, wider underbust shaping, and different side coverage. Ignoring these changes is one reason a larger backless dress can feel less secure even though its total bust circumference matches the specification.
Suppose a size-to-size full bust increase is 40 mm. The corresponding half-body growth is 20 mm, but that does not automatically mean 10 mm should go to the front and 10 mm to the back. A fuller-bust pattern may need a larger share placed through the front bodice, particularly when cups, princess seams, darts, or a structured underbust are involved.
The side seam gives a useful clue. If it moves forward, the front may be short of volume or the back may contain too much. If it moves backward, the front may have received too much width relative to the back. The seam should be checked in both static standing and normal movement because a garment can look balanced for a few seconds and rotate after the wearer sits or raises her arms.
Side-bust coverage should also be measured in very open styles. A garment can meet the total bust specification while still exposing too much near the armhole because the grade was placed in the wrong region.
Cups and Boning
Molded cups, sewn cups, underwires, and boning need component-specific grading rather than blind scaling. A larger dress size may require a different cup, a different cup placement, or both, depending on the brand’s sizing architecture. The cup center should be checked against bust apex, center front, underbust seam, neckline, and side coverage instead of being positioned by garment size alone.
Cup placement errors can have an outsized effect in backless styles because there is less upper-back structure available to compensate. If the cup center remains too far inward while the bust apex moves outward, the wearer may experience pressure at the side of the cup and a loss of support. If the cup moves too far outward, the neckline and side opening can become less secure.
Boning follows a different logic. An increase in bodice width does not imply the same increase in bone length because boning primarily follows vertical panel development and structural direction. A panel that becomes 10 mm wider may need little or no change in bone length, while a 5 mm increase in torso length may be more relevant.
Internal power mesh, waist stays, and support panels should be reviewed in the same way. Their grade should reflect their job inside the garment rather than simply copying the dimensions of the outer shell.
Elastic and Support Tension
Elastic demonstrates how a small component can completely change fit. If a 100 mm body span is controlled by 90 mm of elastic, the component is operating at approximately 10% negative ease before seam allowances and construction factors are considered. If the next size’s body span grows to 110 mm while the same 90 mm elastic is retained, effective negative ease rises to roughly 18%.
That change may make the larger size noticeably tighter even though the pattern itself was graded correctly. The opposite problem occurs when elastic is lengthened too aggressively. The garment gains room, but the back edge may lose the tension needed to stay close to the body.
Underbust elastic, back-edge elastic, grip tape, waist stays, internal mesh, and elasticated straps should therefore be documented by size and tested as functional components. The exact percentage cannot be copied blindly from one fabric to another because elastic modulus, fabric resistance, seam construction, and the amount of body movement all affect how the finished dress feels.
Duolan’s documented development scope includes fit adjustment, contour control, support structure, silhouette balance, grading logic, and technical work on backless, halter, corset, bustier, and other fit-sensitive dress structures. These are useful capabilities to look for when a style depends on several interacting support elements rather than ordinary circumference grading alone.
How Do Fabric and Construction Affect Grading?
Fabric and construction can make the same pattern grade behave very differently on the body. Stretch, recovery, drape, bias growth, lining stability, seam finishes, elastic, and closure systems all influence effective fit. A grade developed for stable satin should not automatically be reused for stretch jersey, power mesh, soft mesh, or bias-cut woven fabric without testing how the material extends, relaxes, recovers, and supports the garment.

Stretch and Recovery
Stretch percentage is useful, but it does not tell the whole story. A fabric that stretches 25% and returns quickly to its original length may support a backless bodice well. Another fabric can reach the same extension but remain slightly longer after repeated stretching, allowing the waist or back edge to relax during wear.
A basic laboratory or development-room calculation is straightforward:
Stretch % = (Extended Length − Original Length) ÷ Original Length × 100
If a 100 mm sample stretches comfortably to 120 mm, the measured extension is 20%. The test should be performed in both directions because many fashion fabrics have very different crosswise and lengthwise behavior. Recovery should also be observed after repeated cycles rather than after one pull.
For close-fitting backless dresses, it is useful to compare the original length with the fabric length after several extension cycles and again after a short relaxation period. A fabric that remains even 3–5 mm longer over a 100 mm test section can behave quite differently around a low back or fitted waist when the effect is repeated across larger garment dimensions.
Negative ease should therefore reflect actual fabric resistance as well as maximum stretch. Two materials can both extend 20%, yet one may feel soft and loose while the other feels firm and compressive. Transferring the same graded pattern between them without testing can change both comfort and support.
Satin, Mesh, and Bias Behavior
Stable satin has little ability to absorb grading errors. If a back edge is slightly too long or the side seam is unbalanced, the problem tends to remain visible because the fabric does not recover toward the body. Stretch satin offers more tolerance, but poor recovery can allow the garment to look clean during the first few minutes of fitting and then relax.
Mesh covers an even wider range of behavior. Power mesh may provide useful internal support and controlled stretch, while lightweight fashion mesh can stretch easily with very little resistance. A single layer and a doubled layer can also behave differently. When mesh forms part of the side or back structure, its stretch direction, recovery, transparency, and connection to the shell should all be considered before a grade is approved.
Bias-cut woven fabrics introduce another issue: relaxation under gravity. A bias-cut panel can become longer after hanging, and the amount depends on fiber, weave, weight, cut direction, and garment construction. The exact growth should be measured on the actual development fabric rather than assumed from a general number.
For a bias-cut backless slip dress, allow the sample to stabilize before making final judgments about back depth, hem level, side-seam rotation, and strap tension. If the grade is approved while the fabric is still relaxing, the relationship between sizes may change later because longer or heavier panels can behave differently under their own weight.
| Material Type | Typical Grading Concern | Practical Check |
| Stable satin | Low tolerance for fit errors | Back-edge length and side-seam balance |
| Stretch satin | Recovery and relaxation | Negative ease after repeated wear |
| Power mesh | Strong stretch with support | Direction, recovery, panel tension |
| Soft mesh | Distortion and low resistance | Coverage and edge growth |
| Bias-cut woven | Lengthwise relaxation | Hanging stability before final fitting |
| Jersey | Variable stretch and modulus | Bust, waist, strap load and recovery |
Shell and Lining Relationships
The shell and lining should be treated as two materials that must cooperate rather than as identical pattern layers. If the shell stretches 15% while the lining stretches only 5%, matching their finished dimensions without considering behavior can restrict the shell. If the lining is too generous, it can bag, twist, or appear above a low-back edge.
Back openings are particularly sensitive because several layers often meet in a narrow area. Shell, lining, facing, stay tape, grip tape, or elastic can each contribute tension. The final edge is the result of all those forces, not simply the shape of the outer pattern.
A useful development check is to compare shell and lining seam lengths before sewing and again after fusing or pressing. Heat can affect stretch fabrics, lightweight linings, fusible materials, and bias-cut components. A difference of only several millimeters along a fitted back edge may be enough to create curling or lifting.
Material substitutions in bulk production should therefore be treated carefully. A lining that looks visually identical may have a different stretch or shrinkage response. On a loose garment, the change may be harmless. On a fitted deep-back dress, it can affect the same edge that the grading team spent several fittings controlling.
Closures and Adjustable Features
The type of closure changes the meaning of finished measurements. A zipper creates a comparatively fixed boundary. A lace-up back introduces an intentional adjustable gap. A tie back depends on knot tension, and elasticized panels are designed to expand after being compressed in the flat garment.
For a lace-up style, the target center-back gap should be specified instead of assuming that both edges need to meet. If the approved sample is designed around a 30 mm gap, allowing the gap to grow to 50–60 mm in larger sizes can alter both appearance and support. The gap itself becomes a controlled measurement.
Tie lengths should be reviewed across the complete size range as well. A tie that produces a comfortable bow on the base size may become too short when the torso circumference increases, while simply adding a large amount of length can make the smaller sizes look untidy. Adjustable details make fit more forgiving, but they do not replace correct grading.
The same principle applies to elasticized backs and adjustable straps. The adjustment mechanism should provide useful tolerance around a well-balanced pattern, not compensate for a grade that changes the underlying design from one size to another.
How Do You Validate Grading Before Production?
A backless dress grade should be validated through CAD nesting, seam walking, finished measurements, size-set fitting, and movement testing. The base size alone cannot prove that the grade works. At least one smaller and one larger risk size should be reviewed so back exposure, strap position, bust containment, side-seam balance, waist anchoring, and support remain consistent before production patterns are released.
Choosing Fit-Test Sizes
The right size-set plan depends on the range, maturity of the block, fabric, and structural difficulty of the dress. A familiar stable style may require fewer physical checks than a new backless silhouette containing cups, narrow straps, mesh panels, and a deep opening. The farther a size sits from the approved base, the more useful it becomes for exposing accumulated grading errors.
Take an XS–XL range with M as the base size. If only the M is fitted, two grade steps above and two below are being accepted largely by assumption. Testing the XS and XL provides much better evidence about the endpoints. For a larger range, the technical team may also need to review the point where grade rules or body proportions change.
The key is risk, not simply sampling every second size. A size located immediately before an extended-size block may be more informative than another size sitting close to the base. A new fabric version can also justify additional fitting even when the pattern has already been approved because stretch, recovery, and garment weight may alter the effective grade.
During each fitting, use the same checkpoints. Compare back width, opening depth, strap position, side-seam angle, bust coverage, waist level, and body movement rather than simply asking whether the dress “fits.” Consistent evaluation makes differences between sizes easier to identify.
CAD and Seam Review
Nested CAD patterns can reveal irregularities that are hard to notice when each size is viewed separately. The complete size range should show a logical progression. Abrupt movements in a strap anchor, deep-back apex, princess seam, bust point, cut-out corner, or side seam deserve investigation even if the final garment measurements still appear correct.
Matching seams should then be walked after grading. The goal is not always zero numerical difference because some constructions intentionally contain ease, but every difference should be understood. Shell-to-lining joins, princess seams, waist seams, facings, zipper seams, cups, and back-edge finishes should all remain compatible.
A 3–4 mm difference may be manageable in a long seam with deliberate easing. The same 3–4 mm can be significant in a short fitted strap attachment or a tightly controlled back edge. Tolerance therefore needs to reflect the function and length of the seam rather than applying one blanket number throughout the garment.
Notches deserve the same attention. Two seams can have identical overall lengths while important balance points have moved. If a princess-seam notch shifts by 10 mm, an operator may distribute fullness into the wrong area and unintentionally move shaping away from the bust. Checking these relationships in CAD is far cheaper than diagnosing them after a complete size set has been sewn.
Movement Testing
A backless dress can look perfect while the wearer stands still and fail as soon as she moves. Fitting should therefore include ordinary actions such as walking, sitting, raising both arms, bending slightly forward, and rotating the torso. Repeating those movements several times is useful because fabrics and straps often settle gradually rather than immediately.
The technical team should watch specific areas instead of judging the garment generally. Does the back edge lift after sitting? Does the strap move toward the shoulder edge after the arms are raised? Does the bust remain seated inside the intended shaping? Does the side seam rotate? Does the waist remain at the same level? Does a lace-up gap widen significantly?
Photographs are a practical way to compare these changes. Front, side, and back images taken from the same approximate camera height make it easier to compare small, base, and large sizes. A measurement sheet may confirm that a waist circumference is within tolerance, while a back-view photograph immediately reveals that the opening has become disproportionately wide.
This documentation also helps later. When the style is reordered months later or developed in another fabric, the team has a visual reference showing how an approved size was supposed to sit on the body rather than relying only on memory.
Production Release
A grade is ready for production when the approved pattern, material, lining, trims, support components, measurements, and construction method all refer to the same confirmed version. A clean CAD nest is useful, but it is only one part of the evidence. The physical garments need to show that the grading logic works across the intended size range.
Before release, technical teams should confirm that critical grade points have been checked, relevant seams have been walked, size-set measurements are within the brand’s approved tolerance, back-opening dimensions are recorded, strap rules are documented, lining relationships are confirmed, and support components are assigned correctly by size. Revision history should also be locked so production does not accidentally use an earlier pattern or component specification.
For styles with higher fit or construction sensitivity, first-piece or pilot-stage confirmation can provide another checkpoint before full quantity is released. Duolan’s documented manufacturing process specifically identifies backless, halter, corset, satin, mesh, and other shape-sensitive dresses as styles where first-piece or small pilot validation can be useful before full production.
The purpose is not to add unnecessary steps. It is to find a 5 mm strap-position error or an unstable back edge while the problem exists on one garment instead of discovering it after the same construction has been repeated hundreds or thousands of times.
Conclusion
Grading a backless dress successfully is less about applying larger or smaller numbers and more about understanding which relationships must remain stable while the body changes. Bust and waist circumference need room to grow, but back exposure, strap security, side coverage, internal support, and visual balance often need much tighter control. The strongest grade rules are therefore built from an approved base pattern, a clear body and garment specification, measured fabric behavior, and physical validation at sizes far enough from the base to expose accumulated errors.
For fashion brands, this approach also reduces a common development problem: a beautiful sample that cannot be reproduced consistently across the commercial size range. When pattern development, grading, fitting, materials, and production preparation are treated as one connected process, the size set becomes much easier to approve and the bulk order becomes less dependent on last-minute corrections. For teams developing technically sensitive backless collections, an experienced development and manufacturing partner can be most valuable at exactly this point—before a small grading decision becomes a large production problem.
Frequently Asked Questions
Can You Use Standard Dress Grading Rules for a Backless Dress?
Standard body-grade rules are useful as a starting framework, especially for bust, waist, hip, and overall body length, but they should not be applied blindly to the exposed back. Back-opening width, opening depth, strap anchors, side coverage, and support points frequently need controlled movement. A standard rule can therefore provide the required body growth while additional design-specific rules preserve the appearance and stability of the original backless silhouette.
How Do You Prevent a Backless Dress From Gaping After Grading?
Start by checking whether the gap actually comes from the back edge. Confirm bust volume, front-body length, side-seam position, waist anchoring, fabric recovery, and lining behavior before shortening the opening. If too much circumference has been distributed toward the rear, changing the edge alone can make the garment tighter without solving the underlying imbalance. The correction should address the pattern area or component that is causing the opening to lift.
Should Back-Opening Width Increase With Every Size?
It can increase, but it does not need to follow the same increment as bust or waist circumference. The appropriate progression depends on body proportions, the design, and how much exposure the brand wants to preserve. A useful approach is to specify maximum opening width as a controlled finished measurement and review it independently. This prevents larger sizes from becoming progressively more revealing simply because surrounding pattern points have moved outward.
Do Strap Lengths Need to Be Graded on Backless Dresses?
Usually yes, but strap length should be graded together with attachment position and torso development rather than by a fixed size-to-size number. A strap can become functionally longer or shorter when its anchors move, even if its physical length barely changes. Fixed straps require especially close fitting, while adjustable straps should retain useful adjustment range at both ends instead of reaching their minimum or maximum setting immediately.
How Does Stretch Fabric Change Backless Dress Grading?
Stretch fabric can reduce the amount of finished garment growth needed between sizes, but the correct rule depends on both stretch and recovery. A fabric with 20% extension and strong recovery behaves differently from another fabric with the same extension but weak recovery. Pattern makers should test the actual material in both directions and consider negative ease, garment weight, lining resistance, and relaxation before transferring grade rules from one stretch fabric to another.
Which Sizes Should Be Tested Before Approving a Backless Dress Grade?
The base size should be fitted first, followed by sizes far enough from the base to expose accumulated grading changes. For an XS–XL range with M as the base, checking XS and XL can provide useful endpoint evidence. Wider or extended ranges may need additional intermediate or upper-range testing, especially where body proportions or grade increments change. The appropriate plan should reflect the style’s structural risk rather than following a fixed sampling formula.
When Is a Backless Dress Pattern Ready for Bulk Production?
The pattern is ready when the size set has been technically and physically validated, critical seams and grade points have been checked, opening and strap measurements are documented, materials and support components match the approved version, and movement testing confirms stable wear. For higher-risk styles, a first-piece or pilot-stage check before full production adds useful protection because it verifies that the approved grading and construction can be reproduced accurately on the actual production line.