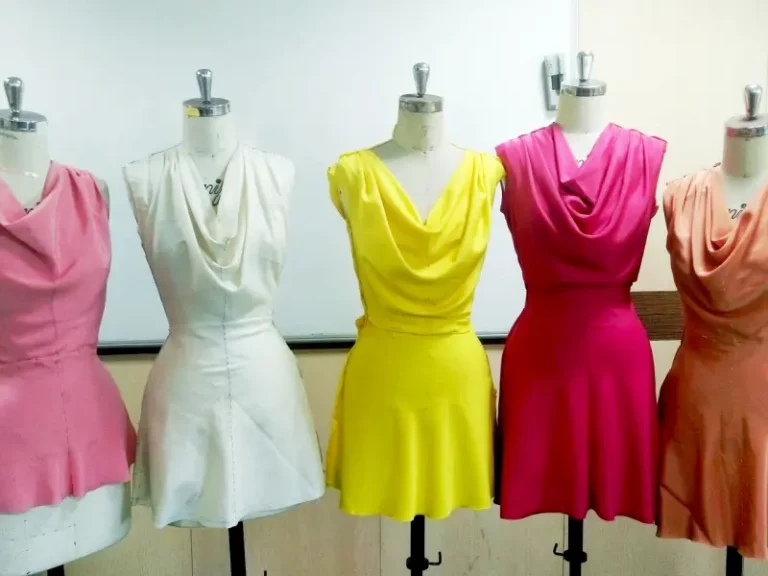
Taking accurate bust, waist and hip measurements sounds straightforward, yet those three numbers create some of the most persistent fitting problems in dress development. A woman may measure as one size through the bust, another through the waist and a third through the hips. Choosing the largest size for the whole garment may solve one tight area while making the shoulders, neckline or waist too loose. Choosing the smallest size can create pulling, riding and restricted movement elsewhere. The challenge is not making three measurements fit one size label. It is making the pattern follow the body naturally from one measurement zone to the next.
To balance bust, waist and hip measurements, begin with accurate body measurements, compare them with the pattern and finished garment measurements, then adjust or blend the pattern where different body areas require different sizes. A balanced dress maintains appropriate ease, correct seam positions, smooth transitions between bust, waist and hip, and enough support or stretch for the intended silhouette and fabric.
That distinction becomes especially important with fitted fashion dresses. A sample can match a measurement chart and still twist at the side seam, gape at the waist, compress the bust or ride upward over the hips. Experienced pattern development therefore goes beyond checking circumference. It considers where body volume sits, how quickly the silhouette narrows and expands, how the fabric responds under tension, and whether the same fit can be reproduced consistently across different sizes. Once those relationships are understood, bust, waist and hip measurements become much more useful than three isolated numbers on a specification sheet.
What Do Bust, Waist and Hip Measurements Tell You About Fit?
Bust, waist and hip measurements describe the body’s main horizontal fit zones, but they do not define good fit on their own. They establish how much circumference is required at key levels. The final result also depends on where that volume is distributed, the garment’s ease, vertical body proportions, fabric behavior, seam placement, support structure and the silhouette the designer intends to create.
Body and Garment Measurements
A body measurement records the circumference of the wearer, while a finished garment measurement records the actual dimension of the clothing after construction. The difference between those numbers represents some form of ease, compression or design volume. This distinction matters because a person with a 92 cm bust does not automatically need a garment that also measures 92 cm at the bust. A structured woven dress may require additional room, whereas an elastic bodycon style may intentionally finish smaller and stretch around the body.
For practical fitting, body measurements, pattern measurements and finished garment measurements should be considered together rather than independently. If a wearer has a 92 cm bust and a finished woven dress measures 97 cm, the dress contains approximately 5 cm of additional bust circumference. Whether that amount is appropriate depends on the fabric, sleeve construction, neckline, intended closeness and movement requirements. The same 5 cm would mean something very different in a loose day dress than in a fitted satin occasion dress.
The relationship becomes more complex because total circumference does not reveal where the available volume sits. Two dresses may both measure 96 cm around the bust, yet one can fit comfortably while the other pulls across the front. The difference may come from dart shaping, princess-seam curvature, front-to-back distribution or bust-point placement. A pattern does not merely contain centimeters; it distributes those centimeters across a three-dimensional body.
For that reason, one of the most useful questions during a fitting is not simply, “Does the bust measurement match the specification?” A better question is, “Is the available bust volume positioned where the wearer actually needs it?” The same principle applies at the waist and hip. Measurement accuracy matters, but measurement distribution is what turns accurate numbers into a dress that sits correctly on the body.
Proportion Matters More Than an Ideal Ratio
There is no universal bust-waist-hip ratio that guarantees good clothing fit. Body-shape descriptions may use ratios to categorize silhouettes, but commercial pattern development has a different purpose. A pattern needs to accommodate the intended wearer while preserving the design. It does not need to force the wearer into a mathematical version of an hourglass, pear, rectangle or any other body category.
Consider two wearers who both have a 96 cm bust and 104 cm hip. If one has a 72 cm waist and the other has an 86 cm waist, they require very different shaping even though their bust and hip measurements are identical. The first body narrows by 24 cm between bust and waist and expands by 32 cm between waist and hip. The second changes by only 10 cm and 18 cm respectively. The pattern curves, dart intake and panel shaping cannot reasonably be identical.
This is particularly visible in fitted dresses. A strong waist-to-hip curve may require some shaping through side seams, some through darts and some through princess seams. Trying to remove all the excess circumference at one seam can create an exaggerated curve that is difficult to sew smoothly and does not follow the body naturally. Dividing the shaping intelligently usually produces a cleaner silhouette and more stable construction.
Vertical proportions matter as well. A pattern may provide the correct 104 cm hip circumference, but if its fullest hip point sits 3 cm above the wearer’s actual full hip, the dress can still pull. Good fitting therefore looks at both horizontal circumference and vertical placement. Bust point, waist level, high hip, full hip and overall torso length work together, and the balance between those landmarks often explains fit problems that a size chart alone cannot.
One Body Can Span Several Sizes
It is completely normal for bust, waist and hip measurements to fall into different columns on a size chart. Standard size charts are built around selected proportional relationships, while real bodies vary much more widely. A wearer may correspond to Size 8 at the bust, Size 10 at the waist and Size 12 at the hip without any of the measurements being unusual or incorrect.
Selecting Size 12 for the whole dress might solve the hip requirement but introduce excess width at the upper chest, shoulders, neckline and armholes. Choosing Size 8 throughout may preserve the upper-body fit but leave the hip restricted, causing horizontal drag lines or making the entire dress creep upward during movement. The correct response is usually to decide where each size is actually needed rather than forcing the whole garment into one number.
An illustrative fit comparison makes the issue clearer:
| Fit Area | Body Measurement | Example Size Match | Practical Interpretation |
| Full bust | 89 cm | Size 8 | Upper bodice may remain close to Size 8 |
| Natural waist | 77 cm | Size 10 | Pattern can transition through waist |
| Full hip | 104 cm | Size 12 | Lower pattern may reach Size 12 by full hip |
| Waist-to-full-hip depth | 21 cm | Individual measurement | Confirms where the added hip width is required |
The size names in this example are only illustrative because every brand uses its own chart. The important point is the method. Pattern development should identify the relevant body level, compare it with the corresponding pattern level, calculate the difference, and decide where that difference needs to be introduced. Size is a convenient label; fit comes from the actual geometry behind it.
How Do You Measure Bust, Waist and Hips Correctly?
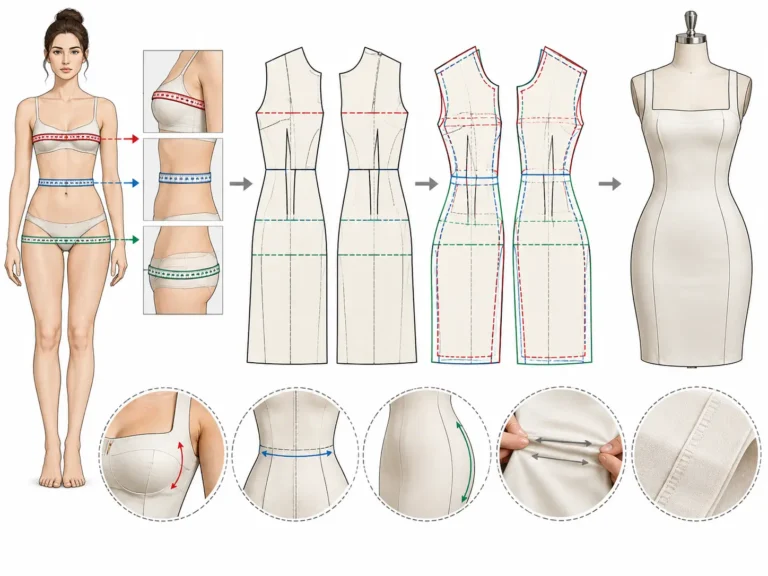
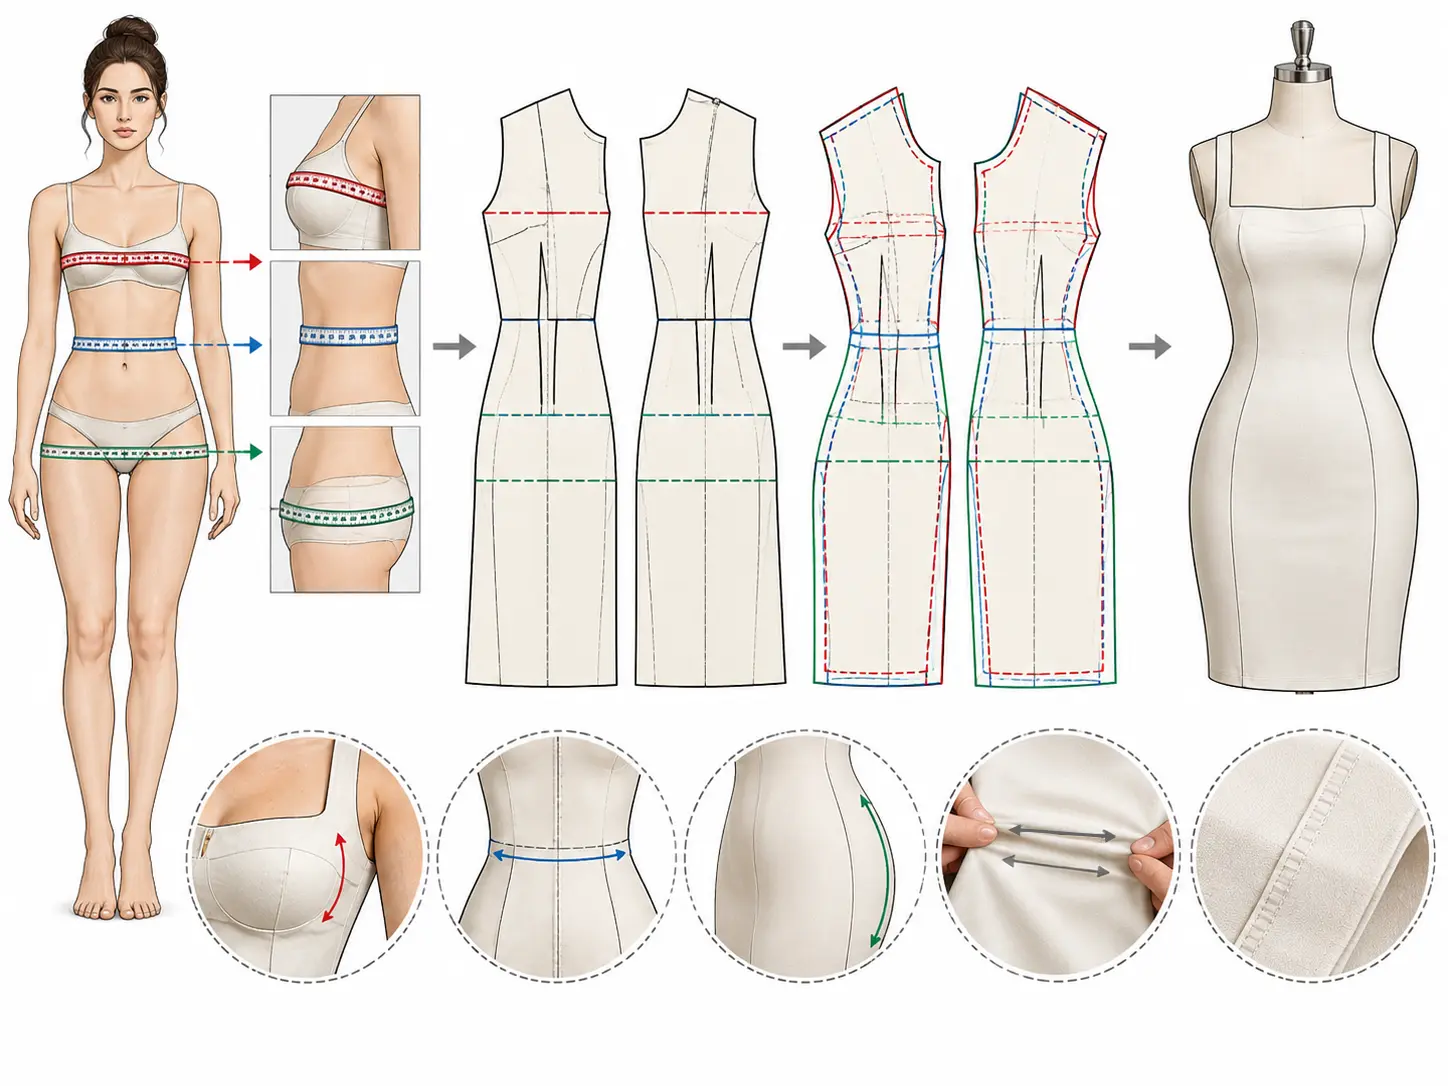
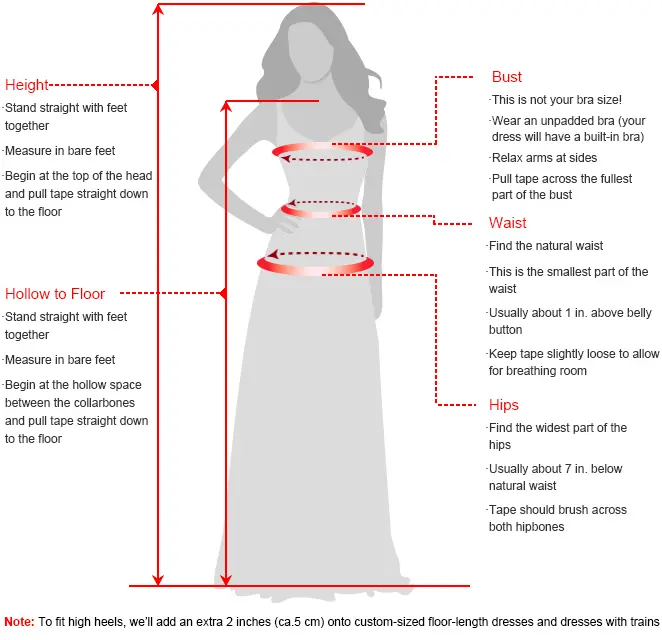
Measure the full bust around its fullest circumference, the waist at the natural waistline, and the hips around the fullest combined hip and seat area. Keep the tape level and comfortably close without compressing the body. Consistent underwear, natural posture and repeatable measuring conditions are essential because even a small measurement error can lead to unnecessary pattern changes later.
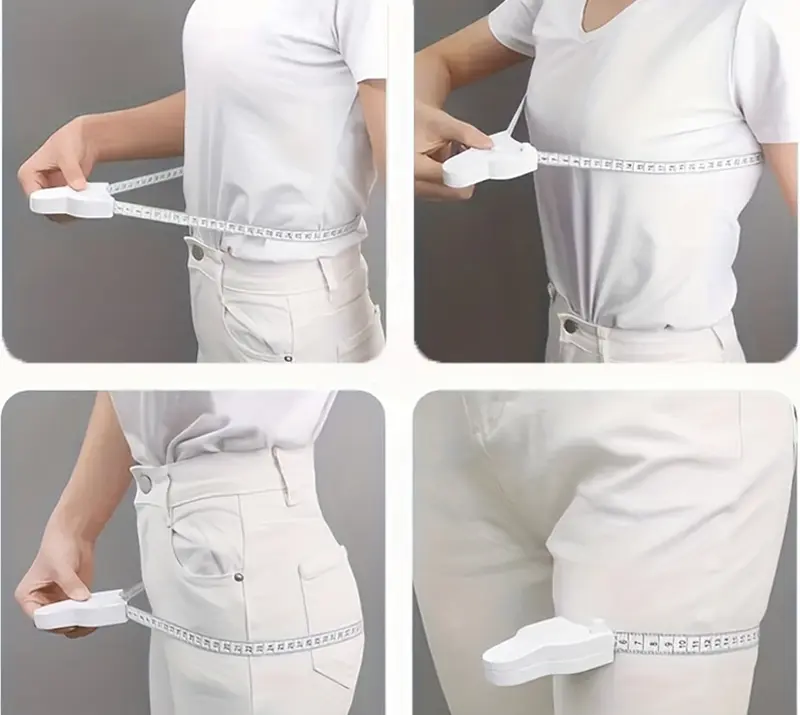
Measuring the Bust
The full bust measurement should pass around the fullest part of the bust while remaining level across the back. The wearer should stand naturally with normal breathing and relaxed shoulders. Pulling the tape tightly enough to compress soft tissue can underestimate the required circumference, while allowing the tape to hang loosely can add unnecessary room that later appears as gaping or excess fabric.
For basic sizing, a full bust measurement may be sufficient, but fitted or structured dresses often benefit from additional information. High bust measurement helps distinguish upper-frame size from bust projection. Bust-point spacing shows where the main volume is positioned horizontally, while shoulder-to-bust-point length indicates where cups, darts or princess-seam shaping should reach vertically. These measurements become especially useful in corset, bustier and closely fitted bodices.
Two women can both have a 96 cm full bust and still require noticeably different patterns. One may have a wider upper frame and moderate bust projection, while the other may have a smaller upper frame with greater projection concentrated toward the front. Increasing the entire bodice to accommodate the second body can enlarge the shoulder, neckline and armhole without placing enough shape where the bust actually projects.
Accurate fitting therefore looks beyond circumference whenever the garment construction demands it. A full bust measurement tells the pattern maker how much total space is needed around the torso. Supporting measurements help determine how that space should be divided and where it should appear. This distinction becomes more important as the dress becomes more fitted, more structured or less forgiving.
Finding the Waist and Hip
The natural waist is generally around the torso’s natural indentation or the point where the body creases when bending gently to one side. It should not automatically be taken from the waistband of trousers or skirts because fashion garments can sit well above or below the anatomical waist. A narrow elastic temporarily tied around the waist can be useful during a detailed fitting because it creates a consistent reference level for several vertical measurements.
The full hip should be measured around the widest combined circumference of the hips and seat, with the tape kept horizontal. Measuring only around the visible side-hip bones can underestimate the true circumference when the fullest area is created by seat projection. This is one reason a dress can feel tight at the back even when a quick front-view assessment suggests that the hip measurement should be sufficient.
Waist-to-hip depth deserves almost as much attention as hip circumference in fitted dresses. One wearer may reach maximum hip circumference 18 cm below the waist while another reaches it at 22 cm. If the pattern places its widest hip point several centimeters above the body’s actual fullest area, adding more overall width may not solve the problem. The extra fabric needs to arrive at the correct level.
For detailed work, high hip can also be useful because it describes the transition between waist and full hip. A wearer with a relatively flat upper hip and strong seat projection needs different shaping from someone whose hip volume begins immediately below the waist. Those differences affect side seams, back darts and panel curves, even when the final full-hip circumference is the same.
Keep Measuring Conditions Consistent
A measurement is only as useful as the conditions under which it was taken. A different bra can change bust height, projection and sometimes total circumference. Shapewear can alter waist and hip measurements. Thick clothing adds volume under the tape, while measuring directly over very compressive garments may reduce the dimensions that the final dress must actually accommodate.
Posture can introduce similar inconsistency. A wearer who deliberately lifts the chest and pulls the shoulders backward during measurement may have a different front and back balance when standing normally in a fitting. For most fashion garments, measurements should be taken in a relaxed, natural stance that can be reproduced later.
Tape tension deserves equal attention. Recording a measurement to the nearest millimeter gives an impression of precision, but that precision has little value if the tape is tilted or pressed into soft tissue. A consistently taken measurement within a few millimeters is more useful than an apparently exact number collected under changing conditions.
Commercial product development benefits from documenting the measuring basis, especially when several sample rounds are expected. The fit model, underwear condition, waist reference and any important body landmarks can be recorded alongside the numbers. If a later fitting appears 1.5 cm different at the waist, the team can determine whether the pattern changed, the garment stretched, or the measurement procedure itself changed. That prevents a pattern from being corrected to compensate for measurement noise.
Which Measurement Should You Use When Sizes Do Not Match?
When bust, waist and hip measurements fall into different sizes, do not automatically choose one size for the entire dress. Select the most suitable base size for the garment’s structural area, check the finished garment measurements, and then blend or adjust the remaining zones. The best choice depends on construction, ease, fabric behavior and where additional or reduced volume is actually needed.
Choosing the Starting Size
There is no universal rule stating that bust, waist or hip must always determine the complete dress size. A fitted bodice depends strongly on the upper torso and bust framework, while a skirt is governed more by waist and hip relationships. A dress combines both systems, which is why different parts of the same pattern may reasonably follow different size lines.
Suppose the bust corresponds closely to one size while the hips fall two sizes larger. If the shoulders, upper chest and neckline already match the smaller size, moving the whole dress up two sizes can destroy areas that were already correct. It is often more logical to preserve the upper-body framework and increase the pattern gradually as it approaches the waist and hip.
Finished garment measurements should always be checked before making the change. A pattern may already contain enough waist or hip ease to accommodate a measurement that appears to fall into the next size on the body chart. Changing the pattern based on body measurements alone can unintentionally add more room than the design requires.
The starting size is therefore only the first decision in a longer process. After choosing it, the pattern maker needs to calculate the available ease, identify which body zones fall outside the intended range, and determine whether the correction should be made through size blending, side seams, darts, princess seams, localized bust adjustment or another method.
The Largest Size Is Not Always Safer
Choosing the largest of the three measurements for the entire garment feels safe because it reduces the chance of tightness, but in fitted clothing it frequently creates a different group of problems. If the hip requires a larger size than the bust, sizing up the complete dress may also increase shoulder width, neckline circumference, armhole depth, upper-chest width and bust-dart placement.
The result can be a garment that fits the hips but looks loose through the top. The wearer may compensate by shortening straps, pulling the dress downward or accepting a gaping neckline, but those changes do not address the original pattern imbalance. They simply move the problem to another location.
A more reliable principle is to solve local problems locally. If the hip needs additional circumference while the waist fits correctly, introduce more room around the hip rather than carrying it upward through the entire pattern. If the bust needs more projection but the shoulders fit, provide additional front bust volume instead of enlarging the complete upper body.
This approach also protects the original design. A narrow neckline, close armhole or sculpted waist can lose its intended character when the entire garment is increased to solve one isolated measurement issue. Good pattern adjustment aims to give the body enough room without changing areas that already work.
Blending Between Sizes
Blending between sizes is useful when different body areas correspond to different size lines and the transition can be achieved through a smooth change in pattern width. The line should move gradually rather than jumping abruptly from one size to another, because sharp changes can create corners, distorted seam shapes or an obviously uneven silhouette.
For example, a dress may remain close to Size 8 through the upper bodice, approach Size 10 around the waist and reach Size 12 by the full hip. The new side seam should form a continuous, natural curve passing through those target zones. After the line is redrawn, adjoining pattern pieces must still be checked to ensure seam lengths, notches, waistlines and hems remain compatible.
Blending primarily changes width progression, so it cannot solve every fitting problem. A fuller bust, prominent seat, rounded abdomen, sway back or significant asymmetry may require a dedicated pattern alteration. Adding width equally at the side seam may produce the correct total circumference while putting that circumference in the wrong place.
This distinction matters in professional fit work. Size blending answers the question, “How should the pattern become wider or narrower between body levels?” Targeted alterations answer a different question: “Where does the wearer need additional three-dimensional volume?” The most successful fitted dresses often use both approaches rather than relying on either one alone.
How Do You Balance Bust, Waist and Hip Measurements in a Dress Pattern?
A balanced dress pattern places the required circumference where the body needs it while keeping seams, darts, waistlines and other landmarks in their intended positions. The transition from bust to waist to hip should remain smooth, and the pattern must account for front-to-back volume as well as total circumference. Successful balance is therefore about distribution, not simply matching three numerical measurements.
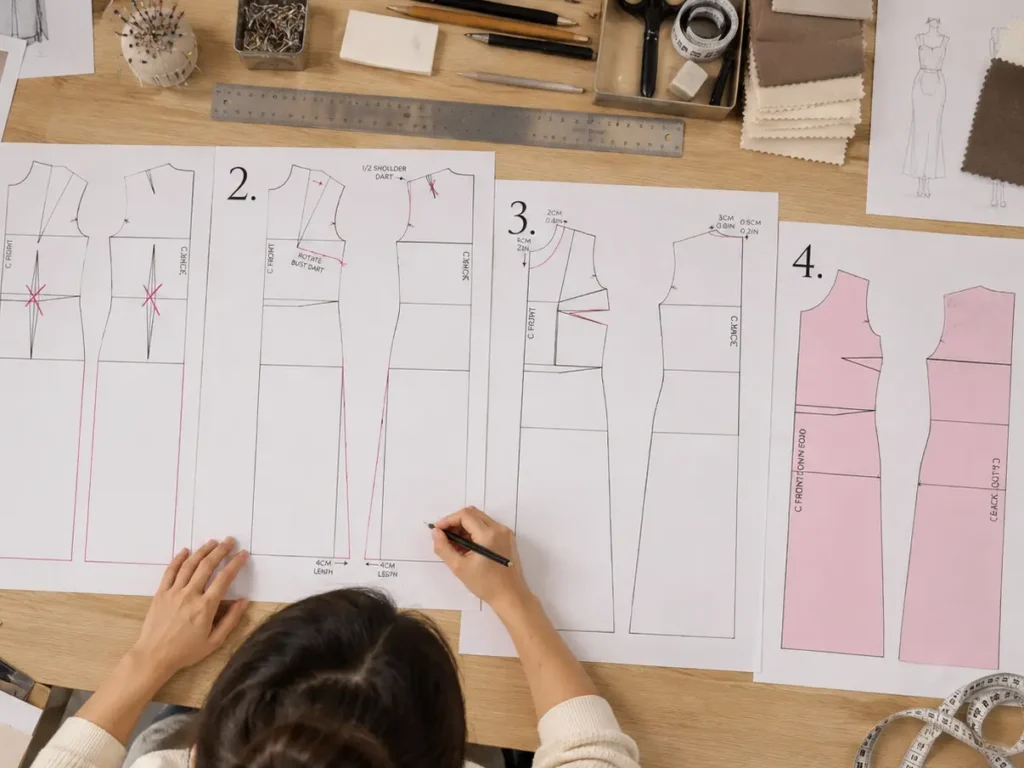
Distributing Pattern Width
The first step is to identify bust, waist, high-hip and full-hip levels on the body and pattern. Measurements should always be compared at corresponding levels. Comparing a full-hip body measurement taken 21 cm below the waist with pattern width measured 18 cm below the waist can create the appearance of a width shortage when the real problem is vertical placement.
When additional circumference is required, the pattern maker also needs to calculate how many pattern edges contribute to the finished garment. In a simple dress with a front and back cut on the fold, four side-seam edges contribute to the total circumference. If the finished garment requires 4 cm of additional hip circumference and the change is divided equally, each of those four edges receives 1 cm.
This arithmetic sounds simple, yet it is an easy place to make a costly mistake. Adding 2 cm to every visible side seam edge could produce 8 cm of additional finished circumference rather than the intended 4 cm. Once the incorrect change is graded into several sizes, the error becomes more difficult to isolate.
Equal distribution is not always ideal either. A wearer with greater seat projection may need more of the additional circumference in the back pattern. A fuller bust may need width and length concentrated at the front. The total measurement can be mathematically correct while the garment still pulls or twists because the available volume has been divided in the wrong places.
Side Seams and Shaping Seams
The side seam is one of the most useful visual lines during a fitting. In a balanced dress, it generally remains near its intended vertical position rather than sweeping strongly toward the front or back. When the seam moves, it often indicates that one side of the garment is trying to borrow volume from another.
If a side seam pulls forward across the bust, the front may need more width or length. If the lower side seam moves backward over the seat, the back hip may require additional room. Increasing total circumference without correcting that front-to-back relationship can leave the garment technically larger but visually just as unbalanced.
Darts and princess seams give the pattern maker more control because shaping can be distributed through several locations. A bust dart creates three-dimensional space around the bust while removing excess fabric toward the waist or side. Princess seams can distribute shaping gradually along the torso, which is particularly useful when a strong difference exists between bust, waist and hip measurements.
A dress with a 96 cm bust, 72 cm waist and 104 cm hip needs to manage 24 cm of reduction from bust to waist and then 32 cm of expansion from waist to hip. Trying to manage all that change through the side seams alone can create an aggressive curve. Sharing the shaping through darts, panel seams or princess seams usually creates a smoother silhouette and a pattern that is easier to sew consistently.
Fitted and Structured Dresses
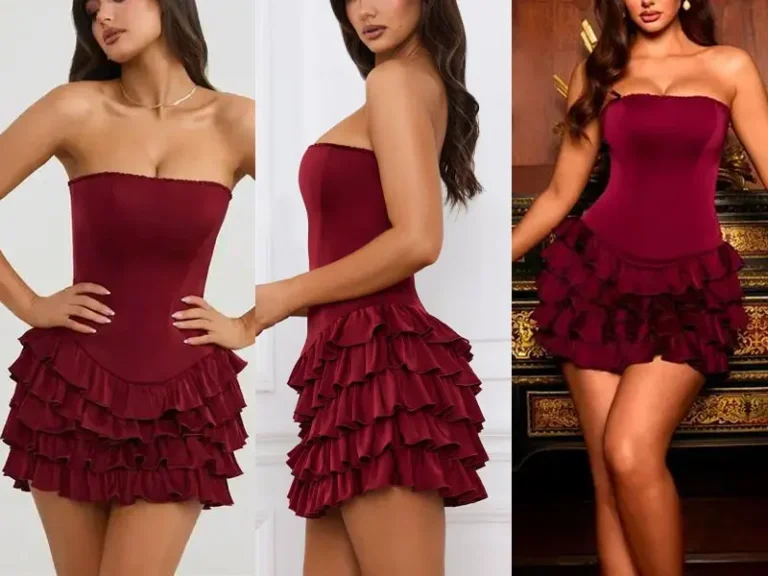
Bodycon, corset, bustier, halter and backless dresses require closer control because small fitting errors become visible quickly. In a relaxed dress, an extra centimeter around the waist may disappear into the silhouette. In a structured corset bodice, the same centimeter can affect neckline contact, cup placement, waist pressure and the way the garment stays on the body.
Corset and bustier styles also introduce internal components such as cups, boning, interfacing and lining. A bodice can contain enough total bust circumference and still fit poorly if the cup apex sits too high, the underbust is positioned incorrectly or the front body length is too short. Adding more width does not solve a problem caused by misplaced volume.
Halter and backless dresses remove some of the conventional support provided by shoulders and upper-back coverage. Strap length, neckline tension, back opening shape and bust support become more interconnected. A change at one point can influence several others, which is why these styles often need more careful fit testing than a straightforward day dress.
In commercial dress development, treating fit, fabric and internal structure as one system usually produces more stable results than adjusting measurements in isolation. Duolan’s documented development approach follows this principle by emphasizing fit adjustment, silhouette balance, support logic, contour control and grading consistency in fit-sensitive dress categories.
How Do Fabric Stretch and Ease Change Measurement Balance?
Fabric stretch and ease determine how body measurements become finished garment dimensions. Stable woven fabrics depend heavily on pattern shaping and positive movement room, while stretch fabrics can use material extension to accommodate the body. Stretch percentage alone is not enough, however. Recovery, weight, stretch direction, lining and internal support determine whether the fit remains comfortable and stable after repeated wear.
Positive and Negative Ease
Positive ease means a finished garment is larger than the corresponding body measurement. Negative ease means it is smaller and relies on fabric extension to fit around the wearer. Zero ease means the body and garment measurements are approximately equal at that point, although construction and fabric behavior can still make the actual fit feel different.
A woven fitted dress generally needs some positive room because the material cannot stretch significantly when the wearer breathes, sits or walks. A bodycon dress made from a suitable stretch fabric may use zero or negative ease so that the garment stays close to the body rather than hanging loosely.
Ease should be evaluated separately at bust, waist and hip rather than applied as one universal number. The bust must allow breathing and accommodate projection. The waist may be intentionally more controlled to maintain contour. The hip must provide enough functional movement for walking and sitting, even if the visual intention is very fitted.
If a wearer has a 100 cm hip and the finished stretch garment measures 96 cm at the same level, the garment contains 4 cm of negative ease, equivalent to 4% of the body measurement. That number alone does not tell us whether the dress will be comfortable. A fabric with strong extension and recovery may handle it easily, while a firm knit with limited stretch could feel restrictive.
Stretch and Recovery
Stretch describes how far a material can extend; recovery describes how effectively it returns toward its original dimensions afterward. Both characteristics influence fit, but recovery is often the more revealing property when evaluating fitted garments intended for repeated wear.
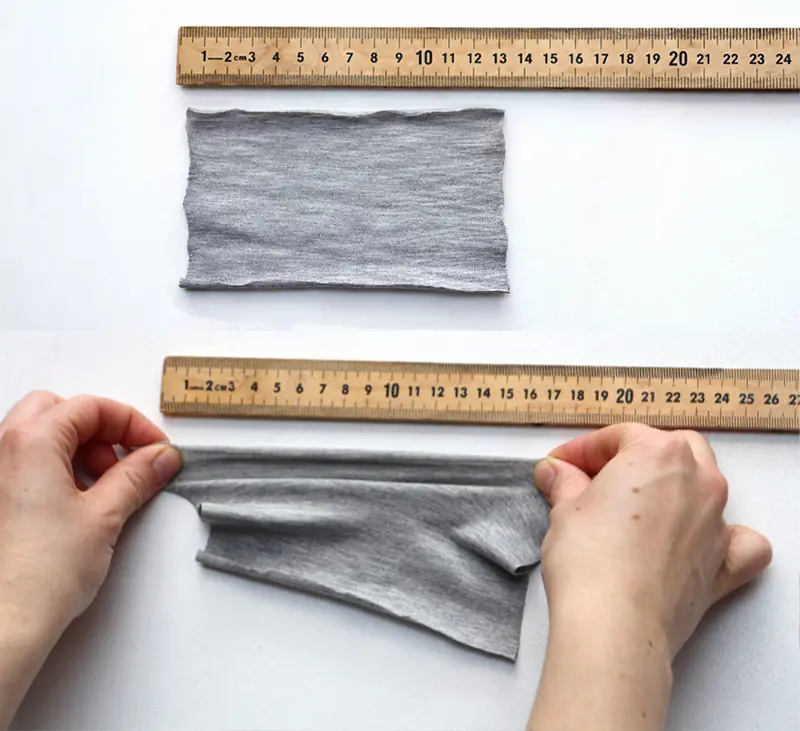
A simple development test can illustrate extension. If a controlled 10 cm fabric section stretches comfortably to 12 cm, the extension is 20%. A second fabric may also reach 12 cm, yet the two materials can perform differently after being stretched several times. One may return almost fully to 10 cm, while another may relax to 10.7 cm and remain partially elongated.
That difference can change a garment noticeably. Weak recovery may cause the waist to lose definition, the seat to bag or a neckline to open after several hours. Fabric weight introduces another variable because gravity can lengthen a stretch dress vertically. A four-way stretch material may also behave differently from a fabric that extends mainly across the width.
| Fabric Behavior | Typical Fit Effect | Practical Development Check |
| Low-stretch woven | Pattern supplies nearly all shaping and movement room | Confirm positive ease and mobility |
| Moderate crosswise stretch | Some circumference ease can be reduced | Check recovery after repeated extension |
| High-stretch knit | Can support closer or negative ease | Review compression, comfort and opacity |
| Four-way stretch | Accommodates width and length more easily | Check vertical growth and dress length |
| Stretch shell with rigid lining | Lining limits usable extension | Test the completed fabric package |
| Weak recovery | Fit may loosen during wear | Repeat stretch and recovery checks |
Fiber composition alone cannot predict these results. Two fabrics labeled 95% polyester and 5% elastane may have very different constructions, weights and recoveries. The exact production material needs to be assessed because changing from one seemingly similar stretch fabric to another can alter how the dress fits at bust, waist and hip.
Linings and Internal Components
The face fabric is only part of the fit system. Lining, cups, boning, elastic, interfacing and stabilizing tapes can all change how much the finished garment stretches and where it applies pressure. A highly elastic shell backed with a stable woven lining will no longer behave like an unrestricted stretch fabric because the lining becomes the limiting layer.
Corset-style dresses make this relationship especially clear. Boning controls collapse through the torso and directs pressure vertically. Cups define the location and shape of the bust. Interfacing adds stiffness. Changing any of those components can alter how the garment feels even if the measured bust and waist circumference remain identical.
The same principle appears in less structured garments. Stay tape can prevent a neckline from stretching. Clear elastic can stabilize a shoulder or waist seam. A concealed zipper introduces a relatively stable vertical area into fabric that may otherwise stretch considerably. These details influence the effective ease available to the wearer.
A fabric or trim substitution should therefore be evaluated for more than color and appearance. If the replacement material has different stretch, recovery, weight or stiffness, the approved pattern may need another fit check. This becomes especially important between sample and bulk production, where a seemingly minor material change can turn an approved fit into a noticeably tighter, looser or less stable garment.
How Do You Check Bust, Waist and Hip Balance Before Production?
Before production, confirm bust, waist and hip balance on an approved fit sample rather than relying only on a size chart or specification. Review finished measurements, seam position, waist level, bust placement, hip movement and the overall silhouette together. Once approved, lock the pattern, material, construction method and measurement tolerances so the same fit logic can be reproduced consistently in later sizes and production.
Reading Fit Symptoms
A fit sample reveals information that a measurement sheet cannot. The dress should be reviewed from the front, side and back while the wearer stands naturally. Movement is equally important. Sitting, walking, turning and raising the arms where appropriate can expose restriction, instability or riding that remains invisible in a static front-view photograph.
Horizontal drag lines often indicate that a body area requires more width, more length or a different distribution of volume. Vertical folds may indicate excess circumference. A side seam that shifts forward or backward can reveal imbalance between the front and back pattern pieces. A waistline that climbs may indicate restriction lower down rather than a problem at the waist itself.
The visible symptom does not always identify the cause immediately. Pulling across the hip can result from insufficient circumference, but it can also occur because the pattern’s full-hip level sits too high. Waist gaping can come from excess width, insufficient dart shaping, back-body curvature or an incorrect transition between bust and waist.
For that reason, a reliable fitting sequence begins by confirming the wearer’s measurement, checking the actual finished garment measurement, locating the relevant pattern landmark and observing seam direction. Only after those checks should the pattern be altered. This method turns vague comments such as “the hip feels wrong” into more useful actions such as lowering the hip shaping or adding controlled back-hip volume.
Correct the Area That Is Actually Wrong
Localized fitting problems usually respond best to localized corrections. If the bust is tight while the shoulders and neckline already fit, moving the whole upper body to a larger size can introduce unnecessary width elsewhere. A targeted bust adjustment may provide the required front volume while protecting the shoulder, armhole and neckline.
The same logic applies at the hip. If the waist fits correctly but the skirt pulls over the fullest hip, additional width should usually enter below or around the waist rather than continuing all the way through the bodice. If the hip circumference is technically sufficient but positioned too high, moving the shaping vertically may solve the issue more effectively than simply adding centimeters.
Every pattern revision should have a clear reason. Adding 0.5 cm at one seam, removing 1 cm at another and repeatedly fitting until the garment “looks better” may eventually produce an acceptable sample, but the resulting pattern often lacks a consistent logic. Problems can return during grading because nobody knows which change actually solved the original issue.
A controlled correction improves both the current sample and the pattern information that follows it into later sizes. That is especially important for commercial development, where a fit decision needs to be repeatable rather than dependent on one technician remembering what was changed during an earlier fitting.
Grading and Production Control
After the base size is approved, the next challenge is maintaining the intended fit across the complete size range. Grading does not simply enlarge every circumference by the same percentage. Bust point, waist position, armhole shape, strap length, hip depth and overall dress length may all change according to the brand’s established grade rules.
A mathematically consistent grade can still alter the visual design. A neckline may become disproportionately wide, a dart may drift away from the bust point, or a hip curve may become too shallow in larger sizes. Fit-sensitive dresses therefore benefit from checking strategic sizes across the range rather than assuming every graded size will behave exactly like the approved base size.
Production introduces another layer of control because the pattern can be correct while sewing, pressing or material behavior changes the finished dimensions. Stretch seams can grow if fabric is fed unevenly. Bias-cut sections can lengthen during handling. Structured bodices can become tighter if interfacing or boning specifications change. Measurement control therefore needs to include the production process as well as the pattern itself.
| Control Point | What Should Be Locked | Main Fit Risk |
| Bust | Finished measurement, bust-point position and support structure | Gaping, compression or displaced bust volume |
| Waist | Circumference and vertical waist location | Riding, twisting or weak contour |
| Hip | Circumference and full-hip depth | Pulling and restricted movement |
| Side seam | Intended front-to-back position | Visible pattern imbalance |
| Fabric | Approved quality, stretch and recovery | Sample-to-bulk fit change |
| Lining and support | Approved components and construction | Effective ease changes |
| Measurement tolerance | Brand-approved limits | Gradual size drift in production |
| First piece | Comparison with approved sample and specification | Early detection before bulk volume |
The approved sample should become a controlled development reference rather than simply a garment hanging in the sample room. Pattern version, size specification, fabric, lining, internal support and workmanship details need to stay aligned. Duolan’s documented manufacturing process follows the same principle for fit- and structure-sensitive styles by using first-piece or pilot-stage verification before larger production runs where appropriate.
A fitted dress can remain within an individual bust, waist or hip tolerance and still lose the silhouette approved during development if those measurements no longer relate to one another in the same way. Strong fit control therefore protects relationships rather than isolated numbers. When the relationship between body measurement, pattern shape, fabric behavior and construction remains stable, the garment is far more likely to reproduce the intended fit across sizes and production quantities.
Balancing bust, waist and hip measurements is ultimately not about finding a perfect three-number formula. It is about understanding how the body changes between those levels and translating those changes into pattern shape, ease and construction. Accurate measurements create the starting point, but the best results come from placing the right amount of volume at the right location and allowing the material to behave in the way the design expects.
For an individual wearer, this approach produces a dress that feels more natural and stays in place during movement. For a fashion product team, it creates something equally important: a repeatable fit standard that can survive grading, material sourcing and production. If a fitted dress repeatedly shows bust gaping, waist migration, hip pulling or side-seam distortion, the answer is rarely another random centimeter added to the pattern. The more reliable approach is to identify which relationship has failed and correct that relationship before the problem travels into the next sample or production run.
Frequently Asked Questions
What Is the Ideal Bust, Waist and Hip Ratio for Clothing Fit?
There is no universal bust-waist-hip ratio that clothing must follow. A ratio can be useful for describing general body shape, but successful garment fitting depends on matching the actual wearer rather than forcing the body toward a predetermined proportion. Pattern makers focus on circumference, vertical placement, front-to-back volume, ease and silhouette. Two people with identical bust and hip measurements can require very different patterns when their waist measurements or body projections differ.
What Should I Do If My Bust, Waist and Hips Are Different Sizes?
It is normal for the three measurements to correspond to different size lines. Instead of selecting one size for the whole garment, start with the size that best fits the most structurally important part of the design, then blend or adjust the remaining areas. A dress may follow one size through the upper bodice, transition at the waist and reach another size at the hip. Finished garment measurements should be checked before any alteration is made.
Which Measurement Should I Use to Choose a Dress Size?
The most useful measurement depends on the dress construction. Bust and upper-body measurements are particularly important for fitted bodices, while hip measurement carries more weight in skirts and lower dress sections. A complete dress often needs both. If the measurements span several sizes, choosing only the largest one may create unnecessary looseness elsewhere. Compare the body chart with finished garment measurements and identify which part of the dress has the least room for adjustment.
How Do You Grade a Pattern Between Bust, Waist and Hip Sizes?
Mark the bust, waist and full-hip levels on the pattern and identify the required size at each level. Then draw a smooth transition between the relevant size lines rather than making abrupt jumps. Check the adjoining pattern pieces after blending so seam lengths and matching points remain correct. Size blending works well for gradual circumference differences, while prominent busts, seats or other localized body shapes may require additional targeted alterations.
How Much Ease Should a Fitted Dress Have?
There is no single ease amount that works for every fitted dress. A stable woven fabric usually needs some positive room for breathing and movement, while a suitable stretch bodycon fabric may use zero or negative ease. The correct amount depends on fabric stretch, recovery, construction, lining, internal support and intended compression. Ease should therefore be checked separately at bust, waist and hip and tested in the actual fabric rather than copied mechanically from another style.
Does Stretch Fabric Change Bust, Waist and Hip Measurements?
Stretch fabric does not change the wearer’s body measurements, but it changes how finished garment measurements can relate to them. A stretch dress may be made smaller than the corresponding body circumference because the material extends during wear. However, extension alone is not enough. Recovery determines whether the garment returns to shape afterward. A fabric that stretches easily but recovers poorly may become loose around the waist, seat or neckline after prolonged wear.
Where Exactly Should You Measure the Hips for a Dress?
Measure around the fullest combined circumference of the hips and seat while keeping the tape horizontal. The widest point is not always at the same distance below the waist for every person, so waist-to-full-hip depth is useful in fitted dress development. If the pattern’s widest hip shaping sits several centimeters above or below the wearer’s actual full hip, a dress can pull even when the stated hip circumference appears correct.