Skip to content


Ruching is often treated as a visual detail, but in product development it behaves more like a structural variable. The moment extra fabric is gathered into a shorter seam, the relationship between the paper pattern, cut panel, finished garment and on-body fit changes. A side seam that begins at 72 cm may finish at 48 cm; an outer jersey layer may contain much more width than the lining beneath it; an adjustable drawstring can make one dress legitimately measure several different lengths. Those differences are not necessarily defects. They become defects when the intended relationship is not defined, measured and reproduced consistently.
Ruching changes garment measurements by compressing a larger fabric area into a smaller finished space. It most often changes effective length, local width, circumference, seam balance and hem position. Accurate control requires separating pre-ruched dimensions from finished measurements, defining the garment’s measurement state, and managing gather ratio, fabric stretch and recovery, lining behavior, grading, elastic or drawstring tension, and production distribution together.
That distinction matters because a ruched style can pass a simple measurement chart and still look wrong. Two dresses may share the same side-seam length but place their fullness in different areas, changing the apparent waist, hip and hem line. A sample may look balanced while the first production pieces begin to creep shorter after steaming because the fabric was stretched during sewing. The practical goal, then, is not to force ruching into the same rules used for a flat basic garment. It is to build a measurement system that describes both the numbers and the visual result well enough for a pattern maker, sample room, sewing line and QC team to reproduce the same garment.
What Measurements Does Ruching Change?
Ruching primarily changes measurements that run in the same direction as the gathering, but its effects can spread into neighboring areas. Vertical ruching commonly changes side-seam or body length, while horizontal gathering can change local width or circumference. It can also affect hem level, waist placement and visual balance, especially when a ruched shell sits over a separate lining or fitted foundation.
Length and Seam Measurements
The first measurements to watch are the ones that travel through the ruched zone. If a dress is gathered vertically along the side seam, the cut edge may be much longer than the finished seam because a portion of that length is converted into folds. A 72 cm edge gathered to 48 cm has 24 cm of material absorbed into the ruched effect. That does not mean the fabric disappeared; it means the visible vertical distance changed while the material remained in the garment. On a fitted mini or midi dress, that local shortening can also change the apparent hip level, the angle of the hem and the distance from waist to hem. When only one side is ruched, the result may be intentionally asymmetric. When both sides are meant to match, even distribution becomes critical because two seams can share the same finished length while one side still hangs higher if the fullness is positioned differently.
Width and Circumference
Ruching does not automatically make the whole garment narrower. The result depends on the direction of gathering and on which layer actually controls fit. Horizontal gathering across a waist panel can reduce the effective width of that visible panel, while vertical side ruching may shorten the garment without materially changing bust or hip circumference. Layered dresses make the distinction especially important. A ruched outer shell might contain 108 cm of fabric around the hip while the lining beneath it finishes at 92 cm. The extra 16 cm is there to create texture, not to provide 16 cm of extra wearable room. If a technician reduces the shell simply because the flat measurement looks too large, the dress can lose its intended fold density without becoming more comfortable. The useful question is therefore not only what the outer layer measures, but which component – shell, lining, elastic, inner bodice or seam – controls the final circumference on the body.
| Construction Example | Pre-Ruched Dimension | Finished Controlled Dimension | Main Measurement Effect |
| Vertical side ruching | 72 cm | 48 cm | Shorter side length; hem balance becomes sensitive |
| Horizontal waist gathering | 96 cm | 72 cm | Visible width is compressed across the waist |
| Ruched shell over lining | 108 cm | 92 cm lining | Extra shell fullness does not equal extra wearable circumference |
| Elasticated ruched section | 58 cm fabric | 42 cm relaxed elastic | Relaxed and extended dimensions both matter |
| Adjustable drawstring side | 64 cm released | 38-52 cm adjusted | Finished garment length becomes variable by design |
The figures above are construction examples rather than universal ratios or tolerances. Their purpose is to show how different components can control the final measurement. A real specification should be based on the approved fabric, intended fit, tested sample and the brand’s own product standards, because a lightweight mesh, a stretch jersey and a structured satin will not respond to the same amount of gathering in the same way.
Pattern Size Versus Finished Size
The pattern dimension and the finished garment measurement answer different questions. Pattern dimensions explain how much material must be cut and where fullness is being introduced; finished measurements explain what the assembled garment should measure under a defined condition. If a 75 cm edge is gathered to a 50 cm finished seam, the gathering ratio is 75 divided by 50, or 1.50:1. The finished distance is 25 cm shorter, which represents 33.3% compression relative to the original edge. That figure is not a recommended ratio; it simply demonstrates why the sample room and QC team may legitimately work with different numbers. Problems arise when only the 50 cm result survives into production documentation. A later repeat order could still hit 50 cm while using less or more shell fabric, changing the visual density of the ruching. Retaining both the pre-ruched and finished dimensions gives the production team a far stronger reference.
Visual Balance
Some of the most important effects of ruching cannot be captured by a tape measure alone. Two garments can share the same side-seam length, waist width and total length while looking noticeably different because the fullness is distributed differently. One piece may carry most of the folds between waist and high hip, while another pushes them toward the hem. Both can technically pass the measurement chart, yet they will create different proportions on the body. This is particularly noticeable in bodycon, party and occasion dresses, where a small shift in fold concentration can change the apparent waistline, hip shape or leg length. For this reason, a practical specification needs more than numeric POMs. Approved samples, marked ruching zones, reference photographs and clear distribution notes can protect the visual intent that ordinary measurements do not describe, especially when several operators or production lines are involved.
How Does Ruching Change Length and Circumference?
Ruching changes length and circumference through controlled compression and redistribution of fabric. Vertical gathering primarily reduces effective length, while horizontal gathering can reduce width or circumference. The final result also depends on fabric stretch, recovery, lining dimensions and the element that carries tension. A visible shell may contain substantial extra fabric while the inner layer still determines the actual fit.
Gathering Ratio
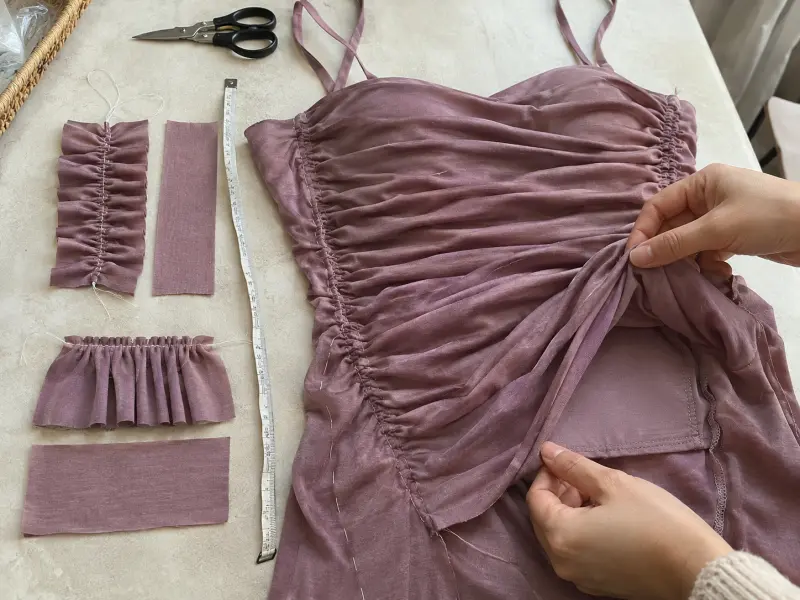
The gathering ratio is one of the clearest ways to describe how much fabric is being condensed into a finished distance. The basic relationship is pre-ruched length divided by finished ruched length. If an 84 cm panel edge is gathered to 56 cm, the ratio is 1.50:1. If 60 cm is gathered to 50 cm, the ratio is 1.20:1. These numbers are useful because they preserve the construction relationship, but the visual result cannot be predicted from the ratio alone. A fine stretch mesh may accept a dense ratio and still form soft, close folds, while a thick double-knit at the same ratio can become bulky and distort the silhouette. Satin may develop attractive folds with moderate fullness but show puckering if too much fabric is forced into a short seam. A practical development decision therefore combines the ratio with fabric weight, thickness, stretch direction, recovery, drape and seam construction rather than treating the ratio as a styling formula.
Stretch and Recovery
Stretch tells you how far a fabric can extend, while recovery tells you how closely it returns to its original dimension after being stretched. Ruching makes that distinction important because the fabric is handled repeatedly during cutting, gathering, sewing, fitting, pressing and wear. A simple development check illustrates the issue: mark a 10 cm section, extend it to 12 cm, allow it to recover, and observe whether it returns to 10 cm or settles longer. If it stabilizes at 10.3 cm, it retains 0.3 cm of extension, equal to 3% of the original reference length. That example is not a laboratory acceptance method, but it shows why two jerseys with similar advertised stretch can behave differently. Poor recovery can flatten folds, lengthen an elasticated panel or allow one side seam to relax more than the other. In fit-sensitive dresses, stretch and recovery should therefore be reviewed before final measurements are frozen, not treated as a separate fabric note.
Shell and Foundation Layers
Many ruched dresses are really two measurement systems assembled together. The outer layer provides texture and visual movement, while the lining or foundation controls opacity, stability and often the true body fit. If those layers are developed independently, the dress can measure correctly on paper but behave poorly when worn. A short lining may pull the shell upward and change the hem; an overly wide lining can collapse under dense ruching and create unwanted bulk; a low-stretch lining can restrict the wearer even when the outer mesh or jersey appears highly flexible. Suppose the shell can comfortably extend 25% across the hip but the lining can extend only 10%. The garment as a complete system will be limited by the less flexible layer. That is why material substitutions need more than a visual match. Stretch direction, recovery, friction between layers, shrinkage response and the way each layer carries tension all influence the final measurement and fit.
Finished Circumference
Finished circumference should always be interpreted according to the structure that controls the body. A horizontally ruched bodice may contain considerable extra shell fabric while being secured to a fitted inner bodice, so the shell circumference is not the same as the wearable circumference. If the ruched shell is the only body layer, however, its measurement may directly control fit. Elastic introduces a further distinction between relaxed and extended dimensions. A waist may measure 64 cm in a relaxed state and expand significantly in wear; recording only the relaxed value does not describe the garment’s functional range, while recording only the extended value says little about its natural appearance. For stretch or elasticated areas, many technical teams therefore define both states when they matter to fit. The important part is to specify how the extended condition is reached, because one inspector’s “gentle stretch” can be very different from another inspector’s maximum pull.
Which Ruching Methods Affect Measurements Most?
Elastic ruching, drawstring ruching and heavily compressed side-seam ruching usually create the greatest measurement variability because tension or adjustment becomes part of the finished dimension. Fixed stitched ruching is generally more stable. As adjustability and fabric elasticity increase, control points, measurement conditions and reference samples become more important, because the same pattern can produce different results if tension or fold distribution changes.

Fixed and Elastic Ruching
Fixed ruching is relatively straightforward to control because the gathers are secured to a predetermined finished distance. If 60 cm of fabric is permanently gathered to a 40 cm seam, the basic construction relationship should remain stable once the seam is sewn correctly. Elastic ruching adds more variables because the result depends on elastic cut length, elongation during sewing, recovery after sewing, overlap at the join, stitch construction and operator technique. If a fitted area is intended to finish at 40 cm relaxed but different pieces use 39 cm, 40 cm and 41 cm of elastic, a one-centimeter difference can be noticeable in a small bust, waist or side panel. The effect can become larger when operators apply uneven tension. One operator may stretch the elastic consistently; another may pull more strongly through the first half of the seam. The overall length can still appear acceptable while the folds are visibly denser in one area, which is why elastic application needs both numeric and visual control.
Drawstring Ruching
Drawstring ruching creates variable dimensions by design, so a single finished length may not fully describe the garment. A side-ruched mini dress might measure 62 cm when the drawstring is released, 50 cm at the approved presentation setting and 40 cm when heavily shortened. All three positions can be valid for the customer, but the production team still needs one defined state for inspection and presentation. If the tech pack says only “side length 50 cm,” it should also explain how the drawstring is positioned when that measurement is taken. A reference cord extension, internal mark, channel position or approved sample can make the setting repeatable. The same issue affects e-commerce consistency. When a sales sample is photographed with strong ruching but finished garments are packed with the drawstring mostly released, the product may appear longer and less fitted when opened. That difference may come from an undefined presentation state rather than from poor sewing.
Side-Seam Ruching
Side-seam ruching deserves special attention because a local change in seam length can alter the entire visual balance of the skirt or dress. Two side seams can both finish at 46 cm and still look different if the front and back panels do not share the fullness in the same way. The start and end positions of the ruching also matter. If an approved sample concentrates more fullness above the full hip, while production pieces push it downward, the waist can appear longer and the skirt shorter even though the total seam measurement is unchanged. Control notches are a practical way to reduce that variation. A long ruched seam can be divided into several zones so that each part of the shell is matched to a defined section of the finished seam. This gives operators physical reference points and reduces the temptation to gather an entire length “by eye,” which is one of the easiest ways for visual drift to enter bulk production.
Fabric Sensitivity
The same ruching method can behave very differently when the fabric changes. Stable woven fabrics usually hold their cut dimensions more predictably, but fluid or bias-sensitive wovens can still move substantially. Stretch jersey may lengthen while being sewn, fine mesh can distort under presser-foot pressure, and satin can show puckering or drag lines when gathering and thread tension are poorly balanced. Material evaluation should therefore go beyond fiber content. Weight, thickness, stretch in both directions, recovery, drape, surface friction and response to steam all influence measurement stability. A fabric that looks excellent in the first sample but relaxes visibly after pressing can create a production issue if the measurement chart was approved before that behavior was understood. The same logic applies to repeat orders. Two fabric lots can look nearly identical in color and handfeel while showing enough difference in recovery to alter fold density or finished length, so material continuity should be checked rather than assumed.
How Should Ruched Garments Be Measured?
Ruched garments should be measured in a defined, repeatable state rather than manipulated until they look flat. The specification should state whether the garment is relaxed, naturally arranged, extended or adjusted to a reference drawstring position. Critical points of measurement should also define the tape path, ruching start and end points, and whether elastic or folds may be stretched during inspection.

Measurement State
Measurement state should be agreed during sample approval, because the same ruched garment can legitimately produce several different readings depending on how it is handled. An elastic waist may measure 64 cm relaxed and considerably more when extended; a drawstring side seam may measure 60 cm released and 44 cm in the approved styled position; a mesh body panel may appear slightly shorter immediately after sewing and then relax after hanging or steaming. None of those observations is useful unless the measurement condition is defined. A relaxed measurement generally means the garment is laid flat without tension. A naturally arranged state allows the folds to sit as they do in the approved sample. An extended state should specify how far the section is stretched, while an adjustable state should define the drawstring or tie position. The purpose is not to make inspection complicated. It is to ensure that two people measuring the same garment under the same instruction can reasonably obtain the same result.
| Measurement State | Handling Method | Typical Use |
| Relaxed | Lay flat without stretching elastic or fabric | Elastic waist, ruched bust, stretch body panels |
| Naturally arranged | Align seams and distribute folds to approved reference | Fixed side ruching, gathered skirt sections |
| Reference-adjusted | Set drawstring or tie to a defined mark or extension | Adjustable side or center-front ruching |
| Extended | Stretch only to a specified functional condition | Elastic performance or fit-range checks |
| Post-finish | Measure after approved steaming/pressing and settling | Final production confirmation on sensitive fabrics |
The most useful state is the one that reflects how the measurement will actually be used. A relaxed measurement can control production consistency, while an extended measurement can describe functional fit. An adjustable presentation state can protect photography and packaging consistency. The important point is to avoid vague instructions such as “stretch slightly” or “arrange naturally” without a visual or physical reference, because those phrases leave too much room for individual interpretation.
Handling Before Measurement
Inspectors should avoid reshaping the garment differently every time they place it on a table. One common mistake is to smooth out the folds because a flat surface feels easier to measure; this can artificially lengthen a ruched seam. Another person may compress the folds toward one end and record a shorter result. A stronger instruction describes the handling sequence: lay the garment flat without tension, align shoulder and side seams, allow the fabric to settle, distribute gathers between approved control marks, do not extend elastic, and measure along the specified seam line. That wording removes several sources of variation before the tape is even used. For fabrics that are sensitive to steam or handling, it may also be useful to define when final measurement occurs in relation to pressing. The exact settling time should be based on development testing rather than copied as a universal rule, because some materials recover quickly while others continue to relax.
Critical POMs
The most useful points of measurement are the ones that explain how the ruching behaves, not simply the largest possible number of POMs. For a side-ruched dress, the critical set may include side-seam length, center-front length, center-back length, ruching start position, ruching end position, waist level and hem relationship. An adjustable drawstring style may also need released length, approved presentation length and drawstring extension. Elastic sections can require relaxed and extended measurements when functional range matters. Every critical POM should answer three questions: where the tape starts and stops, what condition the garment is in, and which construction component controls the dimension. “Side seam 48 cm” leaves room for interpretation; “underarm seam to finished hem along side seam, garment relaxed, gathers evenly distributed, elastic not extended” is much stronger. The extra wording is small compared with the time saved when sample, factory and inspection teams all use the same method.
Tolerance Logic
There is no responsible universal tolerance that fits every ruched garment. Tolerance should reflect the importance of the POM, the stability of the fabric, the construction method and the repeatability of the measurement itself. A fixed ruched side seam can often be measured more consistently than a softly adjustable drawstring section. A neckline position may be visually critical even if the allowable numerical movement is small, while a fully adjustable section may be better controlled by a range. Gather distribution may require an approved-sample comparison rather than a single numeric tolerance. Elastic performance can require both relaxed and extended checks. This is why technical teams often classify measurements by risk instead of applying one blanket allowance across the entire garment. The goal is to control the characteristics that genuinely influence fit, appearance and customer experience, while avoiding false precision on areas that are intentionally adjustable or naturally variable.
How Does Ruching Affect Grading and Fit?
Ruching complicates grading because size changes must preserve both body fit and visual fullness. Increasing bust, waist or hip measurements does not automatically preserve the same fold density. The grading plan should therefore consider gathering ratio, placement, body landmarks, negative ease and fabric behavior together, especially on fitted dresses where tension can open the folds differently across the size range.

Grading the Fullness
The extra fabric allocated to ruching should be graded deliberately rather than allowed to change accidentally as the body pattern grows. Consider a base-size panel with 72 cm of pre-ruched length gathered to 48 cm, giving a 1.50:1 ratio. If the next size finishes at 50 cm and the shell increases to 75 cm, the ratio remains 1.50:1 and the visual density is likely to stay broadly comparable when the same material is used. If the finished seam increases to 52 cm while the shell stays at 72 cm, the ratio falls to about 1.38:1, so the larger size will contain less fullness relative to its finished distance. That does not automatically make it wrong. A thicker fabric or a fuller body area may benefit from a controlled reduction in density. The point is that the change should be intentional and evaluated on the body, not be an unnoticed side effect of conventional grading rules.
Bust, Waist and Hip Balance
Ruching sits on a three-dimensional body, which means circumference changes affect how folds open, move and concentrate. A hip panel that appears densely gathered on a base size with noticeable negative ease can look flatter on a larger size if the same amount of fullness is stretched across a broader surface. Bust ruching is even more sensitive because the folds must move around projection rather than a flat plane. If bust circumference is graded but the ruching start point, underbust level or apex relationship remains unchanged, fullness can migrate upward or collapse into the wrong area. Waist placement matters for the same reason. A dress can meet its nominal waist width while making the waist look too low because the folds have drifted downward. For fitted styles, grading should therefore track body landmarks such as bust apex, underbust, natural waist, high hip and full hip alongside the circumference increases, so that the visual design remains anchored to the body.
Negative Ease and Stretch
Stretch dresses often use negative ease, meaning the garment measures smaller than the body and relies on fabric extension to create fit. Ruching changes how that negative ease appears. Two sizes can use the same fabric and a similar percentage of negative ease, yet the larger size may display lower fold density because more absolute extension occurs across the body. If the fabric also has weak recovery, the garment can look strongly ruched when first produced but become smoother after fitting or wear. That is why body measurement, finished garment measurement, stretch percentage, recovery and fold density should be evaluated as a connected system. It is rarely enough to describe a fabric as simply “stretchy.” The development team needs to know whether the fabric maintains the intended surface effect under the tension expected in wear, whether the lining allows the same movement, and whether the approved look remains consistent across the most commercially important sizes.
When Measurements Pass but Fit Fails
A ruched garment can pass every listed measurement and still look wrong because a conventional chart does not fully describe distribution, seam rotation, visual tension or drape. Two dresses may both measure 46 cm along the side seam, but one may distribute its folds evenly from waist to hem while the other packs most of the fullness into the upper 15 cm. Both pass the tape measure, yet the second can make the waist appear shorter and the hip heavier. The same issue appears with twisting: bust, waist and hip widths may all sit within tolerance while one side seam moves forward because the front and back panels are sharing fullness unevenly. Reliable fit review therefore combines numerical POM checks, visual comparison with the approved sample and on-body or mannequin evaluation. The stronger question is not simply whether the dress measures correctly, but whether it reproduces the approved silhouette while measuring correctly across the intended size range.
How Do You Control Ruching in Bulk Production?
Ruching stays consistent in bulk production when the factory controls the variables that create the final folds: fabric, pattern length, elastic or drawstring dimensions, start and end points, gathering distribution, measurement state and finishing. First-piece verification and early inline checks are more effective than relying only on final inspection, because most ruching problems begin during sewing or handling rather than at packing.
Production Standards
Before the production line starts, the approved garment should be translated into measurable construction instructions rather than left as a visual reference alone. The team should know the approved pattern version, pre-ruched panel dimension, finished ruched dimension, fabric direction, elastic specification, stitch method, control marks and measurement state. If those variables remain open, operators can reach the same finished seam length through different methods. A 48 cm side seam could theoretically be created from 68 cm, 72 cm or 76 cm of shell fabric, yet each version would have a different fold density. This is why retaining the pre-ruched construction measurement is valuable, particularly on repeat orders. Elastic styles also need standardized cut length and joining allowance, while drawstring designs benefit from defined cord length, channel length and reference presentation position. The approved sample remains important because some aspects of fold depth, direction and visual balance cannot be reduced to numbers alone.
Distribution Control
“Gather evenly” is not a strong production instruction because it asks every operator to make the same visual judgment without giving them physical reference points. A more reliable method divides the ruched section into controlled zones with notches, balance marks or other checkpoints. If a finished side seam is 48 cm, for example, it can be divided into four 12 cm zones, with corresponding marks on the shell showing how much extra material belongs between each pair of points. That reduces the chance that fullness drifts from the waist toward the hem or from the front panel toward the back. Elastic ruching needs similar discipline. Operators should apply the defined tension consistently and avoid stretching the garment fabric itself unless the method specifically requires it. Training should focus on the process that creates the approved result, not merely on the final seam measurement, because a garment can hit the number while still distributing its folds incorrectly.
First-Piece and Inline Checks
The most economical time to catch a ruching problem is before hundreds of pieces have been sewn. The first completed unit can reveal whether the gathering ratio, elastic tension, positioning, seam length and overall balance are correct. A practical first-piece review can compare cut-panel dimension, elastic cut length, ruching start and end points, finished seam length, fold distribution, left-right balance, hem level and measurement after the approved finishing process. If the first unit is wrong, the method can be corrected before production accelerates. Inline checks should then focus on the variables most likely to drift, such as elastic length, seam length, fullness concentration and front-back balance. On stretch-sensitive fabrics, it can be useful to compare the garment immediately after sewing, after pressing or steaming, and again at final inspection, because temporary extension during construction may not become obvious until the material has had time to recover.
| Control Stage | Main Check | Example Evidence | Typical Risk Caught Early |
| Cutting | Pre-ruched panel length and balance marks | Pattern and cut-panel check | Wrong fullness before sewing |
| First piece | Finished seam, start/end points, fold distribution | Approved sample comparison and POM check | Wrong ratio or placement |
| Inline sewing | Elastic length, tension and section balance | In-process measurement | Operator-to-operator variation |
| Finishing | Post-steam length and hem balance | Re-measurement after finishing | Relaxation or distortion |
| Final inspection | Critical POMs plus visual match | Measurement report and reference sample | Remaining consistency issues |
The table describes a control sequence rather than a universal inspection plan. The number of checks should be matched to the garment’s risk level, order size and the brand’s quality requirements. A simple fixed gather on a stable woven fabric may need fewer controls, while an asymmetric stretch-mesh dress with elastic ruching and a fitted lining deserves much closer first-piece and inline attention.
Repeat-Order Consistency
Repeat orders often reveal weaknesses that were hidden during the first production run because the pattern may be unchanged while the fabric lot, elastic supplier, sewing line or finishing conditions have changed. A repeat-order review should therefore compare current inputs with the previously approved baseline rather than assuming that the old pattern file is enough. Useful retained information includes pattern version, shell cut dimensions, finished measurements, elastic or drawstring specifications, approved images, distribution notes and any known problem points from the previous run. If the first production used a 74 cm shell length gathered to 49 cm and the new file shows 71 cm, that difference should be investigated before cutting. It may be an intentional correction, but it should not pass unnoticed. When production moves between lines or factories, the receiving team needs the complete process and visual reference, not just the garment outline, because repeatability comes from reproducing the approved method.
Ruching works because it creates controlled irregularity. The folds are meant to move, compress and create dimension, but the product still has to fit, grade and repeat with enough consistency to be commercially reliable. The strongest development process therefore treats the pre-ruched panel, finished POMs, fabric behavior, lining, elastic or drawstring, grading and visual fold distribution as parts of one system. When those relationships are defined during sampling and carried into first-piece and inline production control, the risk of a beautiful sample turning into inconsistent bulk is much lower. For brands developing fit-sensitive ruched dresses, reviewing the construction and measurement logic before specifications are frozen is usually more effective than trying to solve every variation through late-stage tolerance changes. For teams developing fit-sensitive ruched dresses, Duolan can support an early technical review of the pattern, fabric, fit and production logic, especially when the style combines stretch fabric, fitted foundations, asymmetric gathering or adjustable ruching.
Frequently Asked Questions
Does ruching make a dress smaller? Ruching can make a particular section shorter or narrower in its relaxed finished state, but it does not automatically make the whole dress smaller. Vertical ruching often reduces effective length, while horizontal gathering can reduce local width. In layered or elasticated garments, the lining, foundation or elastic may control the true wearable size even when the outer ruched shell contains significantly more fabric.
How do you calculate the gathering ratio for ruching? Divide the pre-ruched fabric length by the finished length after gathering. If an 84 cm edge is gathered to 56 cm, the ratio is 1.50:1. That ratio describes how much material is being condensed into the seam, but it is not a universal design target. Fabric thickness, drape, stretch, recovery and desired fold density determine whether the ratio produces the intended appearance.
Should a ruched dress be measured with the gathers stretched out? Usually no, unless the specification explicitly calls for an extended measurement. Most fixed ruching should be measured in a relaxed or approved naturally arranged state, with folds distributed according to the reference sample. Elasticated or adjustable sections may require both relaxed and extended values. The important point is that the measuring condition must be written clearly so inspectors do not stretch or compress the garment differently.
How does side ruching affect dress length? Side ruching shortens the effective side-seam distance by compressing extra fabric into folds. That local shortening can also change hem angle, hip position and front-to-back balance. Two garments can have the same finished side-seam measurement and still hang differently if the folds are concentrated in different areas, so side-seam length should be checked together with ruching start and end points and overall hem balance.
Does fabric stretch change ruched garment measurements? Yes. Stretch affects how far the garment extends in wear, while recovery affects whether it returns to the approved relaxed dimension afterward. A fabric that stretches easily but recovers poorly can gradually flatten ruching or lengthen a gathered section after sewing, fitting or steaming. That is why stretch direction and recovery should be evaluated alongside the gathering ratio, especially on jersey, mesh and other fitted dress fabrics.
How should ruching be graded across sizes? Grading should preserve both body fit and the intended visual fullness. Increasing bust, waist or hip measurements without reviewing the extra fabric allocated to ruching can make larger sizes look flatter or smaller sizes look overly dense. A constant gathering ratio can be a useful reference, but it is not always mandatory; the ratio, body landmarks, negative ease and fabric thickness should be reviewed together across the size range.
How can factories keep ruching consistent in bulk production? Consistency comes from controlling the inputs rather than judging the final folds by eye. The factory should lock the approved pattern, pre-ruched length, finished seam, elastic or drawstring specification, control marks, measurement state and visual reference. First-piece checks should confirm the method before volume production, while inline checks should monitor the variables most likely to drift, such as elastic tension, fold distribution, seam length and post-finishing relaxation.